crwdns2915892:0crwdne2915892:0
This guide will show you how to replace the trigger in a Dyson V11 Torque Drive vacuum cleaner. Since the trigger is made of plastic is it easily breakable. If the trigger on your Dyson V11 Torque Drive is broken then it will not start vacuuming. Even if the battery is fully charged, the Dyson V11 Torque Drive will not start vacuuming. Once you replace the trigger the Dyson V11 Torque Drive vacuum should be operational agin and it will start vacuuming.
Tools you will need to replace the trigger on the Dyson V11 Torque Drive vacuum are a Phillips #1 screw driver, Phillips #0 screw driver, and a spudger.
crwdns2942213:0crwdne2942213:0
-
-
Remove one Phillips #1 screw from the back of the handle
-
-
-
Remove the two Phillips #1 screws from the underside of the battery.
La tête de la vis est abîmée à force d’essayer de la retirer
Comment faire pour l’enlever ?
-
-
-
Pull down on the battery to slide it out of the handle.
when inserting new battery, don' push too hard you may damage the trigger plastic button
Traducción, gracias por el aporte Mario: al insertar una pila nueva, no presione demasiado fuerte, podría dañar el botón de plástico del gatillo
Carlos López (España - Spain) - crwdns2934203:0crwdne2934203:0
-
-
-
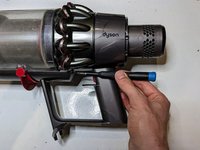
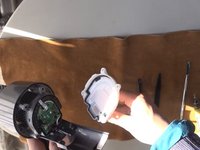
Twist the filter and then slide it off to remove it.
Buena tarde
Nesecito la carcasa de la aspiradora
Nesecito la carcasa de la aspiradora
-
-
-
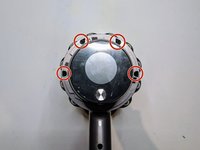
Remove the four screws beside the battery indicator with a Phillips #1 screwdriver.
YOU MUST REMOVE THE BATTERY FIRST!! It is not apparent in this guide, but I almost got electrocuted when I went to remove the power in step 6!
done the same once, but yeah always remove the power source before working on any appliance
Ray Bradshaw (Falconsirrus) - crwdns2934203:0crwdne2934203:0
These screws were very tough to unscrew. I worked on them one at a time in a vague star-like pattern (like when changing a tire you loosen or tighten but not one at a time all the way, and not adjacent ones).
-
-
-
Remove two screws next to the handle using a Phillips #1 screwdriver.
-
-
-
-
Separate the handle and the front end of the vacuum cleaner.
Be careful, there is a thin gasket/seal between the handle and the front end. If it comes off when you separate the handle, make sure that you don't loose it and can insert it the right way. It is not symmetric.
-
-
-
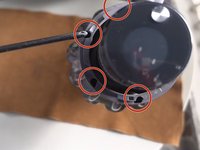
Remove two screws from the protective case covering the circuit board.
-
On some models these screws are Phillips #0, on others Torx #8.
These screws were Torx #7 instead on my Dyson V11
Same for me.
its a T8 on all of the Dysons V10 and V11 at this stage
Ray Bradshaw (Falconsirrus) - crwdns2934203:0crwdne2934203:0
Efectivamente son necesarios un destornillador T7 y un T8
-
-
-
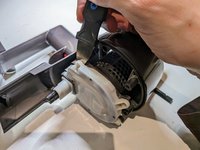
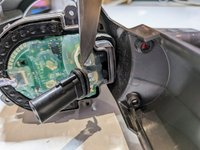
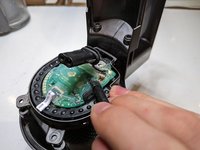
The circuit board casing is very stiff and can be difficult to remove. The key is to use a spudger to pry near the rectangular protrusions, as these cover the plastic clips.
-
It can also help to slide a jimmy under the casing where you just removed the screws from, and pry from there to loosen that side.
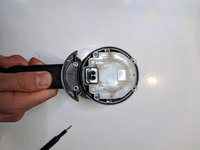
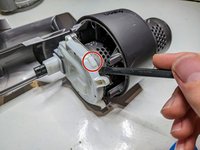
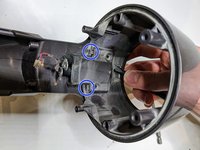
You need to pop the connector through the white cover to enable its removal.
unnecessary in my experience, just move out the way, unclip the tiny wire and remove the 2 power lines
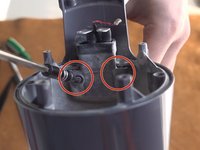
The cover is clipped behind the small protrusions at 11 and 1 o'clock. You can see the counter parts in the image on the vacuum's body. I believe it is safe to pry the white protective case off.
An important addition: behind the cover, right at the two „more solid parts“ at the white cover, it is needed to unclip one little notch at each side. This two notches holds the white cover tight. So don‘t just wigle back and forth with a screw driver, try to unclip these notches.
-
-
-
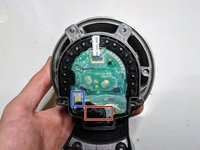
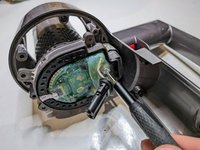
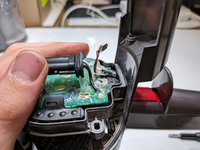
The circuit board may be covered with a great deal of translucent glue. We need to access three things under this covering: two power connections, and the switch cable.
-
Carefully scrape or cut the glue away from the screw heads and power cables.
-
In the same way, free the switch cable and its plug.
On mine Dyson saved me from the hassle to remove the glue… since there is none 😄
-
-
-
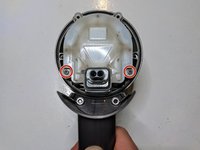
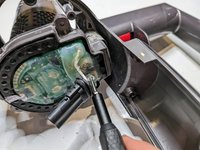
Remove the screws holding down the power cables.
These screws were Torx #7 instead on my Dyson V11 and bth need to be removed and the pins plied back.
There are two screws (torx) here connecting both terminals to the motherboard. Also the pins need to be bent back to slow them to pull through. There was also a black wire that had to be disconnected.
your spot on there. like most metals bending more than necessary will snap them so be careful.
-
-
-
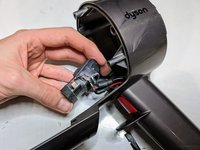
Gently disconnect the switch cable plug and lift the cable up from the circuit board so that it doesn't tangle with the black and white wires.
-
-
-
Rotate the ends of the power cables so that they fit through the slot in the lower circuit board casing more easily.
-
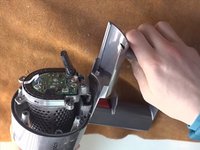
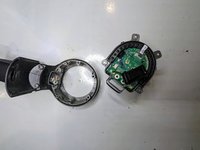
Remove the center part from the outer shell. Ideally, gently push the cables out through the slot, but this may be difficult — you may need to use some force to pull the center part away.
At the point where it is recommended to twist the terminals, it helped me to bend the terminals a bit (less than a 90° angle, more in a straight line).
Especially putting this part back together needs the terminals to be rotated to get them though. And one needs to be careful not to damage the thin wires from the trigger.
Watching a YouTube video helped me. The terminals have the screw holes in them, which helped when twisting them to fit them through the hole.
To reassemble, I tied a thin string to each terminal through the screw holes, to help wiggle and feed them through.
-
-
-
Remove the single screw inside the charging compartment with a Phillips #0 or Torx screwdriver, depending on the screw installed in your model.
This screw was Torx #7 instead on my Dyson V11
What if the housing on that screw is broken? Is it necessary for that screw to be in place?
No, the point of this screw is to fix the trigger assy inside the handle, technically when you refit the battery and screw in, it will all hold in place
My T8 wouldn’t fit here or I had trouble, but I had a thinner T7 and it worked if I angled it.
-
-
crwdns2935267:0crwdne2935267:0Tweezers$4.99
-
Remove two screws from the cable casing.
-
Pry the cable casing up to free the clips. You may need to push on the clips with a screwdriver or tweezers.
-
Slide the casing off the cables.
These screws were Torx #7 instead on my Dyson V11 and you need a very short screwdriver/ratchet or a flexible bit attachment.
T8 - i use a 100mm long shaft, it is at a bit of an angle but works fine
-
-
-
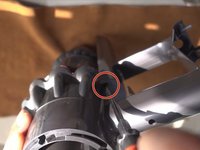
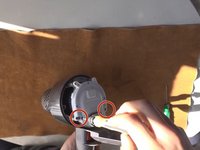
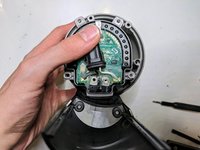
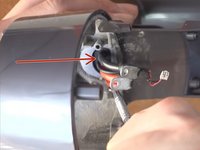
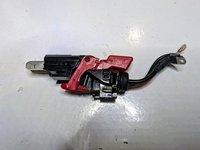
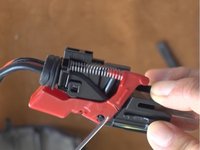
Use a spudger to push the part marked in the image to remove the trigger from the charging compartment.
pushing the trigger assy down tho the handle, well large screwdriver and small hammer works well, lol
Ray Bradshaw (Falconsirrus) - crwdns2934203:0crwdne2934203:0
Donde adquirir el gatillo.
Muchas gracias
Juan Pedro Molina de la Paz - crwdns2934203:0crwdne2934203:0
Amazon renforcé
Reaching up through the bottom with needle nose pliers and grabbing onto the plastic ridge below the main battery terminals and then pulling the assembly down through the handle is much easier
Its a rubber seal thats tight I pushed gently with angled needle pliers and it came out easily.
Two words of advice: The battery cables are more easily fiddled out and in if the angled connectors are carefully bent a bit straighter. They’ll bend back when screwed back on.
I was wondering why the new trigger didn’t get pushed out when reassembled. Thats totally normal, since the spring pulls it in. there is another springed trigger on the battery thats pushing it out once assembled 😄
Thanks Markus, indeed, the trigger spring looks like it doesn't do much on its own. I was worried that I was missing a part or a stronger spring. In fact, the trigger works with its own spring + the battery spring.
-


To reassemble your device, follow these instructions in reverse order.
To reassemble your device, follow these instructions in reverse order.
crwdns2935221:0crwdne2935221:0
crwdns2935229:038crwdne2935229:0

crwdns2915084:0crwdne2915084:0

York University, Team 1-29, O'Regan Winter 2022 crwdns2935289:0York University, Team 1-29, O'Regan Winter 2022crwdne2935289:0
YORK-O'REGAN-W22S1G29
crwdns2934841:01crwdne2934841:0
crwdns2935297:05crwdne2935297:0
crwdns2947412:021crwdne2947412:0
Some of the screws in this repair (step 8 and 9) require a T8 Torx bit instead of a Phillips. The Torx screwdriver should be at least 10 cm long and relatively thin to be able to fit into the base of the vacuum. The screwdriver I used from my iFixit essentials kit was too short and too wide to fit into the compartment. That should be added to the guide.
L'assemblage de cet appareil le rend assez compliqué à démonter... surtout la partie avec les câbles de puissance qui vont à la batterie.
Par expérience, en ce qui concerne la gâchette c'est faisable. La gâchette peut se trouver facilement sur internet, ça permet de réparer à pas cher et souvent certaines pièces génériques sont renforcées.
Also applicable to the v10. Some philips are T8 and as one comment already said, they need to be long and thin for some screws - but otherwise a good guide. Step 1 should be remove battery. My dust cover over the circuit board had little retaining clips which made it feel stuck. The small connector attaching the red/white wires lifts out vertically, with a little retaining clip. The final step, I needed a large screw driver to push the trigger part out. I couldn't get the leverage with the shorter spudger.
I chose to buy the full body and replace it after 6 years of use. I hadn't realized how the performance had degraded over time. My early release V11 animal with a screw on battery works better than new and now I have the upgraded display. I am going to deep clean the old body and replace the trigger as a backup but I didn't have a T8 long enough and skinny enough to remove all the screws.
Missing the punch line! This is a good review all until the last step, which is INCOMPLETE and incorrect. The switch assembly must be removed from the arm, and this is much easier to do with a pliers than by pushing on the top. Once the assembly is removed, you must be careful to note the orientation of the broken switch trigger, remove the old, and replace the new trigger, not forgetting to attach the spring.
I found this very helpful thank you, managed to fit a 3D printed replacement trigger which has a beefed up side to the section that breaks so hopefully will last forever now. Completed job cost $15NZD where as Dyson wanted to sell me a replacement motor body for $269NZD.
Muchas gracias por tu post , acabo de cambiar el gatillo a mi dyson v11 absolute , gracias ati
Just did it. Followed the instructions exactly. Excellent procedure, thanks! Saved me buying a new battery.
Gracias. Guia perfecta para reparar el gatillo sin ser tecnico
Gracias por este magnífico tutorial, excelente.
Sin él me habría sido imposible cambiar el gatillo roto.
Me parece increible que sea tan difícil cambiar un simple gatillo, está claro que lo que quieren los de Dyson es que acudamos al servicio técnico ante la más mínima averia.
Saludos,
Super Anleitung.....es hat absolut geklappt. Jetzt funktioniert der Staubsauger wieder. Das Auseinanderschrauben ist nicht einfach, da man nicht in jedem Baumarkt einen Torxbit 8 kaufen kann, bzw. einen entsprechend langen dünnen Torx 8. Und die ganze Arbeit nur wegen einem kaputten Drücker, der von Dyson eingebaut wurde. Das Teil ist einfach billig hergestellt....aber die Reparatur ist sehr aufwendig. Nochmals recht herzlichen Dank für diese wirklich tolle Reparaturanleitung !!!!!
Magnifico tutorial, técnico y bien estructurado, muy profesional, conciso, eficaz y muy útil.
Muchas gracias
Excellent guide. It was super helpful in getting my replacement done.
Does anyone know how this trigger actually works? I don't see any metal contacts that are being contacted.
Hallo, ich habe heute die Anleitung genutzt und ich muss sagen, dass diese die Beste war, welche ich die letzten Jahre angewendet habe. Leider steht Dyson da nicht ganz so gut im Rampenlicht. Versucht mal diesen Auslöser einzeln zu bestellen. Da müsst ihr nämlich ein komplettes Gehäuse kaufen und dies für etwas um 140 €. Dies kann ich wirklich nicht nachvollzeihen zumal der Auslöser bereits nach vier Jahren defekt war. Vielleicht kann mir an dieser Stelle jemand einen Tipp geben, wo man einen solchen Auslöser bekommt.
Besten Dank noch einmal!
Wenn es nur das rote Plastikteil ist, was gebrochen ist, dann kann man wenn man einen 3D Drucker hat (oder wen kennt) das Ersatzteil einfach neu drucken. Ansonsten AliExpress, eBay oder Amazon wenn man unbedingt den Ami unterstützen möchte.
Markus -
Muy ilustrado y detallado la publicación.
Juan Pedro Molina de la Paz - crwdns2934203:0crwdne2934203:0
j'ai suivi le processus decrit et c'est impeccable - il faut juste avoir un tournevis T08 bien solide pour devisser les cosses de puissances collées avec le mastic de protection répandu sur la carte electronique et assez long pour arriver à devisser la derniere vis en fond de poignée
Vous êtes pas sur Bruxelles par hasard ? ! :D
Anouchka -
I had to replace the trigger/battery housing because of how I held the Dyson when emptying it.
As I now know, I should have the trigger finger outside the trigger, extended, pointing downwards towards the canister. Instead, I would always bunch fingers together on the handle. Eventually the flimsy piece of plastic that is the trigger guard snapped, leaving a jagged edge; lesson learned.
This guide greatly helped disassembly and do the replacement.
There are 3D Print Models available on Makerworld.com and others e.g. https://www.thingiverse.com/search?q=V11...
If you have a 3D Printer there are plenty of improved models available on different sites. iFixit deleted my previous comment with a deep link 🫣