crwdns2915892:0crwdne2915892:0
If your Dyson motor is no longer functioning correctly, grab a pair of long tweezers and check out this guide to replace the main body,
crwdns2942213:0crwdne2942213:0
crwdns2936621:0crwdne2936621:0
-
-
Make sure your vacuum is unplugged.
-
-
-
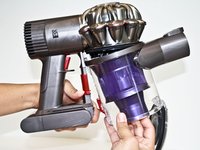
Locate the red lever parallel to the red trigger and on the side of the clear bin.
-
-
-
Push the red lever downward to open the clear bin. You may need to do this over a trash bin if there is debris in the clear bin.
-
-
-
-
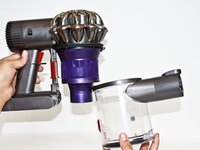
Push the red lever downward again while pulling the clear bin away from the main body of the Dyson vacuum.
-
-
-
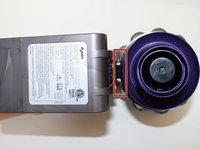
Flip the vacuum over so that the silver cyclone part of the vacuum is now at the base.
-
-
crwdns2935267:0crwdne2935267:0Tweezers$4.99
-
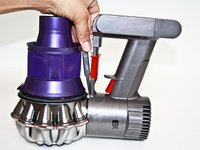
Locate the two visible white clips seen between the main body and the purple cyclone of the vacuum.
-
Use tweezers to pinch the two visible white clips together.
-
-
-
Tilt and pull the main body away from the purple cyclone of the vacuum.
-


To reassemble your device, follow these instructions in reverse order.
crwdns2935221:0crwdne2935221:0
crwdns2935229:012crwdne2935229:0
crwdns2935287:0crwdne2935287:0

CSU Fullerton, Team 2-4, Bruce Fall 2015 crwdns2935289:0CSU Fullerton, Team 2-4, Bruce Fall 2015crwdne2935289:0
CSUF-BRUCE-F15S2G4
crwdns2931471:04crwdne2931471:0
crwdns2935297:019crwdne2935297:0
crwdns2947412:04crwdne2947412:0
Mine ended up dismantled after it had been dropped. Couldn't get it back together until I read the bit about the tweezers /(pliers) and the white clips. It does not push in with out squeezing them first
Jason - crwdns2934203:0crwdne2934203:0 crwdns2950251:0crwdne2950251:0
Has anyone replaced the red release catch?
chrisashton1 - crwdns2934203:0crwdne2934203:0 crwdns2950251:0crwdne2950251:0
The white C-ring with clips must be pushed down in order to reassemble device. Takes some time to practice.
Anton Simonov - crwdns2934203:0crwdne2934203:0 crwdns2950251:0crwdne2950251:0
I'm trying to figure out how to put spring and plastic pieces back in on the inside of red lever on motor body?? Any help I'd really appreciate ?
t_picano - crwdns2934203:0crwdne2934203:0 crwdns2950251:0crwdne2950251:0