crwdns2933423:0crwdne2933423:0
crwdns2947577:0crwdnd2947577:0crwdne2947577:0
Dyson DC39 Origin  Replacement

Dyson DC39 Origin Replacement

Michael Hutcheson

crwdns2944107:0crwdnd2944107:0Michael Hutchesoncrwdnd2944107:0crwdnd2944107:0crwdnd2944107:02crwdnd2944107:0crwdne2944107:0

crwdns2944111:0Mha 16, 2017crwdne2944111:0

6 - 10 crwdns2931279:0crwdne2931279:0
crwdns2937799:0crwdne2937799:0

crwdns2915892:0crwdne2915892:0

crwdns2942287:0crwdne2942287:0

This guide shows how to remove the inlet hose of the Dyson DC39 Origin. This process requires removing the bin and separating the steering assembly from the main body of the device.

crwdns2942213:0crwdne2942213:0

crwdns2943215:0crwdne2943215:0

crwdns2944105:0crwdne2944105:0

  1. Dyson DC39 Origin  Replacement, Bin: crwdns2935265:01crwdnd2935265:01crwdnd2935265:03crwdne2935265:0 Dyson DC39 Origin  Replacement, Bin: crwdns2935265:01crwdnd2935265:02crwdnd2935265:03crwdne2935265:0 Dyson DC39 Origin  Replacement, Bin: crwdns2935265:01crwdnd2935265:03crwdnd2935265:03crwdne2935265:0
    • Push down on the gray button located next to the power button to release the bin from the ball housing.

    • Pull the bin away, then up from the ball housing to remove it.

    • If the bin won't fit back into place during re-assembly, you may need to push the grey button again.

  2. Dyson DC39 Origin  Replacement, Steering Assembly: crwdns2935265:02crwdnd2935265:01crwdnd2935265:03crwdne2935265:0 Dyson DC39 Origin  Replacement, Steering Assembly: crwdns2935265:02crwdnd2935265:02crwdnd2935265:03crwdne2935265:0 Dyson DC39 Origin  Replacement, Steering Assembly: crwdns2935265:02crwdnd2935265:03crwdnd2935265:03crwdne2935265:0
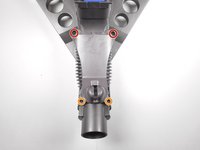
    • Place the ball housing on its side and orient it so that the underside of the steering assembly is facing you.

    • Remove the four 18.0 mm Torx 15 screws.

  3. Dyson DC39 Origin  Replacement: crwdns2935265:03crwdnd2935265:01crwdnd2935265:03crwdne2935265:0 Dyson DC39 Origin  Replacement: crwdns2935265:03crwdnd2935265:02crwdnd2935265:03crwdne2935265:0 Dyson DC39 Origin  Replacement: crwdns2935265:03crwdnd2935265:03crwdnd2935265:03crwdne2935265:0
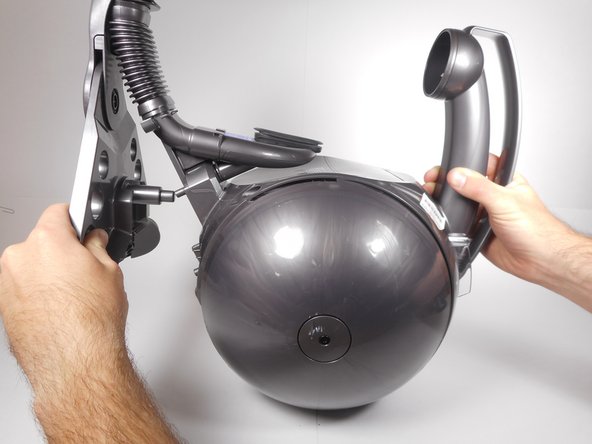
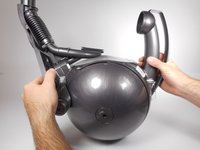
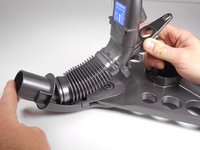
    • Using two hands, hold the ball housing with the handle in one hand and the steering assembly base in the other.

    • Hold the steering assembly base near one of the wheels.

    • Pull the steering assembly base directly away from the ball housing. You should notice a pin release.

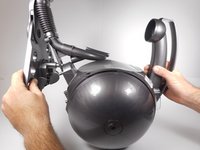
    • Push up on the steering assembly to remove it completely from the ball housing.

    • During reassembly, slide the steering assembly in first, then push the pin back into its locking position.

  4. Dyson DC39 Origin  Replacement, Inlet Hose: crwdns2935265:04crwdnd2935265:01crwdnd2935265:02crwdne2935265:0 Dyson DC39 Origin  Replacement, Inlet Hose: crwdns2935265:04crwdnd2935265:02crwdnd2935265:02crwdne2935265:0
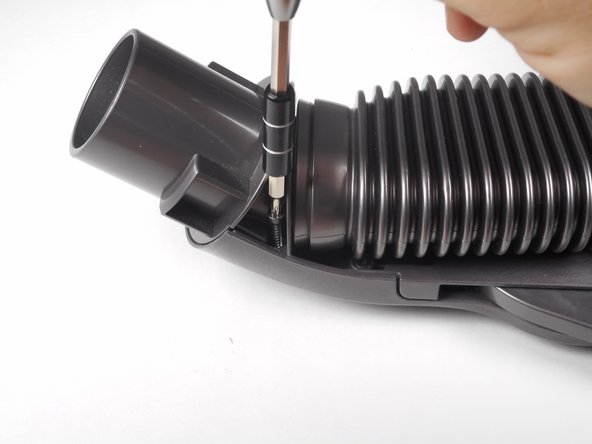
    • Remove the two 17.8 mm Phillips #2 screws located in the top of the inlet hose bracket.

    • Remove the two 13.7 mm Torx 8 screws located at the opposite end of the inlet hose.

    • The Torx 8 screws are located at an odd angle. Be sure the screwdriver is secure to prevent stripping the screws.

  5. Dyson DC39 Origin  Replacement: crwdns2935265:05crwdnd2935265:01crwdnd2935265:02crwdne2935265:0 Dyson DC39 Origin  Replacement: crwdns2935265:05crwdnd2935265:02crwdnd2935265:02crwdne2935265:0
    • Pull the inlet hose straight up from the steering assembly.

    • The inlet hose 'snaps' out of its position, so you may have to apply a little extra force while pulling.

crwdns2915888:0crwdne2915888:0

To reassemble your device, follow these instructions in reverse order.

crwdns2935229:05crwdne2935229:0

Michael Hutcheson

crwdns2935283:004/26/17crwdne2935283:0

297 crwdns2915208:0crwdne2915208:0

crwdns2935297:02crwdne2935297:0

crwdns2915084:0crwdne2915084:0

Cal Poly, Team S23-G6, Livingston Spring 2017 crwdns2935289:0Cal Poly, Team S23-G6, Livingston Spring 2017crwdne2935289:0

CPSU-LIVINGSTON-S17S23G6

crwdns2931471:03crwdne2931471:0

crwdns2935297:06crwdne2935297:0

crwdns2947410:01crwdne2947410:0

Really clear instructions - thank you

collette - crwdns2934203:0crwdne2934203:0

crwdns2917038:0crwdne2917038:0

crwdns2936625:0crwdne2936625:0:

crwdns2936751:024crwdne2936751:0 0

crwdns2936753:07crwdne2936753:0 0

crwdns2936753:030crwdne2936753:0 10

crwdns2942667:0crwdne2942667:0 4,463