crwdns2942213:0crwdne2942213:0
-
-
Take off the dust cannister.
-
Remove the suction hose.
-
-
-
Extract the rear filter.
-
Unscrew the first Torx screw.
-
-
-
Optionally, remove the rear filter cover.
-
-
-
Unscrew the 2nd Torx screw.
-
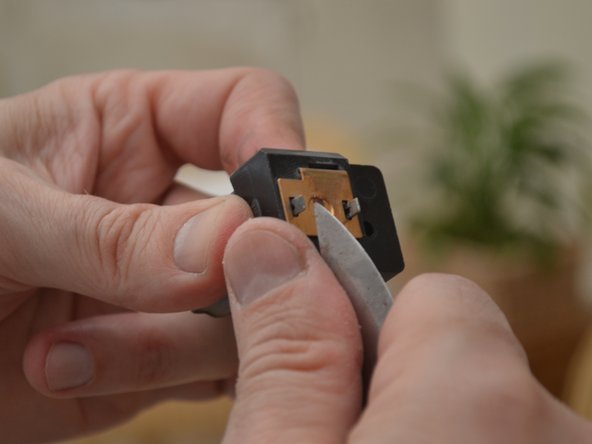
Disassemble the suction hose connection (optional)
-
-
-
-
Remove the wheels.
-
Unscrew the 4 Torx screws (two in the right and two on the left).
You have to insert a flat blade screw driver between the wheel and the body of the vac cleaner for 2-3 inches to prise of the wheel.
-
-
-
Open the body of the vacuum cleaner.
-
You can use a multimeter to test the switch.
-
Disconnect the brown wire at the switch.
-
Disconnect the blue wire at the single connector by the motor.
-
Lift out the motor.
-
-
-
Open the motor housing (4 clips).
-
Remover the motor from its plastic casing.
-
Disconnect the motor.
-
-
-
disassembly of 2 engine coals (1 Phillips screw per coal)
-
-
-
Worn brush.
-
Opening the brush housing.
-


To reassemble your device, follow these instructions in reverse order.
To reassemble your device, follow these instructions in reverse order.
crwdns2935221:0crwdne2935221:0
crwdns2935229:016crwdne2935229:0
crwdns2934873:0crwdne2934873:0
100%


crwdns2934885:0crwdne2934885:0 crwdns2934875:0crwdne2934875:0
crwdns2934877:0crwdne2934877:0 ›
crwdns2944067:014crwdne2944067:0
Very useful guide - I treated myself to a new motor as the cost was not much more than the cost of replacement brushes.
Hi, where did you buy the new motor?
Nadja -
Bravo, très bon tutoriel
Bonjour
et si on n’a rien pour souder, y a t’il une autre solution svp?
Bonjour ! Si vous ne disposez pas de matérial de soudure, nous vous conseillons de vous rendre à un Repair Café ou un Fab Lab. Ces associations mettent du matériel à disposition et peuvent éventuellement aussi vous conseiller sur la démarche à suivre. Bonne réparation !
Finalement, j’ai acheté les blocs charbons.
Mais j’ai un gros problème, je n’arrive pas à refermer le boîtier plastique noir qui contient le moteur, peut-être que je replace mal le moteur…y a-t-il une astuce svp?
Merci pour votre aide..
J’ai eu le même problème.
J’avais mal orienté l’rembobineur de câble.
Et aussi l’interrupteur.
Il restait 2-3 mm de décalage coté interrupteur, en forçant avec les vis, c’est passé !
super, merci beaucoup.
Je voudrais aussi changer le flexible du DC08, j’ai enlevé le support du bas, sui se fixe sur l’aspirateur, mais comment sortir le flexible de ce support svp?
J’ai beau tirer, rien ne vient…
Merci d’avance si vous pouvez m’aider
Merci pour ce tuto très bien fait.
Quelqu’un aurait les dimensions des charbons ?
Je voudrais en commander des génériques mais je viens de tout remonter !
Pour les dimensions des charbons, je viens de redémonter :
11mm x 7mm
et en longueur
8 mm usée
30 mm neuf
Y a t’il un ressort au contact du bouton de l enrouleur car en remontant le bouton n’a plus de prise sur l enrouleur
merci
Merci beaucoup pour ce tutoriel. J’ai trouvé sur Amazon les balais déjà tout montés avec leur charbon. Heureusement, car sinon j’aurais dû appendre à souder.
Brosses De Charbon Moteur avec Support Convient pour Dyson DC 08 Avec YDK https://amzn.eu/d/9upXWXE
Bon tuto.
J'ai acheté un nouveau moteur, pas cher (35€) mais de moins bonne qualité. Pas de problème, on verra combien de temps cela durera. Sinon je vais rechercher 2 charbon, le moteur d'origine fonctionnant toujours (juste problème de charbon).
Merci