crwdns2933423:0crwdne2933423:0
crwdns2947577:0crwdnd2947577:0crwdne2947577:0

DualShock 4 Controller Rumble Motors Replacement

crwdns2942213:0crwdne2942213:0

    1. DualShock 4 Controller Rumble Motors Replacement, Rumble Motors: crwdns2935265:01crwdnd2935265:01crwdnd2935265:01crwdne2935265:0
      • Remove the four 2mm screws on the rear plate using the #000 Phillips screwdriver.

      crwdns2952109:0crwdne2952109:0

      crwdns2917038:0crwdne2917038:0

    2. DualShock 4 Controller Rumble Motors Replacement: crwdns2935265:02crwdnd2935265:01crwdnd2935265:01crwdne2935265:0
      • Remove the rear plate.

      • We recommend using a metal spudger for this step.

      crwdns2952109:0crwdne2952109:0

      crwdns2917038:0crwdne2917038:0

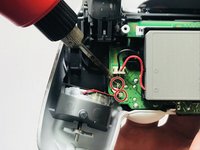
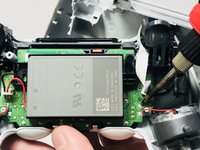
    3. DualShock 4 Controller Rumble Motors Replacement: crwdns2935265:03crwdnd2935265:01crwdnd2935265:02crwdne2935265:0 DualShock 4 Controller Rumble Motors Replacement: crwdns2935265:03crwdnd2935265:02crwdnd2935265:02crwdne2935265:0
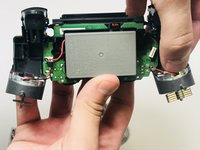
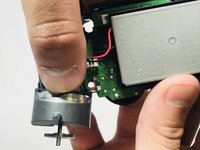
      • Desolder the joints that attach the rumble motors to the motherboard.

      • For more information on soldering, click here.

      crwdns2952109:0crwdne2952109:0

      crwdns2917038:0crwdne2917038:0

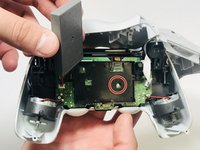
    4. DualShock 4 Controller Rumble Motors Replacement: crwdns2935265:04crwdnd2935265:01crwdnd2935265:02crwdne2935265:0 DualShock 4 Controller Rumble Motors Replacement: crwdns2935265:04crwdnd2935265:02crwdnd2935265:02crwdne2935265:0
      • There is a hidden screw underneath the battery pack that attaches the faceplate to the motherboard.

      • Lift the pack and remove the 10mm screw using the #000 Phillips screwdriver.

      crwdns2952109:0crwdne2952109:0

      crwdns2917038:0crwdne2917038:0

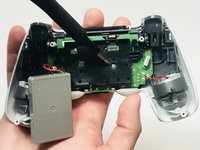
    5. DualShock 4 Controller Rumble Motors Replacement: crwdns2935265:05crwdnd2935265:01crwdnd2935265:01crwdne2935265:0
      • Remove the faceplate from the motherboard.

      crwdns2952109:0crwdne2952109:0

      crwdns2917038:0crwdne2917038:0

    6. DualShock 4 Controller Rumble Motors Replacement: crwdns2935265:06crwdnd2935265:01crwdnd2935265:03crwdne2935265:0 DualShock 4 Controller Rumble Motors Replacement: crwdns2935265:06crwdnd2935265:02crwdnd2935265:03crwdne2935265:0 DualShock 4 Controller Rumble Motors Replacement: crwdns2935265:06crwdnd2935265:03crwdnd2935265:03crwdne2935265:0
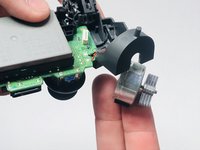
      • With some added pressure, push down and outward in order to free and remove the rumble motors from their socket.

      crwdns2952109:0crwdne2952109:0

      crwdns2917038:0crwdne2917038:0

crwdns2915888:0crwdne2915888:0

To reassemble your device, follow these instructions in reverse order.

crwdns2935221:0crwdne2935221:0

crwdns2935229:014crwdne2935229:0

Pedro Rodriguez

crwdns2935283:002/22/18crwdne2935283:0

539 crwdns2915208:0crwdne2915208:0

crwdns2935295:0crwdne2935295:0

crwdns2935287:0crwdne2935287:0

University of Memphis, Team S5-G4, Baddour Spring 2018 crwdns2935289:0University of Memphis, Team S5-G4, Baddour Spring 2018crwdne2935289:0

UM-BADDOUR-S18S5G4

crwdns2931471:02crwdne2931471:0

crwdns2935297:012crwdne2935297:0

crwdns2947412:03crwdne2947412:0

I’d recommend adding removal instructions for the touchpad also

AlexMorse - crwdns2934203:0crwdne2934203:0 crwdns2950251:0crwdne2950251:0

the rumble packs are stuck with an adhesive on my controller. The best way to remove the rumble pack in this case? thanks

Ka Erd - crwdns2934203:0crwdne2934203:0 crwdns2950251:0crwdne2950251:0

I'm most likely way too late, but if there is an adhesive, I would probably use something that breaks glue down and is safe for electronics

Harry Harshman - crwdns2934203:0crwdne2934203:0 crwdns2950251:0crwdne2950251:0

crwdns2917038:0crwdne2917038:0

crwdns2936625:0crwdne2936625:0:

crwdns2936751:024crwdne2936751:0 12

crwdns2936753:07crwdne2936753:0 79

crwdns2936753:030crwdne2936753:0 396

crwdns2942667:0crwdne2942667:0 33,664