crwdns2915892:0crwdne2915892:0
Use this guide to replace the molded analog joystick covers on a DualShock 3 controller. The electronic joysticks are soldered to the controller board.
crwdns2942213:0crwdne2942213:0
-
-
Remove the five 7.2 mm Phillips screws securing the rear cover to the controller.
-
-
-
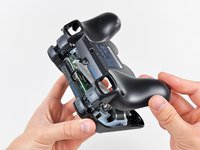
Press on the rear cover between the analog sticks and slightly lift the lower edge of it away from the rest of the controller.
-
-
-
Push the rear cover slightly toward the top edge of the controller to clear the front edge of the #2 triggers.
-
Pull the rear cover away from the rest of the controller, being careful not to pop off the #2 triggers.
-
-
-
Lift the battery off the motherboard for enough clearance to access the battery connector.
-
-
-
crwdns2935267:0crwdne2935267:0Tweezers$4.99
-
Carefully pull the battery connector away from its socket on the motherboard.
-
-
-
Remove the single 7.2 mm Phillips screw securing the motherboard to the front cover.
-
-
-
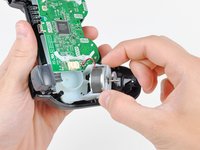
Slide the trigger button retainers slightly away from the front cover.
-
Remove the #1 button on both sides.
-
-
-
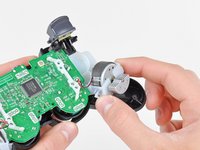
Pull the vibration motor retainers away from the front cover to dislodge the motherboard assembly.
-
-
-
Remove the motherboard assembly from the front cover.
-
-
-
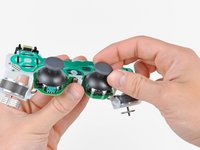
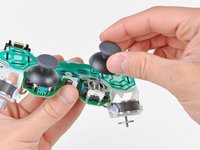
Pull the analog stick covers straight up off the joystick posts attached to the motherboard.
-


To reassemble your device, follow these instructions in reverse order.
crwdns2935221:0crwdne2935221:0
crwdns2935229:093crwdne2935229:0

crwdns2947412:03crwdne2947412:0
Reassembly doesn’t quite follow these steps in reverse order. Proper reassembly with the shoulder buttons is tricky. However, its much more simple to omit resinstalling the ‘1’ buttons until the controller housing is completely reassembled. They have one-way snapping clips on the edges, and appear designed to installed this way. Also, it’s good to double check the internal ‘1’ button switches are correctly centered inside the controller housing before4 snap in the ‘1’ buttons.
Question; do I have to remove the vibration motors to remove the joysticks?
Thanks Andrew, your guide worked like a charm. My roomie spilled soda on the controller and the buttons were sticky. Cleaned it all up and all is good. As an aside, this controller had a rattle inside from new. I found a little black piece of plastic that looks like a bridge of sort. Now the rattle is gone too.