crwdns2933423:0crwdne2933423:0

Drill Master Heat Gun Heating Coil Replacement

crwdns2942213:0crwdne2942213:0

  1. Drill Master Heat Gun Heating Coil Replacement, Heating Coil: crwdns2935265:01crwdnd2935265:01crwdnd2935265:01crwdne2935265:0
    • Be sure the heat gun is unplugged before starting this process.

    • Remove the seven 14mm screws from the side of the drill using the PH#0 screwdriver.

    • You will need a screwdriver extension.

  2. Drill Master Heat Gun Heating Coil Replacement: crwdns2935265:02crwdnd2935265:01crwdnd2935265:01crwdne2935265:0
    • Remove the 8mm screw from underside of barrel using the PH#0 screwdriver.

    • Don't try to open the casing just yet.

  3. Drill Master Heat Gun Heating Coil Replacement: crwdns2935265:03crwdnd2935265:01crwdnd2935265:03crwdne2935265:0 Drill Master Heat Gun Heating Coil Replacement: crwdns2935265:03crwdnd2935265:02crwdnd2935265:03crwdne2935265:0 Drill Master Heat Gun Heating Coil Replacement: crwdns2935265:03crwdnd2935265:03crwdnd2935265:03crwdne2935265:0
    • Remove the barrel casing on either end by twisting and pulling each side off.

  4. Drill Master Heat Gun Heating Coil Replacement: crwdns2935265:04crwdnd2935265:01crwdnd2935265:01crwdne2935265:0
    • Remove the top casing to reveal inside of drill. You might have to tug a little harder for this one.

  5. Drill Master Heat Gun Heating Coil Replacement: crwdns2935265:05crwdnd2935265:01crwdnd2935265:01crwdne2935265:0
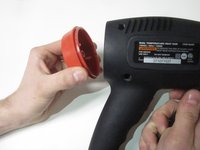
    • Remove the plastic casing from the end of the barrel.

  6. Drill Master Heat Gun Heating Coil Replacement: crwdns2935265:06crwdnd2935265:01crwdnd2935265:01crwdne2935265:0
    • Remove the metal casing from the heating element.

  7. Drill Master Heat Gun Heating Coil Replacement: crwdns2935265:07crwdnd2935265:01crwdnd2935265:01crwdne2935265:0
    • Slowly remove the heat resistant wrapping from the heating element.

    • Be careful here - the wrapping can be easily torn!

  8. Drill Master Heat Gun Heating Coil Replacement: crwdns2935265:08crwdnd2935265:01crwdnd2935265:02crwdne2935265:0 Drill Master Heat Gun Heating Coil Replacement: crwdns2935265:08crwdnd2935265:02crwdnd2935265:02crwdne2935265:0
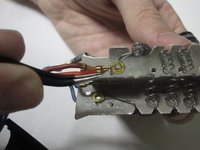
    • Use the angled tweezers to remove the heating coil end from the input point.

  9. Drill Master Heat Gun Heating Coil Replacement: crwdns2935265:09crwdnd2935265:01crwdnd2935265:01crwdne2935265:0
    • Remove the heating coil by unraveling it from the heating element.

    • To replace, you'll need to re-wrap a new wire around the coil and attach it to the wires at the bottom (see Step 8).

crwdns2915888:0crwdne2915888:0

To reassemble your device, follow these instructions in reverse order.

crwdns2935229:02crwdne2935229:0

Mikayla Kim

crwdns2935283:001/31/17crwdne2935283:0

523 crwdns2915208:0crwdne2915208:0

crwdns2935297:05crwdne2935297:0

crwdns2915084:0crwdne2915084:0

University of North Texas, Team 1-2, Campbell Spring 2017 crwdns2935289:0University of North Texas, Team 1-2, Campbell Spring 2017crwdne2935289:0

UNT-CAMPBELL-S17S1G2

crwdns2931471:03crwdne2931471:0

crwdns2935297:010crwdne2935297:0

crwdns2944067:03crwdne2944067:0

Where are the heating coil wires found?

Thomas Frye - crwdns2934203:0crwdne2934203:0

I am asking where I can find a NEW heating coil wire?

Thomas Frye - crwdns2934203:0crwdne2934203:0

There is continuity in the heating coil wire, so I believe something else is causing my problem. There is one terminal on the heating element

that has a curved, rigid, bulbous hotdog shaped component that is right close to the terminal on the heating element. I am not sure what it is.

One can be seen in the picture at the top of the page in the introduction.

Thomas Frye - crwdns2934203:0crwdne2934203:0

crwdns2917038:0crwdne2917038:0

crwdns2936625:0crwdne2936625:0:

crwdns2936751:024crwdne2936751:0 1

crwdns2936753:07crwdne2936753:0 14

crwdns2936753:030crwdne2936753:0 57

crwdns2942667:0crwdne2942667:0 4,118