crwdns2915892:0crwdne2915892:0
This guide will show you how to replace the power and volume buttons on your tablet.
crwdns2942213:0crwdne2942213:0
-
-
Remove the two screws from the top of the tablet as shown in the figure using a J0 philips head bit.
-
-
-
Use the large plastic opening tool to separate the back cover from the device. Wedge the sharp end of the tool into the crack and use leverage to further separate the back cover from the device.
-
Still holding pressure on the opening tool, slowly and carefully slide the tool along the gap to separate it further. You should hear slight snapping as it comes apart. Work your way around all sides until the cover is able to be removed.
-
-
-
-
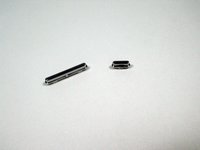
Ensure your buttons look like this
-
If either the buttons or the button holes in the back cover are dirty, clean them.
-
If the buttons are cracked or broken, they will have to be replaced
-
-
-
With the old buttons removed place the new ones in
-
-
-
These buttons are held in by gravity alone so when reattaching the device back on to the cover, keep it upside down.
-
Secure the bottom of the device first before closing up the sides.
-


To reassemble your device, follow these instructions in reverse order.
To reassemble your device, follow these instructions in reverse order.
crwdns2935221:0crwdne2935221:0
crwdns2935229:02crwdne2935229:0
crwdns2915084:0crwdne2915084:0

UMass Dartmouth, Team 4-7, Catania Spring 2016 crwdns2935289:0UMass Dartmouth, Team 4-7, Catania Spring 2016crwdne2935289:0
UMASSD-CATANIA-S16S4G7
crwdns2931471:03crwdne2931471:0
crwdns2935297:08crwdne2935297:0