crwdns2915892:0crwdne2915892:0
A common issue with the Dolce Gusto Oblo is water that leaks between the water tank connector and the water tank itself when it’s unused and has water remaining on its tanks.
In this guide we will take a look at how to open the device and replace the gasket of the water tank connector assembly.
Generic spare parts for this device can be found nowadays, most parts still available for those ordering from Europe but may be difficult to find without the reference of the spare part. Have a look to the spare part schema for this device to find the reference of the spare parts easily.
The reference identifier for the gasket of the water tank connector is MS-623712.
crwdns2942213:0crwdne2942213:0
-
-
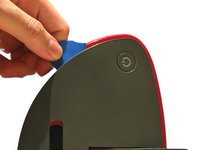
Let’s begin by removing the water tank.
-
Then lift the gray handle then remove the pod holder.
-
Then remove the drip tray.
-
-
-
Rotate the coffee machine so the back plate is facing you.
-
And remove the 8 screws using a Torx TR10 screwdriver.
-
6 Torx TR10 15 mm screws
-
2 Torx TR10 8 mm screws
-
-
-
Once the back plate screws are removed, look at the top plate of the coffee machine.
-
Then detach the top plate using an opening pick or a plastic opening tool if needed.
-
-
-
-
Lift carefully the top plate and turn it so you can see the back of the top plate.
-
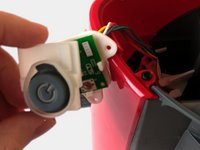
Locate the power button behind the top plate.
-
Then remove the 3 screws securing the power button using a Philips #1 head screwdriver.
-
3 Philips #1 8 mm screws
-
-
-
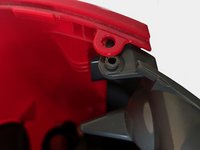
Locate the 2 screws securing the back plate and the front plate together. Then remove the 2 screws using a Torx TR10 screwdriver.
-
2 Torx TR10 15mm screws
-
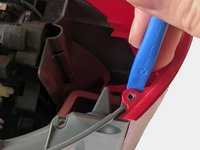
Once screws are removed, pry on the plastic rings on the right side of the front plate using a plastic opening tool to detach it partially (see 2nd and 3rd picture that shows how to detach the right side)
-
Then do the same on the left side.
-
Then lift the front plate to detach the bottom of the front plate.
-
-
-
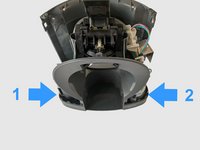
Look at the bottom sides of the device indicated by the arrows numbered 1 and 2.
-
Left side (arrow number 1)
-
Right side (arrow number 2)
-
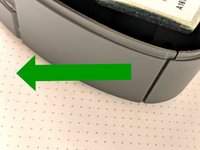
Look at the left side and pull at the end of the back plate in the direction indicated by the arrow (1) in order to detach the backplate.
-
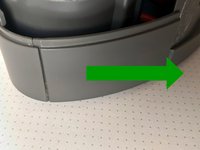
Then repeat this step for the other side (2)
-
Once both ends are freed, you can simply pull on the backplate upwards to remove it.
-
-
-
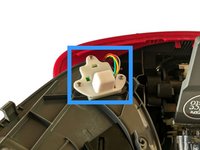
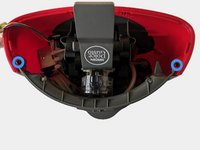
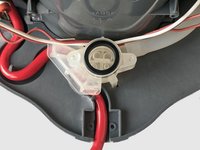
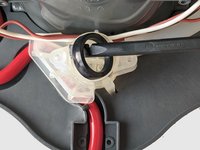
Locate the water tank connector assembly on the back of the rest of the coffee machine.
-
Remove its gasket by lifting the gasket upwards using a spudger or a plastic opening tool or your hands.
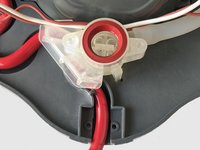
-
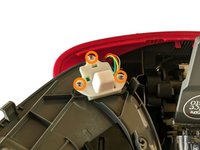
Then insert a new gasket in the water tank connector assembly using your hands.
-


To reassemble your device, follow these instructions in reverse order.
crwdns2935221:0crwdne2935221:0
crwdns2935229:06crwdne2935229:0

crwdns2947412:03crwdne2947412:0
Retour d'expérience :
Cette réparation a été assez simple, la partie la plus difficile a été de détacher la plaque avant, car elle est solidement maintenue par les attaches qui sont réparties tout autour de cette pièce et sa forme atypique complique son démontage. De même pour le remontage de cette pièce qui nécessite de faire plusieurs tentatives pour bien la rattacher.
La réparation tient bien dans le temps, il n'y a plus la moindre fuite, j'utilise l'appareil tous les jours. Un bref retour sur la durée dans le temps de cette réparation sera effectué dans environ 1 an après la rédaction de ce tutoriel. En raison du type de pièce remplacée, il est certain que cette réparation durera au moins aussi longtemps que quand l'appareil était neuf. Cet appareil obtient donc une seconde vie pour un simple joint remplacé.
Bilan de la réparation : 2,5 kg de déchet plastique et électronique évité.
Astuce : pour préserver l'environnement et avoir du bon café, il existe des dosettes réutilisables en métal pour cet appareil.
Le joint du réservoir lui -même⏎⏎
Le réservoir présente un ressort et un joint, sur un piston.⏎⏎
Ce joint MS-624399 sert uniquement quand le réservoir est hors de la cafetière.⏎⏎
Il a un diamètre intérieur de 5mm. Facile a trouver dans les kits de joint, mais le probleme est sont épaisseur; et là, c'est plus compliquer à trouver.⏎⏎
Il faut 3 ou 3,55 d’épaisseur.⏎⏎
(j'ai pas trouver d'équivalent) j'ai donc tenter avec deux joints de 5mm(diamètre) x 1,8 (épaisseur).⏎⏎
C'est pas génial ... :(
⏎⏎
Si ce joint est sec/dur, alors il est hs. et c'est alors difficile de l'enlever.⏎⏎
J'ai réussi avec un cutteur pour le sectionner en partie, ce qui la affaibli, Et un couteau pour le tirer de sont emplacement.
Superbes explication qui m'ont permis de ne pas casser toutes les pattes en plastique de la cafetière. Et comme toute chose qui peut se réparer facilement, je me suis dit ( non sans surprise) "tout ça à retirer , juste pour ça ". Et oui pour un simple petit joint. Encore une cafetière qui ne partira pas à la poubelle..Merci à vous pour avoir contribué au recyclage