crwdns2933423:0crwdne2933423:0

Disassembling Toshiba NB205 N330PK Back Panels

crwdns2942213:0crwdne2942213:0

  1. Disassembling Toshiba NB205 N330PK Back Panels, Disassembling Toshiba NB205 N330PK Back Panels: crwdns2935265:01crwdnd2935265:01crwdnd2935265:02crwdne2935265:0 Disassembling Toshiba NB205 N330PK Back Panels, Disassembling Toshiba NB205 N330PK Back Panels: crwdns2935265:01crwdnd2935265:02crwdnd2935265:02crwdne2935265:0
    • Using the Phillips #0 in the bit driver, carefully loosen and remove the single 5mm screw.

    • With the retaining screw removed, lift the panel upwards to separate it from the netbook.

  2. Disassembling Toshiba NB205 N330PK Back Panels: crwdns2935265:02crwdnd2935265:01crwdnd2935265:02crwdne2935265:0 Disassembling Toshiba NB205 N330PK Back Panels: crwdns2935265:02crwdnd2935265:02crwdnd2935265:02crwdne2935265:0
    • To replace the panel, do step 1 in reverse:

    • Align the panel slots in the appropriate grooves and set in place.

    • With the bit driver, replace the screw to secure the RAM panel.

  3. Disassembling Toshiba NB205 N330PK Back Panels: crwdns2935265:03crwdnd2935265:01crwdnd2935265:02crwdne2935265:0 Disassembling Toshiba NB205 N330PK Back Panels: crwdns2935265:03crwdnd2935265:02crwdnd2935265:02crwdne2935265:0
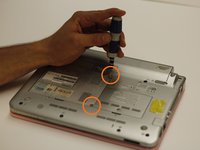
    • Using the bit driver and the Phillips bit, remove both of the panel's retaining screws.

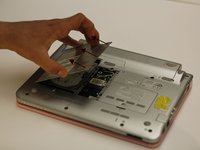
    • With the screws removed, lift the panel in the designated direction, as depicted in photo, for removal.

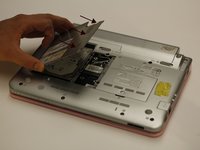
    • The hard drive is located beneath this cover and is now accessible.

  4. Disassembling Toshiba NB205 N330PK Back Panels: crwdns2935265:04crwdnd2935265:01crwdnd2935265:02crwdne2935265:0 Disassembling Toshiba NB205 N330PK Back Panels: crwdns2935265:04crwdnd2935265:02crwdnd2935265:02crwdne2935265:0
    • To replace the hard drive panel, do step 3 in reverse:

    • Place the panel back in its original position and press down.

    • If the hard drive was removed or replaced during this process, improper installation may prevent the hard drive panel from sitting in the slots properly.

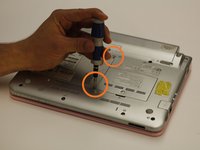
    • With the bit driver and Phillips bit, replace the two retaining screws to secure the cover plate in place.

crwdns2915888:0crwdne2915888:0

To reassemble your device, follow these instructions in reverse order.

Mason McCaskill

crwdns2935283:010/18/13crwdne2935283:0

1,000 crwdns2915208:0crwdne2915208:0

crwdns2935297:09crwdne2935297:0

crwdns2915084:0crwdne2915084:0

Clemson, Team 14-2, Benson Fall 2013 crwdns2935289:0Clemson, Team 14-2, Benson Fall 2013crwdne2935289:0

CLEM-BENSON-F13S14G2

crwdns2931471:03crwdne2931471:0

crwdns2935297:027crwdne2935297:0

crwdns2944067:00crwdne2944067:0

crwdns2917038:0crwdne2917038:0

crwdns2936625:0crwdne2936625:0:

crwdns2936751:024crwdne2936751:0 0

crwdns2936753:07crwdne2936753:0 3

crwdns2936753:030crwdne2936753:0 19

crwdns2942667:0crwdne2942667:0 980