crwdns2933423:0crwdne2933423:0

Disassembling PlayStation 2 Slimline Outer Shell

crwdns2942213:0crwdne2942213:0

  1. Disassembling PlayStation 2 Slimline Outer Shell, Outer Shell: crwdns2935265:01crwdnd2935265:01crwdnd2935265:01crwdne2935265:0
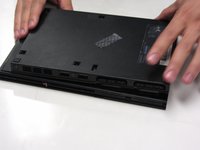
    • Disconnect all cables from the console and flip the unit over to reveal its base.

  2. Disassembling PlayStation 2 Slimline Outer Shell: crwdns2935265:02crwdnd2935265:01crwdnd2935265:03crwdne2935265:0 Disassembling PlayStation 2 Slimline Outer Shell: crwdns2935265:02crwdnd2935265:02crwdnd2935265:03crwdne2935265:0 Disassembling PlayStation 2 Slimline Outer Shell: crwdns2935265:02crwdnd2935265:03crwdnd2935265:03crwdne2935265:0
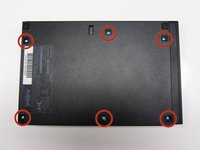
    • Locate the 6 feet on the base of the unit. Pry them off using a spudger to reveal the screws.

    • Note: One of the feet is located under the sticker shown in the photo. Removing this sticker will void any warranty with Sony.

  3. Disassembling PlayStation 2 Slimline Outer Shell: crwdns2935265:03crwdnd2935265:01crwdnd2935265:03crwdne2935265:0 Disassembling PlayStation 2 Slimline Outer Shell: crwdns2935265:03crwdnd2935265:02crwdnd2935265:03crwdne2935265:0 Disassembling PlayStation 2 Slimline Outer Shell: crwdns2935265:03crwdnd2935265:03crwdnd2935265:03crwdne2935265:0
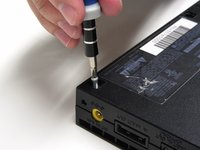
    • Remove all six 4.0 mm screws from the base of the unit using a #1 Phillips screwdriver.

  4. Disassembling PlayStation 2 Slimline Outer Shell: crwdns2935265:04crwdnd2935265:01crwdnd2935265:03crwdne2935265:0 Disassembling PlayStation 2 Slimline Outer Shell: crwdns2935265:04crwdnd2935265:02crwdnd2935265:03crwdne2935265:0 Disassembling PlayStation 2 Slimline Outer Shell: crwdns2935265:04crwdnd2935265:03crwdnd2935265:03crwdne2935265:0
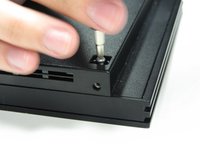
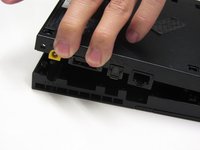
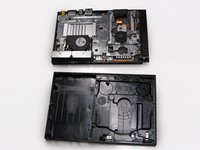
    • Starting at the corner at which the power and Ethernet ports are located, pry open the outer shell using a spudger and continue around the entire unit.

    • Note: You may use your hands for additional force to separate the two pieces of the outer shell.

crwdns2915888:0crwdne2915888:0

To reassemble your device, follow these instructions in reverse order.

crwdns2935229:019crwdne2935229:0

Thomas Sullivan

crwdns2935283:010/23/13crwdne2935283:0

3.927 crwdns2915208:0crwdne2915208:0

crwdns2935297:06crwdne2935297:0

crwdns2944067:03crwdne2944067:0

Just to clarify: in order to FULLY remove the bottom half of the shell on my PS2 Slim, I had to remove a screw that pinned the controller ports in place; it's at the front, right between the Player 1 and Player 2 ports.

Other than that, this guide worked perfectly! :D

Kizul Emeraldfire - crwdns2934203:0crwdne2934203:0

Good morning. Hello. The disassembly of the PS2 series 7XXXX (PS2 Slim) is very well explained, except for one detail. Indeed, when I started to separate the bottom from the top, a small metal plate with a threaded hole in the center. And I find no mention of it anywhere. Considering the part, I think it's used by one of the screws that holds the two plastic hulls, but I don't see where. Can you help me, please? Friendly, Marc.

Translated with www.DeepL.com/Translator

Marc Blériot - crwdns2934203:0crwdne2934203:0

The metal plate with a screw hole in the middle is for the stand-up-base-stand to be screwed down. It’s an after market item SONY sold seperately.

김동현 -

crwdns2917038:0crwdne2917038:0

crwdns2936625:0crwdne2936625:0:

crwdns2936751:024crwdne2936751:0 3

crwdns2936753:07crwdne2936753:0 33

crwdns2936753:030crwdne2936753:0 127

crwdns2942667:0crwdne2942667:0 10,885