crwdns2933423:0crwdne2933423:0

Disassembling Nokia 3560 Microphone

crwdns2942213:0crwdne2942213:0

  1. Disassembling Nokia 3560 Microphone, Back Cover: crwdns2935265:01crwdnd2935265:01crwdnd2935265:02crwdne2935265:0 Disassembling Nokia 3560 Microphone, Back Cover: crwdns2935265:01crwdnd2935265:02crwdnd2935265:02crwdne2935265:0
    • Press down on the release latch on the bottom of the cover.

    • Once the latch is released, lift the cover from the phone.

  2. Disassembling Nokia 3560 Microphone, Disassembling Nokia 3560 Keypad: crwdns2935265:02crwdnd2935265:01crwdnd2935265:01crwdne2935265:0
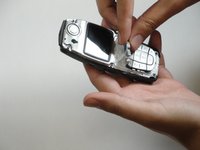
    • Lift the front case off of the phone body.

  3. Disassembling Nokia 3560 Microphone: crwdns2935265:03crwdnd2935265:01crwdnd2935265:02crwdne2935265:0 Disassembling Nokia 3560 Microphone: crwdns2935265:03crwdnd2935265:02crwdnd2935265:02crwdne2935265:0
    • Lift the keypad off of the phone.

  4. Disassembling Nokia 3560 Microphone, Disassembling Nokia 3560 LCD Display: crwdns2935265:04crwdnd2935265:01crwdnd2935265:01crwdne2935265:0
    • The screen is held to the body by six screws.

  5. Disassembling Nokia 3560 Microphone: crwdns2935265:05crwdnd2935265:01crwdnd2935265:01crwdne2935265:0
    • Unscrew the six screws with a Torx screwdriver (six-pointed star shaped bit).

  6. Disassembling Nokia 3560 Microphone: crwdns2935265:06crwdnd2935265:01crwdnd2935265:02crwdne2935265:0 Disassembling Nokia 3560 Microphone: crwdns2935265:06crwdnd2935265:02crwdnd2935265:02crwdne2935265:0
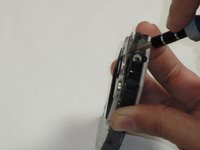
    • Insert a flat screwdriver between the black body and plastic layer.

  7. Disassembling Nokia 3560 Microphone: crwdns2935265:07crwdnd2935265:01crwdnd2935265:01crwdne2935265:0
    • Pry the layers apart. The LCD and plastic layer will lift out as one piece.

  8. Disassembling Nokia 3560 Microphone, Disassembling Nokia 3560 Logic Board: crwdns2935265:08crwdnd2935265:01crwdnd2935265:01crwdne2935265:0
    • With the screws removed, the logic board can then be lifted out of the body by hand.

  9. Disassembling Nokia 3560 Microphone, Microphone: crwdns2935265:09crwdnd2935265:01crwdnd2935265:01crwdne2935265:0
    • Use tweezers to securely grip the microphone, then pull.

    • Be careful not to remove the metal prongs.

crwdns2915888:0crwdne2915888:0

To reassemble your device, follow these instructions in reverse order.

Sam Ryan

crwdns2935283:004/18/10crwdne2935283:0

1 crwdns2915208:0crwdne2915208:0

crwdns2935297:08crwdne2935297:0

crwdns2915084:0crwdne2915084:0

Cal Poly, Team 30-39, Garner Spring 2010 crwdns2935289:0Cal Poly, Team 30-39, Garner Spring 2010crwdne2935289:0

CPSU-GARNER-S10S30G39

crwdns2931471:05crwdne2931471:0

crwdns2935297:016crwdne2935297:0

crwdns2944067:00crwdne2944067:0

crwdns2917038:0crwdne2917038:0

crwdns2936625:0crwdne2936625:0:

crwdns2936751:024crwdne2936751:0 0

crwdns2936753:07crwdne2936753:0 0

crwdns2936753:030crwdne2936753:0 1

crwdns2942667:0crwdne2942667:0 1,835