crwdns2933423:0crwdne2933423:0

Disassembling Nintendo DSi Bottom case

crwdns2862587:0crwdne2862587:0
crwdns2862588:0crwdne2862588:0

crwdns2942213:0crwdne2942213:0

  1. crwdns2944590:01crwdnd2944590:02crwdnd2944590:0crwdnd2944590:0crwdne2944590:0

    Disassembling Nintendo DSi Bottom case, Battery: crwdns2935265:01crwdnd2935265:01crwdnd2935265:01crwdne2935265:0
    • Loosen the two screws on the battery panel. Then lift the panel up to remove it.

  2. Disassembling Nintendo DSi Bottom case: crwdns2935265:02crwdnd2935265:01crwdnd2935265:01crwdne2935265:0
    • L Button.

    • Top of the battery pack.

    • To remove the battery pack, place your fingernail or a spudger at the top of the battery near the L button. Gently lift the battery out.

  3. crwdns2944590:03crwdnd2944590:04crwdnd2944590:0crwdnd2944590:0crwdne2944590:0

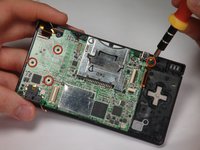
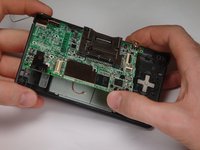
    Disassembling Nintendo DSi Bottom case, Motherboard: crwdns2935265:03crwdnd2935265:01crwdnd2935265:02crwdne2935265:0 Disassembling Nintendo DSi Bottom case, Motherboard: crwdns2935265:03crwdnd2935265:02crwdnd2935265:02crwdne2935265:0
    • Remove 4 Phillips screws from the board.

    • Lift the main board from the bottom end and flip it over to reveal the last connector.

    • Keep the main board fairly close to the case, making sure not to damage the last ribbon cable holding it in place.

  4. Disassembling Nintendo DSi Bottom case: crwdns2935265:04crwdnd2935265:01crwdnd2935265:01crwdne2935265:0
    • Disconnect the ribbon cable by gently using a plastic opening tool to flip up the black connector latch. The cable should easily slide out from the connector.

    • The motherboard should now be free from the rest of the device.

  5. Disassembling Nintendo DSi Bottom case, Disassembling Nintendo DSi Bottom case: crwdns2935265:05crwdnd2935265:01crwdnd2935265:01crwdne2935265:0
    • Remove the rubber front-panel button membranes from the device. Pay careful attention to where the buttons go, so you can replace them correctly.

    • A/B/X/Y button assembly

    • Select/Start button assembly

    • D-pad

    • Power button

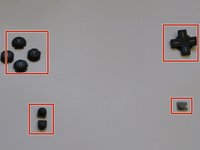
  6. Disassembling Nintendo DSi Bottom case: crwdns2935265:06crwdnd2935265:01crwdnd2935265:02crwdne2935265:0 Disassembling Nintendo DSi Bottom case: crwdns2935265:06crwdnd2935265:02crwdnd2935265:02crwdne2935265:0
    • Remove the plastic buttons and keep them in a safe place.

    • All of the buttons have "key" notches to prevent them from being inserted incorrectly (backwards or in the wrong place), but it can take a while to figure out where everything goes if they get shuffled around.

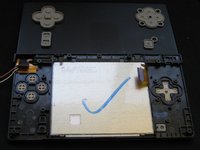
  7. Disassembling Nintendo DSi Bottom case: crwdns2935265:07crwdnd2935265:01crwdnd2935265:02crwdne2935265:0 Disassembling Nintendo DSi Bottom case: crwdns2935265:07crwdnd2935265:02crwdnd2935265:02crwdne2935265:0
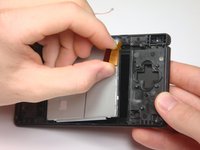
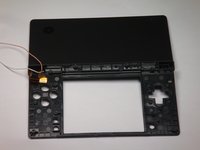
    • Flip the case open, and push the lower screen assembly out of the frame.

crwdns2915888:0crwdne2915888:0

To reassemble your device, follow these instructions in reverse order.

rjcamero

crwdns2935283:011/05/09crwdne2935283:0

44 crwdns2915208:0crwdne2915208:0

crwdns2935297:03crwdne2935297:0

crwdns2915084:0crwdne2915084:0

Cal Poly, Team 6-1, Maness Fall 2009 crwdns2935289:0Cal Poly, Team 6-1, Maness Fall 2009crwdne2935289:0

CPSU-MANESS-F09S6G1

crwdns2931471:05crwdne2931471:0

crwdns2935297:04crwdne2935297:0

crwdns2944067:00crwdne2944067:0

crwdns2917038:0crwdne2917038:0

crwdns2936625:0crwdne2936625:0:

crwdns2936751:024crwdne2936751:0 0

crwdns2936753:07crwdne2936753:0 2

crwdns2936753:030crwdne2936753:0 5

crwdns2942667:0crwdne2942667:0 5,328