
Disassembling Nintendo DSi Bottom case

crwdns2959932:0crwdnd2959932:0rjcamerocrwdnd2959932:0crwdnd2959932:0crwdnd2959932:015crwdnd2959932:0crwdne2959932:0
crwdns2959936:0Mha 2, 2024crwdne2959936:0
crwdns2869540:0crwdne2869540:0: 7544
crwdns2959988:0crwdne2959988:0
- crwdns2959990:0crwdne2959990:0
- 9
- crwdns2959992:0crwdne2959992:0
- 42
- crwdns2959994:0crwdne2959994:0
- 159
- crwdns2959996:0crwdne2959996:0
- 7,544
crwdns2955950:0crwdne2955950:0: 1
crwdns2960002:01crwdne2960002:0.
crwdns2959984:0crwdne2959984:0: 1 2
crwdns2959972:01crwdne2959972:0
crwdns2959970:02crwdne2959970:0
crwdns2959986:0crwdne2959986:0: 5 6
crwdns2959982:05crwdne2959982:0
crwdns2959978:06crwdne2959978:0
crwdns2869334:0crwdne2869334:0
crwdns2862610:0crwdne2862610:0
crwdns2869446:0crwdne2869446:0
crwdns2869447:0crwdne2869447:0
crwdns2890100:0crwdne2890100:0
crwdns2944378:0crwdne2944378:0
crwdns2915892:0crwdne2915892:0
crwdns2959928:0crwdne2959928:0 ↓This guide has been updated by iFixit staff! Read the new, official guide here.
A guide on how to disassemble the bottom case assembly, including removing the LCD and buttons.
crwdns2959930:0crwdne2959930:0
crwdns2943213:0crwdne2943213:0
-
Nintendo DSi Touchscreen$19.99

crwdns2943215:0crwdne2943215:0
-
-
Spudger4.9
-


-
-
crwdns2955114:01crwdne2955114:0 Battery
crwdns2944590:01crwdnd2944590:02crwdnd2944590:0crwdnd2944590:0crwdne2944590:0
-
Loosen the two screws on the battery panel. Then lift the panel up to remove it.
 crwdns2952109:0crwdne2952109:0
-
-
-
L Button.
-
Top of the battery pack.
-
To remove the battery pack, place your fingernail or a spudger at the top of the battery near the L button. Gently lift the battery out.
-
-
-
-
crwdns2955114:03crwdne2955114:0 Motherboard
crwdns2944590:03crwdnd2944590:04crwdnd2944590:0crwdnd2944590:0crwdne2944590:0
-
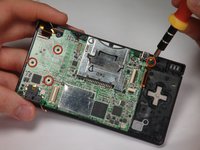
Remove 4 Phillips screws from the board.
-
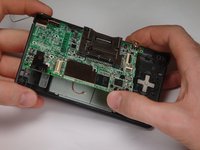
Lift the main board from the bottom end and flip it over to reveal the last connector.
-
-
-
Disconnect the ribbon cable by gently using a plastic opening tool to flip up the black connector latch. The cable should easily slide out from the connector.
-
The motherboard should now be free from the rest of the device.
-
-
-
-
-
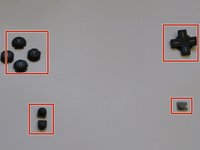
A/B/X/Y button assembly
-
Select/Start button assembly
-
D-pad
-
Power button
-
-
-
-
Remove the plastic buttons and keep them in a safe place.
-
-
-
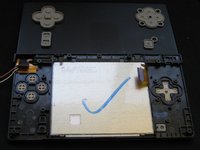
Flip the case open, and push the lower screen assembly out of the frame.
-
-






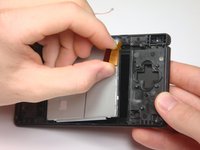
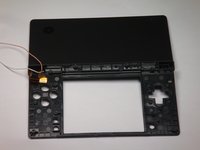
To reassemble your device, follow these instructions in reverse order.
crwdns2935221:0crwdne2935221:0
crwdns2935227:0crwdne2935227:0

crwdns2935287:0crwdne2935287:0

Cal Poly, Team 6-1, Maness Fall 2009 crwdns2935289:0Cal Poly, Team 6-1, Maness Fall 2009crwdne2935289:0
CPSU-MANESS-F09S6G1
crwdns2931471:05crwdne2931471:0
crwdns2935297:048crwdne2935297:0
