crwdns2933423:0crwdne2933423:0
crwdns2947577:0crwdnd2947577:0crwdne2947577:0

Disassembling ModRetro M64 Pro Controller

crwdns2942213:0crwdne2942213:0

    1. Disassembling ModRetro M64 Pro Controller, Battery Pack: crwdns2935265:01crwdnd2935265:01crwdnd2935265:02crwdne2935265:0 Disassembling ModRetro M64 Pro Controller, Battery Pack: crwdns2935265:01crwdnd2935265:02crwdnd2935265:02crwdne2935265:0
      • Slide the battery release button down.

      • Pull the battery pack away from the controller and set it aside.

      crwdns2952109:0crwdne2952109:0

      crwdns2917038:0crwdne2917038:0

    2. Disassembling ModRetro M64 Pro Controller, Front Panel: crwdns2935265:02crwdnd2935265:01crwdnd2935265:03crwdne2935265:0 Disassembling ModRetro M64 Pro Controller, Front Panel: crwdns2935265:02crwdnd2935265:02crwdnd2935265:03crwdne2935265:0 Disassembling ModRetro M64 Pro Controller, Front Panel: crwdns2935265:02crwdnd2935265:03crwdnd2935265:03crwdne2935265:0
      • Place the device on a soft, flat surface to avoid scratching the top shell.

      • On the back of the controller, remove eleven screws on the back using the Tri-wing Y1 Screwdriver.

      • The eleven screws come in four distinct lengths. Organize them carefully during removal. The exact placement for each group of screws is highlighted in the image.

      • Gently separate the front panel from the back panel and set them aside.

      crwdns2952109:0crwdne2952109:0

      crwdns2917038:0crwdne2917038:0

    3. Disassembling ModRetro M64 Pro Controller, Membranes and Buttons: crwdns2935265:03crwdnd2935265:01crwdnd2935265:03crwdne2935265:0 Disassembling ModRetro M64 Pro Controller, Membranes and Buttons: crwdns2935265:03crwdnd2935265:02crwdnd2935265:03crwdne2935265:0 Disassembling ModRetro M64 Pro Controller, Membranes and Buttons: crwdns2935265:03crwdnd2935265:03crwdnd2935265:03crwdne2935265:0
      • Gently pull three membranes from their pockets to expose the buttons and D pad.

      • Remove the buttons and the D-pad from the shell with tweezers or by hand. If you flip the shell over, they will fall out freely.

      • For reassembly, align the guide tabs on the buttons and rubber membranes to ensure proper orientation during reassembly.

      crwdns2952109:0crwdne2952109:0

      crwdns2917038:0crwdne2917038:0

    4. Disassembling ModRetro M64 Pro Controller, Thumb Stick Gate: crwdns2935265:04crwdnd2935265:01crwdnd2935265:02crwdne2935265:0 Disassembling ModRetro M64 Pro Controller, Thumb Stick Gate: crwdns2935265:04crwdnd2935265:02crwdnd2935265:02crwdne2935265:0
      • To remove the thumb stick gate, remove three screws using a Tri-wing Y1 Screwdriver.

      • Pull the Gate away from the front panel and set aside.

      crwdns2952109:0crwdne2952109:0

      crwdns2917038:0crwdne2917038:0

    5. Disassembling ModRetro M64 Pro Controller, Rumble Motor: crwdns2935265:05crwdnd2935265:01crwdnd2935265:03crwdne2935265:0 Disassembling ModRetro M64 Pro Controller, Rumble Motor: crwdns2935265:05crwdnd2935265:02crwdnd2935265:03crwdne2935265:0 Disassembling ModRetro M64 Pro Controller, Rumble Motor: crwdns2935265:05crwdnd2935265:03crwdnd2935265:03crwdne2935265:0
      • To prevent damaging the board, use ESD protection

      • Unplug the Rumble Motor cable connector from the PCB.

      • Remove one screw holding down the motor using the Y1 Tri-wing screwdriver.

      • Lift the motor away and set aside.

      crwdns2952109:0crwdne2952109:0

      crwdns2917038:0crwdne2917038:0

    6. Disassembling ModRetro M64 Pro Controller, Battery PCB: crwdns2935265:06crwdnd2935265:01crwdnd2935265:03crwdne2935265:0 Disassembling ModRetro M64 Pro Controller, Battery PCB: crwdns2935265:06crwdnd2935265:02crwdnd2935265:03crwdne2935265:0 Disassembling ModRetro M64 Pro Controller, Battery PCB: crwdns2935265:06crwdnd2935265:03crwdnd2935265:03crwdne2935265:0
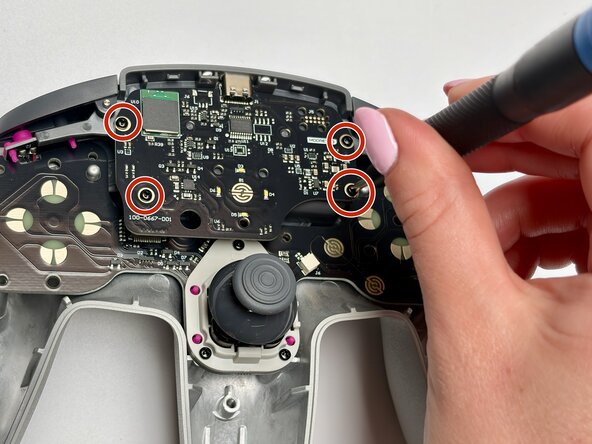
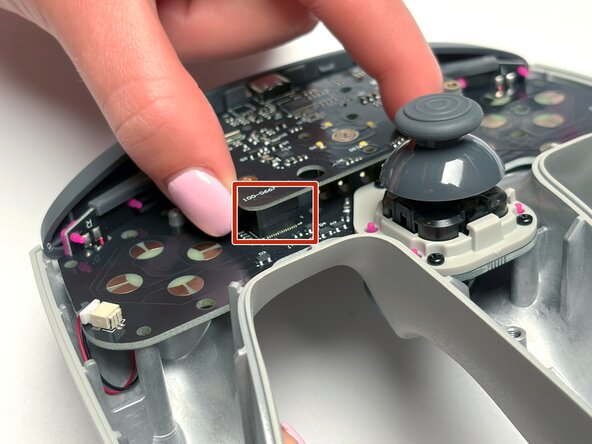
      • Unscrew four screws using a Tri-wing Y1 Screwdriver.

      • The upper battery PCB connects to the underlying main PCB via a board-to-board connector located near the bottom-left corner of the battery PCB (Image 2).

      • Gently wiggle the battery PCB to loosen up the connector before lifting the PCB vertically. Set them aside.

      crwdns2952109:0crwdne2952109:0

      crwdns2917038:0crwdne2917038:0

    7. Disassembling ModRetro M64 Pro Controller, Back Enclosure: crwdns2935265:07crwdnd2935265:01crwdnd2935265:03crwdne2935265:0 Disassembling ModRetro M64 Pro Controller, Back Enclosure: crwdns2935265:07crwdnd2935265:02crwdnd2935265:03crwdne2935265:0 Disassembling ModRetro M64 Pro Controller, Back Enclosure: crwdns2935265:07crwdnd2935265:03crwdnd2935265:03crwdne2935265:0
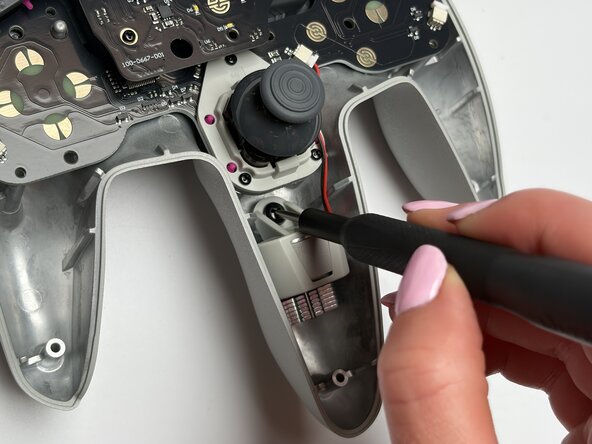
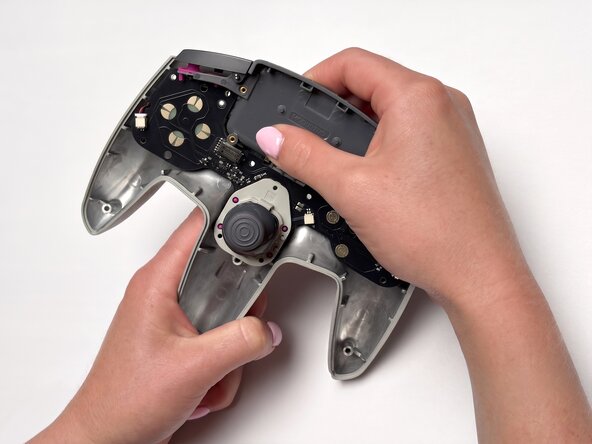
      • Unscrew three screws around the joystick using a Tri-wing Y1 Screwdriver.

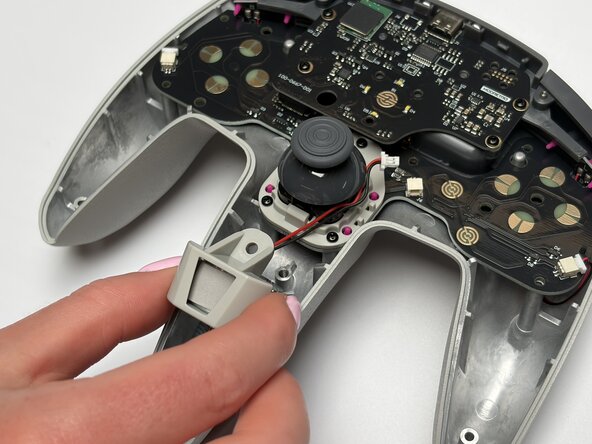
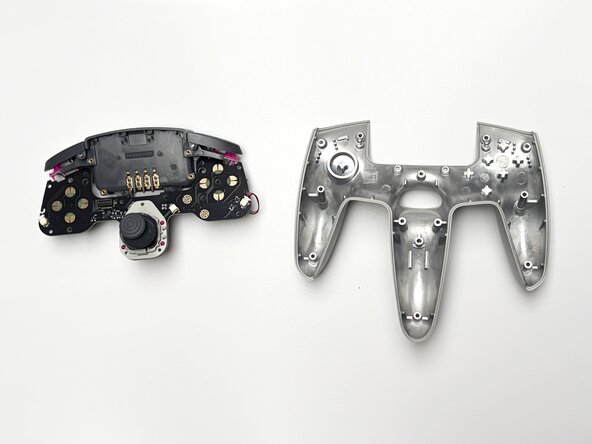
      • Grip the top of the battery compartment. Gently wiggle while pulling straight up to clear the two metal alignment pins and release the back enclosure.

      • You will experience some physical resistance here.

      • Separate the back enclosure from the PCB and battery compartment module, then set the enclosure aside.

      crwdns2952109:0crwdne2952109:0

      crwdns2917038:0crwdne2917038:0

    8. Disassembling ModRetro M64 Pro Controller, Battery Compartment: crwdns2935265:08crwdnd2935265:01crwdnd2935265:02crwdne2935265:0 Disassembling ModRetro M64 Pro Controller, Battery Compartment: crwdns2935265:08crwdnd2935265:02crwdnd2935265:02crwdne2935265:0
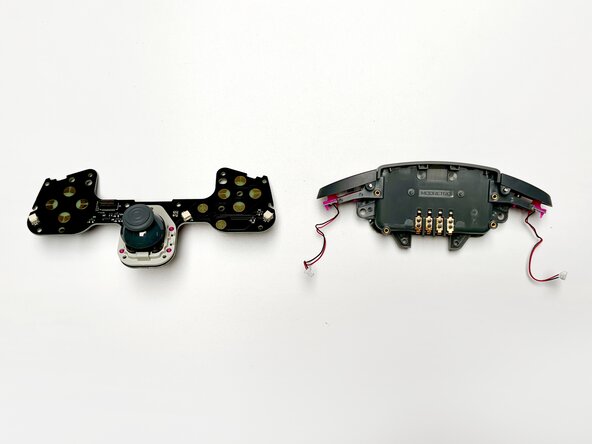
      • Disconnect two off-white connectors on each side. Use your fingers or tweezers to disconnect the connector.

      • Separate the PCB from the Battery Compartment and set aside.

      crwdns2952109:0crwdne2952109:0

      crwdns2917038:0crwdne2917038:0

    9. Disassembling ModRetro M64 Pro Controller, L/R Bumper Membrane: crwdns2935265:09crwdnd2935265:01crwdnd2935265:02crwdne2935265:0 Disassembling ModRetro M64 Pro Controller, L/R Bumper Membrane: crwdns2935265:09crwdnd2935265:02crwdnd2935265:02crwdne2935265:0
      • Slide the button membrane and bumper PCB on each side away from the battery compartment, then set them aside.

      crwdns2952109:0crwdne2952109:0

      crwdns2917038:0crwdne2917038:0

    10. Disassembling ModRetro M64 Pro Controller, Thumb Stick: crwdns2935265:010crwdnd2935265:01crwdnd2935265:03crwdne2935265:0 Disassembling ModRetro M64 Pro Controller, Thumb Stick: crwdns2935265:010crwdnd2935265:02crwdnd2935265:03crwdne2935265:0 Disassembling ModRetro M64 Pro Controller, Thumb Stick: crwdns2935265:010crwdnd2935265:03crwdnd2935265:03crwdne2935265:0
      • Firmly pull the thumbstick cap straight up to remove it from the press-fit connection.

      • Pinch the top and bottom retaining snap-wings on the thumbstick module, then pull the module straight out from the main gray shell.

      • Put the Thumb Stick cap and module aside.

      crwdns2952109:0crwdne2952109:0

      crwdns2917038:0crwdne2917038:0

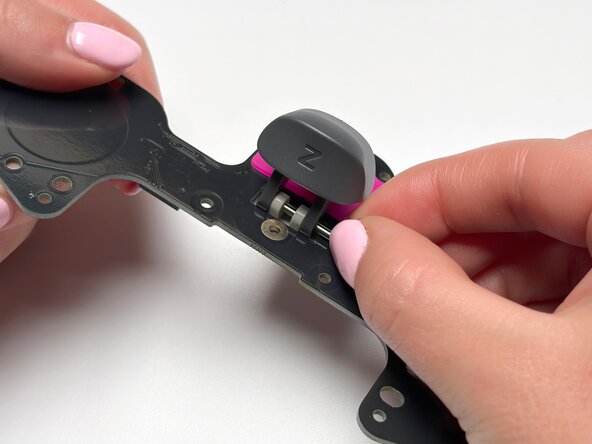
    11. Disassembling ModRetro M64 Pro Controller, Z Trigger: crwdns2935265:011crwdnd2935265:01crwdnd2935265:03crwdne2935265:0 Disassembling ModRetro M64 Pro Controller, Z Trigger: crwdns2935265:011crwdnd2935265:02crwdnd2935265:03crwdne2935265:0 Disassembling ModRetro M64 Pro Controller, Z Trigger: crwdns2935265:011crwdnd2935265:03crwdnd2935265:03crwdne2935265:0
      • Push one side of the Z-trigger hinge pin and pull it out from the opposite side to remove it.

      • Gently pull the membrane from the PCB.

      • To reinstall the membrane, feed the alignment legs through their respective holes. Grip the legs from the other side and pull gently until they are fully seated.

      • Remove the front gray holder

      crwdns2952109:0crwdne2952109:0

      crwdns2917038:0crwdne2917038:0

crwdns2915888:0crwdne2915888:0

To reassemble your device, follow these instructions in reverse order.

crwdns2935221:0crwdne2935221:0

tmai_modretro

crwdns2935283:007/15/26crwdne2935283:0

409 crwdns2915208:0crwdne2915208:0

crwdns2935297:02crwdne2935297:0

crwdns2947412:00crwdne2947412:0

crwdns2917038:0crwdne2917038:0

crwdns2936625:0crwdne2936625:0:

crwdns2936751:024crwdne2936751:0 26

crwdns2936753:07crwdne2936753:0 137

crwdns2936753:030crwdne2936753:0 540

crwdns2942667:0crwdne2942667:0 665