crwdns2915892:0crwdne2915892:0
Disassembling the printer is relatively simple, and involving only one screw being removed and some cables being unplugged.
crwdns2942213:0crwdne2942213:0
-
-
Pull down both front panels to open the printer. Lift the scanner flap upward by pulling down on it; there are two mouth pieces that need to be pulled down.
-
Adjust the flap covering the scanner upward, as shown.
-
-
-
Pull the scanner flap gently away from the printer to release its two clips.
-
-
-
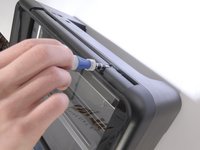
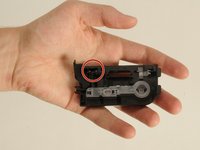
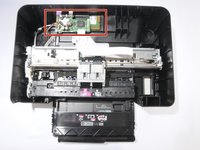
Locate the three screws on top of the printer.
-
The orange circle shows a fourth screw located behind the power panel. Ignore this one for now, as directions to remove this screw are in Step 5.
-
-
-
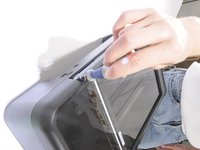
Using a T-9 screwdriver, remove the three screws from the printer's top.
-
-
-
-
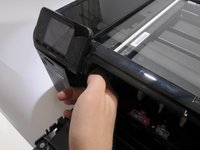
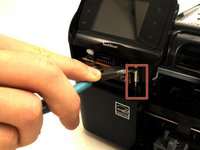
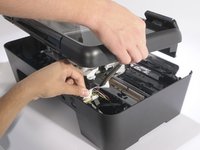
Reach inside the printer's front opening.
-
Press the small clip behind the power button.
-
Pull the panel out from right to left.
-
-
-
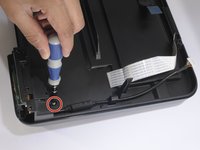
Remove the fourth screw, which was covered by the power button panel.
-
-
-
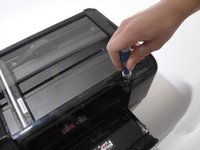
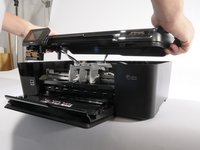
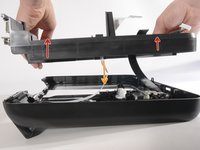
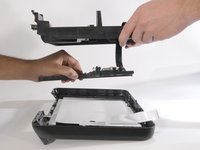
Have one person lift the hood 2-3 inches.
-
Have the other person disconnect the three cables from the motherboard (the green PCB) to the hood by gently pulling upward on them.
-
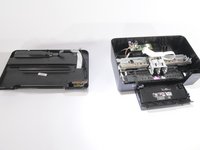
Remove the hood completely.
-
-
-
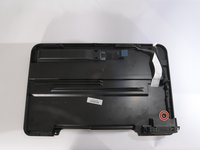
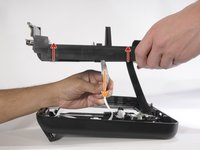
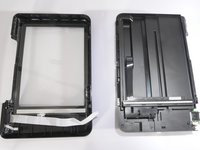
Remove the single T-9 screw from the hood's underside, as shown.
-
-
-
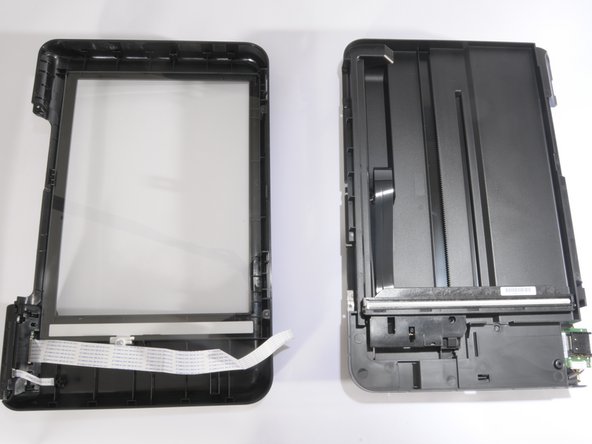
With the screw removed, separate the two pieces of the hood by lifting it vertically.
-
Carefully pull down the white ribbon cable through the top piece of the hood.
-
-
hi, can assist me on how to replace encoder strip hp d110a. thanks


To reassemble your device, follow these instructions in reverse order.
To reassemble your device, follow these instructions in reverse order.
crwdns2935221:0crwdne2935221:0
crwdns2935229:019crwdne2935229:0
crwdns2915084:0crwdne2915084:0

Cal Poly, Team 10-38, Forte Spring 2011 crwdns2935289:0Cal Poly, Team 10-38, Forte Spring 2011crwdne2935289:0
CPSU-FORTE-S11S10G38
crwdns2931471:05crwdne2931471:0
crwdns2935297:010crwdne2935297:0
crwdns2947412:09crwdne2947412:0
Thanks for this guide. I never would have found that fourth screw without this guide. The illustration of the "clip" for removal of the power quadrant face could have been more detailed and/or you could have said in the description, "Feel for the TAB on the right center of the power button quadrant behind the "cartridge door open" feeler and push it toward the outside of the printer". Other than that, this was great.
Hi Joseph,
Thanks for the guide. Very easy to follow. Saved me some dollars.
Great Support,.!!!
I am a handy person and a Computer tech for family and friends,.
Some time You just need Instruction on how to do do things, Other wise You taking the risks of braking things instead of fixing them
Thanks Guys
Thank you for posting this. In place of the pliers, I recommend using a small reversible ratchet offset (mine was 3-1/4"W x 6-3/4"L x 1/2"H) to remove the 4th screw. It won't slide of the screw like pliers and will make both the removal and replacement much easier.
Where can I find spare parts for HP PSC photosmart D110?
Regards
Hi please I need some help I have this printer and I can’t print wireless I have an Error says
server connection error
There was a problem conectinng to the server
I try everything no luck I resetting a factory default
no working please sent me any information thanks
Hi I have the same printer I used with the WiFi
all the time I change the company Internet now I can’t connect WiFi I have a message saying
server connection error !!!
please help I did a reset no luck please instructions
how to fix it thanks.
Does anyone know whee to purchase parts for the D110? I just need several parts…the drive belt for the print head mechanism, and one of the cam operated stops that keeps the print head from moving to the right side of the mechanism. Thanks for any information available. 3-19-2020
Harry
It was very helpful