crwdns2933423:0crwdne2933423:0

Disassembling HP Pavilion g7-2275dx Front Panel

crwdns2862623:0crwdne2862623:0
crwdns2942641:0crwdne2942641:0

crwdns2942213:0crwdne2942213:0

  1. Disassembling HP Pavilion g7-2275dx Front Panel, Front Panel: crwdns2935265:01crwdnd2935265:01crwdnd2935265:01crwdne2935265:0
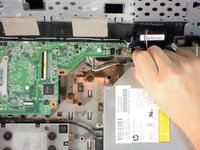
    • Unscrew the four 7 mm Phillips #1 screws on the board.

  2. Disassembling HP Pavilion g7-2275dx Front Panel: crwdns2935265:02crwdnd2935265:01crwdnd2935265:03crwdne2935265:0 Disassembling HP Pavilion g7-2275dx Front Panel: crwdns2935265:02crwdnd2935265:02crwdnd2935265:03crwdne2935265:0 Disassembling HP Pavilion g7-2275dx Front Panel: crwdns2935265:02crwdnd2935265:03crwdnd2935265:03crwdne2935265:0
    • Use a plastic opening tool to lift the white clip up, towards the screen.

    • Pull the white cable with blue head, away from the clip.

  3. Disassembling HP Pavilion g7-2275dx Front Panel: crwdns2935265:03crwdnd2935265:01crwdnd2935265:02crwdne2935265:0 Disassembling HP Pavilion g7-2275dx Front Panel: crwdns2935265:03crwdnd2935265:02crwdnd2935265:02crwdne2935265:0
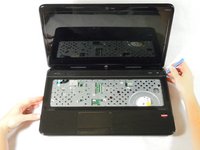
    • With a plastic opening tool, pry open a side or corner of the top panel. Slide the tool around the rest of the panel to release it from the clips.

    • If you have to use a large amount of force, you may not have removed all the necessary screws. Double check to ensure you have.

    • You should hear clips releasing from the board.

  4. Disassembling HP Pavilion g7-2275dx Front Panel: crwdns2935265:04crwdnd2935265:01crwdnd2935265:01crwdne2935265:0
    • Lifting the top panel too quickly or forcefully may damage the speaker cable, which is still attached underneath.

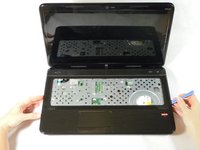
    • Rotate the top panel away from you, keeping the back near the hinge of the laptop to avoid damaging the speaker cable.

  5. Disassembling HP Pavilion g7-2275dx Front Panel: crwdns2935265:05crwdnd2935265:01crwdnd2935265:02crwdne2935265:0 Disassembling HP Pavilion g7-2275dx Front Panel: crwdns2935265:05crwdnd2935265:02crwdnd2935265:02crwdne2935265:0
    • Using a plastic opening tool, disconnect the black speaker connector from the top right of the motherboard.

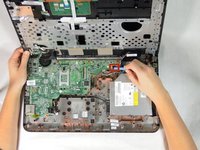
    • Set aside the top panel until your are ready to reassemble your laptop.

crwdns2915888:0crwdne2915888:0

To reassemble your device, follow these instructions in reverse order.

Erik Miller

crwdns2935283:004/22/14crwdne2935283:0

2,141 crwdns2915208:0crwdne2915208:0

crwdns2935297:04crwdne2935297:0

crwdns2915084:0crwdne2915084:0

Cal Poly, Team 11-51, Amido Spring 2014 crwdns2935289:0Cal Poly, Team 11-51, Amido Spring 2014crwdne2935289:0

CPSU-AMIDO-S14S11G51

crwdns2931471:04crwdne2931471:0

crwdns2935297:021crwdne2935297:0

crwdns2947412:00crwdne2947412:0

crwdns2917038:0crwdne2917038:0

crwdns2936625:0crwdne2936625:0:

crwdns2936751:024crwdne2936751:0 2

crwdns2936753:07crwdne2936753:0 12

crwdns2936753:030crwdne2936753:0 13

crwdns2942667:0crwdne2942667:0 69