crwdns2933423:0crwdne2933423:0

Disassembling Galaxy Tab S 10.5 Back Rim Cover

crwdns2862623:0crwdne2862623:0
crwdns2942641:0crwdne2942641:0

crwdns2942213:0crwdne2942213:0

  1. Disassembling Galaxy Tab S 10.5 Back Rim Cover, Disassembling Galaxy Tab S 10.5 Back Cover: crwdns2935265:01crwdnd2935265:01crwdnd2935265:02crwdne2935265:0 Disassembling Galaxy Tab S 10.5 Back Rim Cover, Disassembling Galaxy Tab S 10.5 Back Cover: crwdns2935265:01crwdnd2935265:02crwdnd2935265:02crwdne2935265:0
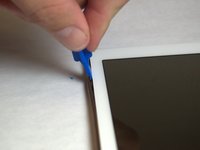
    • Place the plastic opening tool into the SD card slot or charge port.

    • Try in an upward motion until you see a separation between the tablet and back cover.

  2. Disassembling Galaxy Tab S 10.5 Back Rim Cover: crwdns2935265:02crwdnd2935265:01crwdnd2935265:01crwdne2935265:0
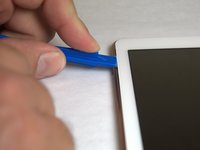
    • Work around the entire device by sliding the plastic opening tool around the rim.

    • If this is the first time, it will be hard to separate the back cover from the tablet.

    • The clips are approximately 5 cm apart. While working around the device, the clips will make a dislocating sound when disconnected.

  3. Disassembling Galaxy Tab S 10.5 Back Rim Cover: crwdns2935265:03crwdnd2935265:01crwdnd2935265:01crwdne2935265:0
    • Remove the back cover once all links have been separated.

    • Be careful when touching any of the internal components of the tablet.

  4. Disassembling Galaxy Tab S 10.5 Back Rim Cover, Back Rim Cover: crwdns2935265:04crwdnd2935265:01crwdnd2935265:03crwdne2935265:0 Disassembling Galaxy Tab S 10.5 Back Rim Cover, Back Rim Cover: crwdns2935265:04crwdnd2935265:02crwdnd2935265:03crwdne2935265:0 Disassembling Galaxy Tab S 10.5 Back Rim Cover, Back Rim Cover: crwdns2935265:04crwdnd2935265:03crwdnd2935265:03crwdne2935265:0
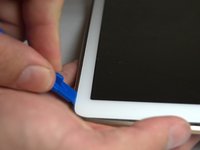
    • Place the plastic opening tool in between the outer rim.

    • Move the tool in a downward motion to separate the 2 parts.

    • Run the tool along the rim to disconnect all connectors holding the outer rim to the back of the device.

  5. Disassembling Galaxy Tab S 10.5 Back Rim Cover: crwdns2935265:05crwdnd2935265:01crwdnd2935265:01crwdne2935265:0
    • Repeat this step for all four sides, then remove the rim.

crwdns2915888:0crwdne2915888:0

To reassemble your device, follow these instructions in reverse order.

crwdns2935227:0crwdne2935227:0

Jordan Soto

crwdns2935283:008/26/15crwdne2935283:0

3,276 crwdns2915208:0crwdne2915208:0

crwdns2935297:06crwdne2935297:0

crwdns2915084:0crwdne2915084:0

USF Tampa, Team 3-2, Eyestone Fall 2015 crwdns2935289:0USF Tampa, Team 3-2, Eyestone Fall 2015crwdne2935289:0

USFT-EYESTONE-F15S3G2

crwdns2931471:03crwdne2931471:0

crwdns2935297:020crwdne2935297:0

crwdns2947412:00crwdne2947412:0

crwdns2917038:0crwdne2917038:0

crwdns2936625:0crwdne2936625:0:

crwdns2936751:024crwdne2936751:0 0

crwdns2936753:07crwdne2936753:0 0

crwdns2936753:030crwdne2936753:0 0

crwdns2942667:0crwdne2942667:0 185