crwdns2915892:0crwdne2915892:0
We'll remove the top cover from the device, allowing the other components to be seen and replaced or repaired.
crwdns2942213:0crwdne2942213:0
-
-
Flip your device over so the bottom panel is facing up.
-
To remove the old battery from the laptop, first unscrew the eight screws (size M2.5x8) from the bottom with a Phillips #0 screwdriver, this will allow the removal of the keyboard and front panel.
-
-
-
-
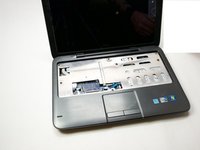
Flip the device over again and open the laptop so that you have access to the keyboard. There are hooks on the bottom of the keyboard, but gently pulling the keyboard towards the monitor will allow it to pull out easily. Be sure to unclamp the ribbon cable. Remove the three screws under the keyboard.
-
Remove the three plastic Keyboard and trackpad connectors (these are labeled with a blue circle on the second photograph).
-
-
-
Next, remove the top cover from the device using the plastic opening tools. It snaps in on the sides, so don't worry if you hear it unsnapping; it's not breaking.
Before trying to remove the top cover, make sure to remove the 4 srcews that were hidden under the keyboard and also two additional screws on the bottom, otherwise you will damage the top cover. If you remove all the screws, the cover will come off a lot easier :-)
-


To reassemble your device, follow these instructions in reverse order.
To reassemble your device, follow these instructions in reverse order.
crwdns2935221:0crwdne2935221:0
crwdns2935229:02crwdne2935229:0
crwdns2915084:0crwdne2915084:0

UW Tacoma, Team 1-1, Liner SU 2015 crwdns2935289:0UW Tacoma, Team 1-1, Liner SU 2015crwdne2935289:0
UWT-LINER-SU15S1G1
crwdns2931471:03crwdne2931471:0
crwdns2935297:04crwdne2935297:0
crwdns2947410:01crwdne2947410:0
Can I get a broken screen
There are seven screws, not eight. You need to slide away to cover to get to the seventh screw near the Windows 7 label.
There are two more screws (in the bottom of the picture) that need to be removed before the top cover can be removed.
Chiel Kersten - crwdns2934203:0crwdne2934203:0
What is the battery name or number for replacement?
Emma Cabrera - crwdns2934203:0crwdne2934203:0
Also remove the 2 screws under the slide away at the bottom of the picture is they are present
Gresh - crwdns2934203:0crwdne2934203:0
Battery is marked as "Type WW12P"
Gresh - crwdns2934203:0crwdne2934203:0