crwdns2933423:0crwdne2933423:0

Disassembling Canon PowerShot A590 IS Front Cover

crwdns2942213:0crwdne2942213:0

  1. Disassembling Canon PowerShot A590 IS Front Cover, Batteries: crwdns2935265:01crwdnd2935265:01crwdnd2935265:02crwdne2935265:0 Disassembling Canon PowerShot A590 IS Front Cover, Batteries: crwdns2935265:01crwdnd2935265:02crwdnd2935265:02crwdne2935265:0
    • The battery hatch is on the bottom of the camera.

    • CAUTION: Locate the switch to open the hatch and push gently toward the front of the camera. Too much force can break the hatch.

    • While the switch is pushed forward, pull the cover away from the camera.

  2. Disassembling Canon PowerShot A590 IS Front Cover: crwdns2935265:02crwdnd2935265:01crwdnd2935265:01crwdne2935265:0
    • This camera requires AA batteries.

    • To remove batteries, simply allow them to fall out of the camera.

    • Use a fingernail to lift the clock battery out of the camera.

  3. Disassembling Canon PowerShot A590 IS Front Cover: crwdns2935265:03crwdnd2935265:01crwdnd2935265:01crwdne2935265:0
    • When replacing the AA batteries, verify they are oriented correctly by following the (+) and (-) signs on the camera.

  4. Disassembling Canon PowerShot A590 IS Front Cover, Back Cover: crwdns2935265:04crwdnd2935265:01crwdnd2935265:01crwdne2935265:0
    • Remove the screw located under the rubber flap on the left side of the camera using a Phillips #00 screwdriver.

  5. Disassembling Canon PowerShot A590 IS Front Cover: crwdns2935265:05crwdnd2935265:01crwdnd2935265:01crwdne2935265:0
    • Remove the two screws located on the other side of the camera using a Phillips #00 screwdriver.

  6. Disassembling Canon PowerShot A590 IS Front Cover: crwdns2935265:06crwdnd2935265:01crwdnd2935265:01crwdne2935265:0
    • Remove the three screws located at the bottom of the camera using a Phillips #00 screwdriver.

  7. Disassembling Canon PowerShot A590 IS Front Cover: crwdns2935265:07crwdnd2935265:01crwdnd2935265:01crwdne2935265:0
    • Open the battery cover.

    • Using the iFixit opening tool, push up gently around all edges of the camera.

  8. Disassembling Canon PowerShot A590 IS Front Cover, Remove Lens Cover: crwdns2935265:08crwdnd2935265:01crwdnd2935265:01crwdne2935265:0
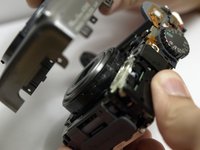
    • Press and hold down the button shown in the blue circle.

    • While pressing the button, rotate the lens cover in a counter-clockwise direction to remove it.

  9. Disassembling Canon PowerShot A590 IS Front Cover, Remove Front Cover: crwdns2935265:09crwdnd2935265:01crwdnd2935265:02crwdne2935265:0 Disassembling Canon PowerShot A590 IS Front Cover, Remove Front Cover: crwdns2935265:09crwdnd2935265:02crwdnd2935265:02crwdne2935265:0
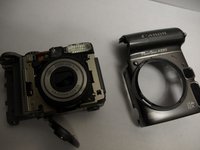
    • Remove the front cover of the camera.

    • This may require a bit of force.

crwdns2915888:0crwdne2915888:0

To reassemble your device, follow these instructions in reverse order.

crwdns2935229:05crwdne2935229:0

Zach

crwdns2935283:010/11/10crwdne2935283:0

281 crwdns2915208:0crwdne2915208:0

crwdns2935297:06crwdne2935297:0

crwdns2915084:0crwdne2915084:0

Cal Poly, Team 9-19, Regan Fall 2010 crwdns2935289:0Cal Poly, Team 9-19, Regan Fall 2010crwdne2935289:0

CPSU-REGAN-F10S9G19

crwdns2931471:04crwdne2931471:0

crwdns2935297:014crwdne2935297:0

crwdns2944067:03crwdne2944067:0

The photos do not show a camera strap, and the instructions don't mention it. Before starting disassembly, I advise removing the camera strap. It make it easier to remove and re-attach the back cover.

jwoconnor - crwdns2934203:0crwdne2934203:0

A handy guide. I had an A590IS with a broken battery door latch on the camera body, and I managed to obtain a dead A590IS with a fully intact latch for free. So using this guide I swapped the body shells over! All fixed and working again!

brianinnes81 - crwdns2934203:0crwdne2934203:0

l cannot get an answer to my question on why my Canon A590 will not power on.

burks817 - crwdns2934203:0crwdne2934203:0

crwdns2917038:0crwdne2917038:0

crwdns2936625:0crwdne2936625:0:

crwdns2936751:024crwdne2936751:0 3

crwdns2936753:07crwdne2936753:0 7

crwdns2936753:030crwdne2936753:0 15

crwdns2942667:0crwdne2942667:0 14,638