crwdns2915892:0crwdne2915892:0
This guide describes the steps to opening the case.
crwdns2942213:0crwdne2942213:0
-
-
Remove 2 screws from each side of the amplifier.
-
-
-
Remove 2 screws on rear of device. Slide top cover up and back from main case.
-
-
-
-
Remove 3 screws on bottom of case.
-
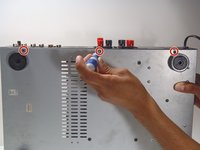
Remove 13 screws on rear panel.
-
-
-
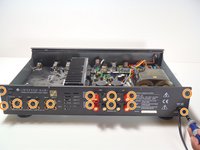
Using a pair of pliers, squeeze the retainer for the power cord as shown and pull it toward the external side the panel.
-
It may require some wiggling, but it should slip out of the hole and then off of the cord.
-


To reassemble your device, follow these instructions in reverse order.
To reassemble your device, follow these instructions in reverse order.
crwdns2935221:0crwdne2935221:0
crwdns2935229:03crwdne2935229:0

crwdns2915084:0crwdne2915084:0

Cal Poly, Team 28-36, Regan Spring 2010 crwdns2935289:0Cal Poly, Team 28-36, Regan Spring 2010crwdne2935289:0
CPSU-REGAN-S10S28G36
crwdns2931471:04crwdne2931471:0
crwdns2935297:03crwdne2935297:0