crwdns2933423:0crwdne2933423:0

Disassembling Breville BKC600XL Bottom Covers

crwdns2862623:0crwdne2862623:0
crwdns2942641:0crwdne2942641:0

crwdns2942213:0crwdne2942213:0

  1. Disassembling Breville BKC600XL Bottom Covers, Bottom Cover #1: crwdns2935265:01crwdnd2935265:01crwdnd2935265:03crwdne2935265:0 Disassembling Breville BKC600XL Bottom Covers, Bottom Cover #1: crwdns2935265:01crwdnd2935265:02crwdnd2935265:03crwdne2935265:0 Disassembling Breville BKC600XL Bottom Covers, Bottom Cover #1: crwdns2935265:01crwdnd2935265:03crwdnd2935265:03crwdne2935265:0
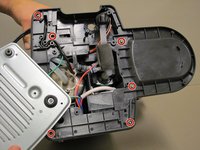
    • Use a Phillips #0 screwdriver to remove the following ten screws:

    • Four 18mm Phillips screws.

    • Four 9.75mm Phillips screws.

    • Two 8mm Phillips screws.

    • The cover will not remove entirely. Keep green ground wire attached to the cover.

  2. Disassembling Breville BKC600XL Bottom Covers, Black Water Inlet: crwdns2935265:02crwdnd2935265:01crwdnd2935265:02crwdne2935265:0 Disassembling Breville BKC600XL Bottom Covers, Black Water Inlet: crwdns2935265:02crwdnd2935265:02crwdnd2935265:02crwdne2935265:0
    • Remove the two 14.5 Phillips screws.

    • Ensure that only the water inlet valve can be moved.

  3. Disassembling Breville BKC600XL Bottom Covers, Bottom Cover #2: crwdns2935265:03crwdnd2935265:01crwdnd2935265:02crwdne2935265:0 Disassembling Breville BKC600XL Bottom Covers, Bottom Cover #2: crwdns2935265:03crwdnd2935265:02crwdnd2935265:02crwdne2935265:0
    • Use a Phillips #0 screwdriver to remove the following six screws:

    • Six 14.5mm Phillips screws.

  4. Disassembling Breville BKC600XL Bottom Covers, Power Cord: crwdns2935265:04crwdnd2935265:01crwdnd2935265:02crwdne2935265:0 Disassembling Breville BKC600XL Bottom Covers, Power Cord: crwdns2935265:04crwdnd2935265:02crwdnd2935265:02crwdne2935265:0
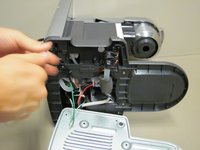
    • Remove the power cord from the groove. (the black cord that leads into the green wire.)

    • This creates more slack in the wire to give you more room to work with.

    • DO NOT remove green wire from the cover its attached to.

crwdns2915888:0crwdne2915888:0

To reassemble your device, follow these instructions in reverse order.

Antonio

crwdns2935283:009/26/12crwdne2935283:0

135 crwdns2915208:0crwdne2915208:0

crwdns2935297:06crwdne2935297:0

crwdns2915084:0crwdne2915084:0

Cal Poly, Team 1-3, Propen Fall 2012 crwdns2935289:0Cal Poly, Team 1-3, Propen Fall 2012crwdne2935289:0

CPSU-PROPEN-F12S1G3

crwdns2931471:04crwdne2931471:0

crwdns2935297:018crwdne2935297:0

crwdns2947412:00crwdne2947412:0

crwdns2917038:0crwdne2917038:0

crwdns2936625:0crwdne2936625:0:

crwdns2936751:024crwdne2936751:0 0

crwdns2936753:07crwdne2936753:0 0

crwdns2936753:030crwdne2936753:0 1

crwdns2942667:0crwdne2942667:0 1,854