crwdns2915892:0crwdne2915892:0
This repair is necessary if the motherboard of the Digital2 D2-912 becomes defective at any point. Repairing the motherboard will help overall performance, as it establishes a connection from the hardware of the device to the processor. Special skills are not required to complete this repair. This manual highlights the necessary steps and tools for successful completion.
crwdns2942213:0crwdne2942213:0
-
-
Remove the two Phillips #00 screws from the bottom of the case.
-
-
-
Wedge the opening tool in the space between the back and the front of the tablet.
-
Carefully work your way around the perimeter, wedging the opening tool between the front and back of the tablet.
-
When the back of the tablet is mostly detached from the front, carefully pull it away completely.
-
-
-
crwdns2935267:0crwdne2935267:0Desoldering Pump$3.99
-
Remove the wires shown in the image, using a soldering iron and solder sucker.
-
-
-
Use the Phillips #00 screwdriver to remove the three screws from motherboard.
-
-
-
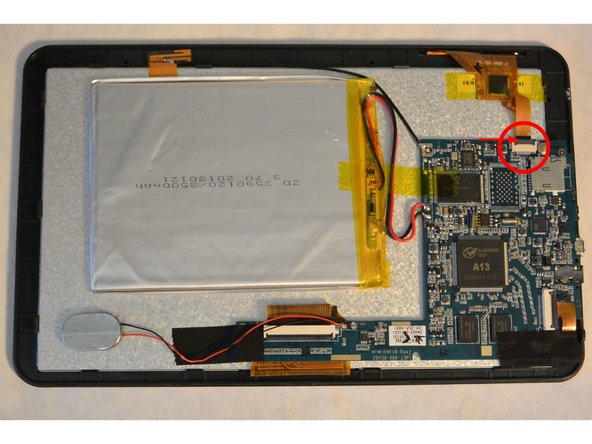
Detach the capacitive touch controller from the motherboard.
-
Carefully pry the narrow black connector upward to release the ribbon.
-
Remove the ribbon from the connector.
-
-
-
Locate the camera found in the image.
-
Carefully pry the black connector upward to release ribbon.
-
Remove the black tape to release the camera from the motherboard.
-
Remove the ribbon from the connector.
-
Remove and replace the motherboard.
-


To reassemble your device, follow these instructions in reverse order.
To reassemble your device, follow these instructions in reverse order.
crwdns2935221:0crwdne2935221:0
crwdns2935229:02crwdne2935229:0
crwdns2915084:0crwdne2915084:0

IUPUI, Team 1-1, Harley Fall 2015 crwdns2935289:0IUPUI, Team 1-1, Harley Fall 2015crwdne2935289:0
IUPUI-HARLEY-F15S1G1
crwdns2931471:04crwdne2931471:0
crwdns2935297:06crwdne2935297:0