crwdns2933423:0crwdne2933423:0

Digiland DL1168A Rear Case Replacement

crwdns2942213:0crwdne2942213:0

  1. Digiland DL1168A Rear Case Replacement, Rear Case: crwdns2935265:01crwdnd2935265:01crwdnd2935265:01crwdne2935265:0
    • Using an opening tool, begin softly prying open device by first inserting it in between the front and back panels.

    • Continue prying the edges while moving around the device's perimeter until the back can be easily removed.

  2. Digiland DL1168A Rear Case Replacement: crwdns2935265:02crwdnd2935265:01crwdnd2935265:02crwdne2935265:0 Digiland DL1168A Rear Case Replacement: crwdns2935265:02crwdnd2935265:02crwdnd2935265:02crwdne2935265:0
    • Carefully lift back panel away from the body of the device.

    • Be gentle when lifting the back panel. The speaker wires are still connected to both the front and back panel.

  3. Digiland DL1168A Rear Case Replacement: crwdns2935265:03crwdnd2935265:01crwdnd2935265:02crwdne2935265:0 Digiland DL1168A Rear Case Replacement: crwdns2935265:03crwdnd2935265:02crwdnd2935265:02crwdne2935265:0
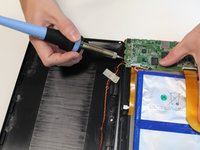
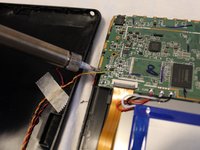
    • Desolder the four wires connecting the rear case to the motherboard.

    • Disconnect the wires from the motherboard.

    • Remove the rear case from the device.

crwdns2915888:0crwdne2915888:0

To reassemble your device, follow these instructions in reverse order.

Ryan Barker

crwdns2935283:010/15/19crwdne2935283:0

217 crwdns2915208:0crwdne2915208:0

crwdns2935297:02crwdne2935297:0

crwdns2915084:0crwdne2915084:0

Grand Valley State University, Team S1-G1, DeVasto Fall 2019 crwdns2935289:0Grand Valley State University, Team S1-G1, DeVasto Fall 2019crwdne2935289:0

GVSU-DEVASTO-F19S1G1

crwdns2931471:04crwdne2931471:0

crwdns2935297:04crwdne2935297:0

crwdns2947412:00crwdne2947412:0

crwdns2917038:0crwdne2917038:0

crwdns2936625:0crwdne2936625:0:

crwdns2936751:024crwdne2936751:0 0

crwdns2936753:07crwdne2936753:0 0

crwdns2936753:030crwdne2936753:0 3

crwdns2942667:0crwdne2942667:0 143