crwdns2915892:0crwdne2915892:0
If one or both of the footswitches works inconsistently or not at all, refer to this guide.
crwdns2942213:0crwdne2942213:0
-
-
Remove the four 8mm Phillips #0 screws located on the back panel.
 crwdns2952109:0crwdne2952109:0
-
-
-
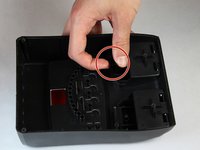
Remove the back panel to expose the motherboard.
-
-
-
-
Remove the two 11mm #0 Phillips screws located at the bottom of the motherboard.
-
-
-
Lift the indented end of the motherboard opposite the input/output jacks. Then, pull away from the input/output jacks to slide the motherboard out of the casing.
-
-
-
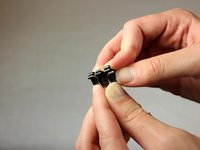
Pull firmly on the binder clips that are holding the footswitches in place to remove them.
-
-
-
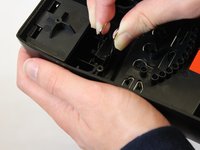
Pull the footswitch down and upwards to remove it from the casing.
-


To reassemble your device, follow these instructions in reverse order.
crwdns2935221:0crwdne2935221:0
crwdns2935229:02crwdne2935229:0
crwdns2935287:0crwdne2935287:0

Appalachian State University, Team S2-G2, Menagarishvili Fall 2018 crwdns2935289:0Appalachian State University, Team S2-G2, Menagarishvili Fall 2018crwdne2935289:0
APSU-MENAGARISHVILI-F18S2G2
crwdns2931471:03crwdne2931471:0
crwdns2935297:06crwdne2935297:0
crwdns2947410:01crwdne2947410:0
So what is the fix? Replacing both foot switches with new ones? Or removing them and reinstalling them will fix the problem of them not working at all? What’s Step 7? If you stop after completing Step 6 you now just have a casing without foot switches. What will fix the problem of them not working qt all after removing the foot switches?
Carl - crwdns2934203:0crwdne2934203:0 crwdns2950251:0crwdne2950251:0