crwdns2933423:0crwdne2933423:0

DigiLand DL8006 Speaker Replacement

crwdns2942213:0crwdne2942213:0

  1. DigiLand DL8006 Speaker Replacement, Speaker: crwdns2935265:01crwdnd2935265:01crwdnd2935265:01crwdne2935265:0
    • Begin by opening the device around its edge using the iFixit opening tool.

  2. DigiLand DL8006 Speaker Replacement: crwdns2935265:02crwdnd2935265:01crwdnd2935265:02crwdne2935265:0 DigiLand DL8006 Speaker Replacement: crwdns2935265:02crwdnd2935265:02crwdnd2935265:02crwdne2935265:0
    • Remove the metallic tape that covers the lower section of the battery.

  3. DigiLand DL8006 Speaker Replacement: crwdns2935265:03crwdnd2935265:01crwdnd2935265:02crwdne2935265:0 DigiLand DL8006 Speaker Replacement: crwdns2935265:03crwdnd2935265:02crwdnd2935265:02crwdne2935265:0
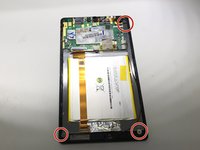
    • Remove the three battery screws using a Phillips #0 screwdriver.

  4. DigiLand DL8006 Speaker Replacement: crwdns2935265:04crwdnd2935265:01crwdnd2935265:03crwdne2935265:0 DigiLand DL8006 Speaker Replacement: crwdns2935265:04crwdnd2935265:02crwdnd2935265:03crwdne2935265:0 DigiLand DL8006 Speaker Replacement: crwdns2935265:04crwdnd2935265:03crwdnd2935265:03crwdne2935265:0
    crwdns2935267:0crwdne2935267:0
    Tweezers
    $4.99
    crwdns2942207:0crwdne2942207:0
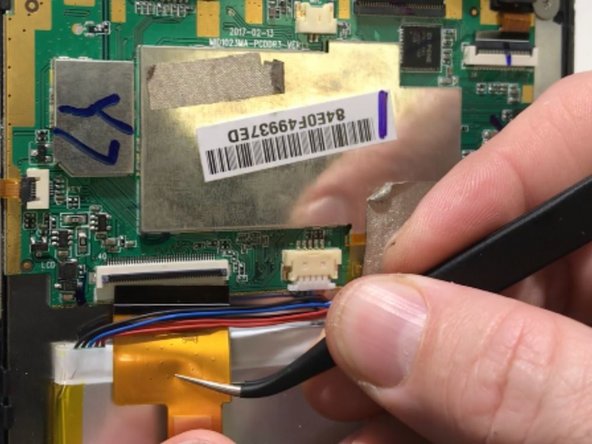
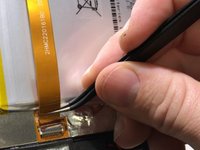
    • Pop up the locking tab of the ZIF connector using tweezers, and carefully pull the cable out from the motherboard.

    • Make sure the ribbon passes under the microphone wiring to avoid damage to the components.

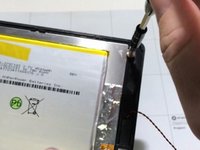
    • Remove the lower section of the ribbon cable repeating the previous bullet.

  5. DigiLand DL8006 Speaker Replacement: crwdns2935265:05crwdnd2935265:01crwdnd2935265:01crwdne2935265:0
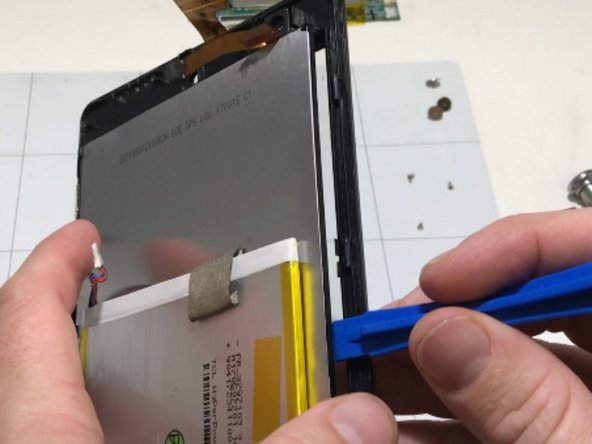
    • Remove the battery from the phone using the iFixit opening tool or the spudger.

  6. DigiLand DL8006 Speaker Replacement: crwdns2935265:06crwdnd2935265:01crwdnd2935265:02crwdne2935265:0 DigiLand DL8006 Speaker Replacement: crwdns2935265:06crwdnd2935265:02crwdnd2935265:02crwdne2935265:0
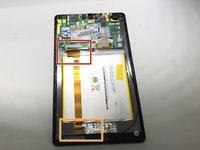
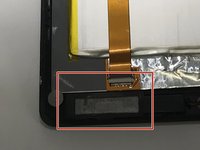
    • Finally, remove the speaker from the tablet using the spudger.

    • In this image, a screwdriver was used to pry the speaker from its housing. You should use an ESD-safe tool to avoid causing damage to your device.

crwdns2915888:0crwdne2915888:0

To reassemble your device, follow these instructions in reverse order.

Alec Trela

crwdns2935283:010/30/19crwdne2935283:0

327 crwdns2915208:0crwdne2915208:0

crwdns2935297:02crwdne2935297:0

crwdns2915084:0crwdne2915084:0

University of Memphis, Team S2-G5, Kim Fall 2019 crwdns2935289:0University of Memphis, Team S2-G5, Kim Fall 2019crwdne2935289:0

UM-KIM-F19S2G5

crwdns2931471:03crwdne2931471:0

crwdns2935297:05crwdne2935297:0

crwdns2944067:00crwdne2944067:0

crwdns2917038:0crwdne2917038:0

crwdns2936625:0crwdne2936625:0:

crwdns2936751:024crwdne2936751:0 0

crwdns2936753:07crwdne2936753:0 2

crwdns2936753:030crwdne2936753:0 4

crwdns2942667:0crwdne2942667:0 146