crwdns2915892:0crwdne2915892:0
A computer graphics card allows a computer to plug into a monitor and be displayed. Graphics cards are vital components for computers. Also, replacing a graphics card can help your computer run more quickly and smoothly.
crwdns2942213:0crwdne2942213:0
-
-
Remove the two Phillips #2 head 5mm screws from the back side of the computer case. You only need to remove the screws that hold down the panel.
 crwdns2952109:0crwdne2952109:0
-
-
-
Next, remove the side panel of the computer case to allow access into the computer. Slide the panel towards the back of the computer and lift it up to remove.
-
-
-
-
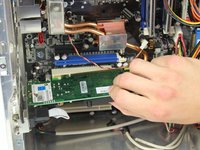
Remove the Phillips #2 head, 5mm screw holding the graphics card in place.
-
-
-
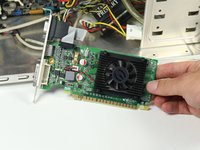
Press the latch on the side of the connector area to unlock the graphics card, and carefully slide the graphics card out from its slot in the computer.
-
A good technique is to lay the computer onto it side, push the latch down and lift the graphics card out.
-


To reassemble your device, follow these instructions in reverse order.
crwdns2935221:0crwdne2935221:0
crwdns2935229:086crwdne2935229:0
crwdns2935287:0crwdne2935287:0

Cal Poly, Team 4-5, Maness Spring 2015 crwdns2935289:0Cal Poly, Team 4-5, Maness Spring 2015crwdne2935289:0
CPSU-MANESS-S15S4G5
crwdns2931471:04crwdne2931471:0
crwdns2935297:045crwdne2935297:0
crwdns2947412:03crwdne2947412:0
There should be a notice about the PCI-E slot, which has a security latch; the latch should be pressed in order to remove the graphics card from the motherboard.
Ons NA - crwdns2934203:0crwdne2934203:0 crwdns2950251:0crwdne2950251:0
I have a all in one pc so this is not relevant
Robert Campanelli - crwdns2934203:0crwdne2934203:0 crwdns2950251:0crwdne2950251:0
any diffrerences in slots?
benzy aceware - crwdns2934203:0crwdne2934203:0 crwdns2950251:0crwdne2950251:0