crwdns2915892:0crwdne2915892:0
When your Delta touch faucet starts to act up... it doesn't flow like it used to... or it stutters or doesn't turn off or on at all, your electric valve needs some attention.
First make sure your batteries are good. Your indicator light should be going on and off as you touch the faucet, and you should hear the valve clicking. IF not, replace the batteries first.
crwdns2942213:0crwdne2942213:0
-
-
FIRST: Turn off your hot and cold water supply. If your faucet does not have a shutoff valve for each line, you will have to go find your main water supply valve and shut it off.
-
There are two clips on each end of the valve. The BLUE one just pops off.(Red circle) You DID turn off the water right? Otherwise, things are going to get pretty wet.
-
The top black clip is metal,(Green circle) and it is rotated off of the upper hose. Its difficult to unclip. You will need to use a finger on each side of the clip edge and push. It's edges are sharp so be careful.
-
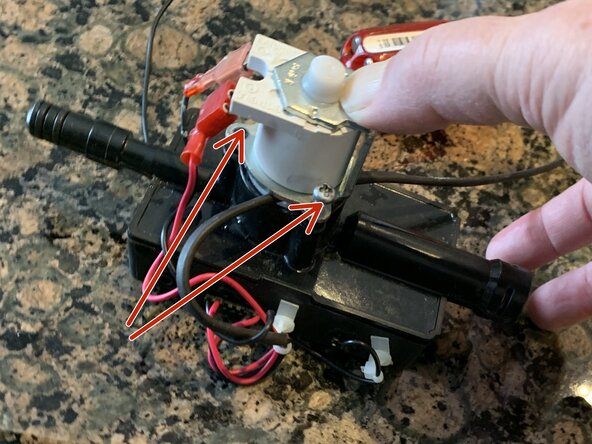
Unplug the wire on the bottom right(Yellow circle) ( Its like an audio jack) that goes up to your faucet. There is a second wire (Blue arrow) that also goes up to the faucet that is connected to a metal grounding clip that will be snapped into the base of your faucet. It should just unclip at the faucet end.
-
Now, grip the hose below the valve and gently pull it free of the valve.
-
Repeat on the upper hose. You should now be able to pull the whole package free and place it on a work surface.
-
-
-
Remove the three Phillips screws at the base of the metal retainer.
-
Gently lift the assembly from the base to expose the valve. That little silver cylinder is the valve. There is a spring under it, so it wants to pop out. (Red arrow)
-
-
-
-
Do you see the tiny dent in the black tip of the valve? That is the reason why your faucet no longer turns on and off or it has a crappy flow rate.
-
This is where you will be using the 2000 grit wet/dry sandpaper
-
To disassemble the valve, gently pull on the metal cylinder to slide it free of the plastic cylinder. There is another spring inside, so be ready for it.
-
Now pick up the little metal part with the black rubber tip. Holding it upright as close to vertical as possible... drag it GENTLY along the sandpaper for three or four swipes. DO NOT PRESS HARD
-
Examine the black tip. If the dent is no longer visible, you are done. If it is still there, do a couple more passes.
-
Re-assemble the valve by putting the spring back and gently pushing the black tip back into the plastic cylinder.
-
Put the valve back into the white housing
-
Put the white housing back onto the black box, and put the Phillips screws back in. You just have to tighten them until the metal retainer is secure.
-
-
-
Reverse the steps you took to remove your valve assembly in step one.
-
Make sure all of the tube clips are secure.
-
Turn your water back on, and you now have a working touch valve again
-


To reassemble your device, follow these instructions in reverse order.
To reassemble your device, follow these instructions in reverse order.