crwdns2915892:0crwdne2915892:0
Remove the admin password of the BIOS of a Dell Latitude 7420 laptop by performing a factory reset of the BIOS itself.
Note: This guide is very challenging and requires a lot of specialized tools but once you have them, the repair itself is quite straightforward. Good luck.
crwdns2942213:0crwdne2942213:0
-
-
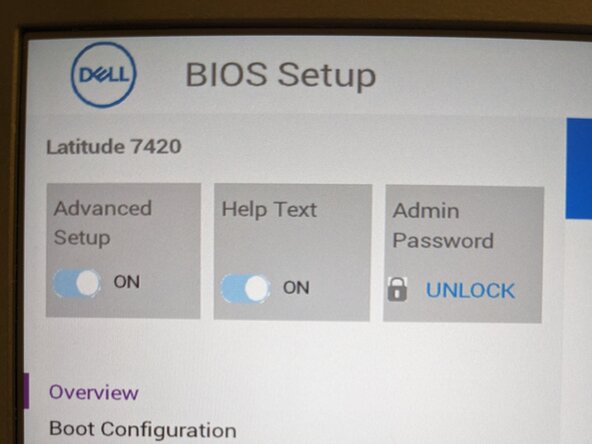
Boot the computer and smash F2 on the keyboard to enter into the BIOS (Basic Input/Output System).
-
If you look on the top left, you can see that the computer is BIOS locked with an admin password. It is impossible to change the settings to reinstall the machine without it. As the password has been lost, it makes this machine completely unusable and the purchase a complete loss.
-
-
-
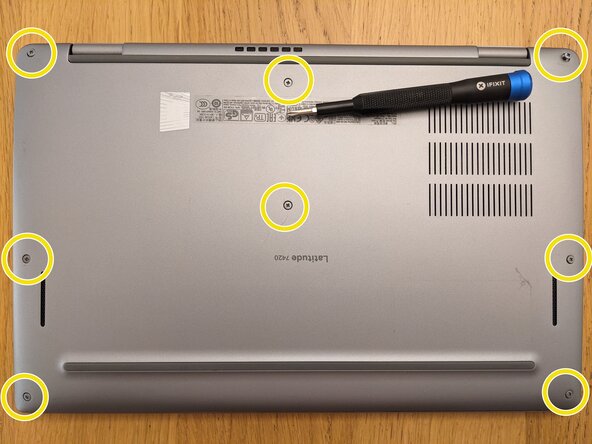
Turn off the machine and turn it around.
-
Remove the 8 x 7 mm screws holding the back of the machine with a Phillips #1 screwdriver.
-
Use a plastic pick to lift the back of the case first, close to the hinges of the screen. There are 4 small plastic tabs holding the back in place.
-
-
-
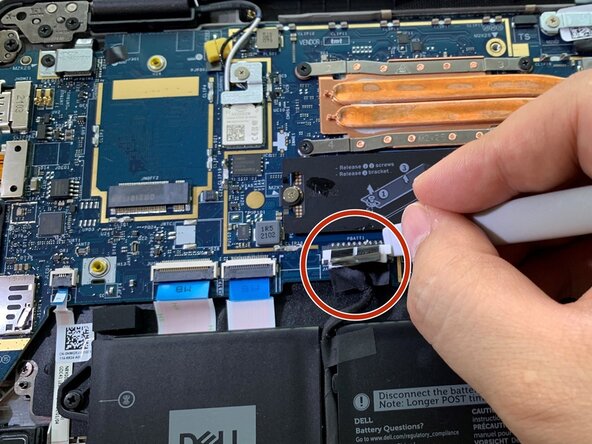
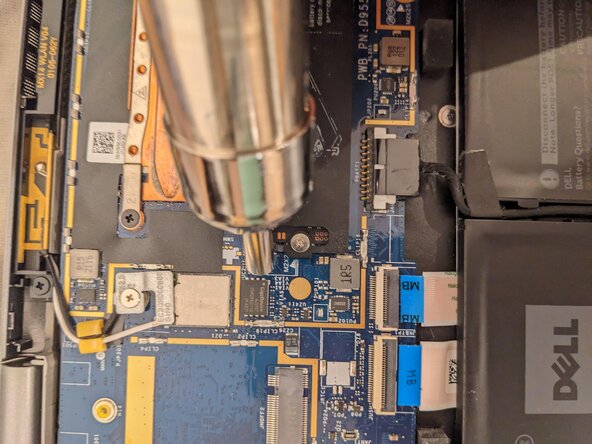
Disconnect the battery to ensure you will not short anything while working on the motherboard.
-
-
-
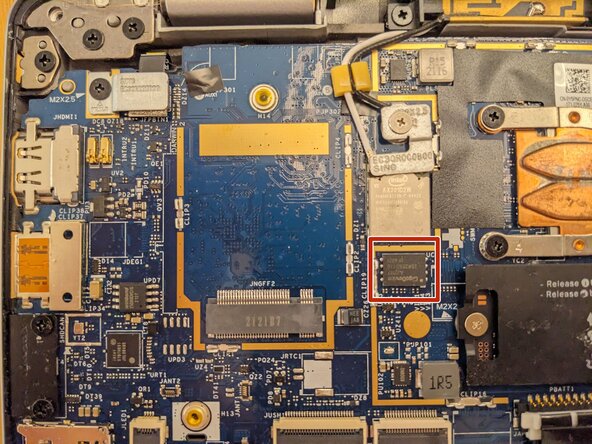
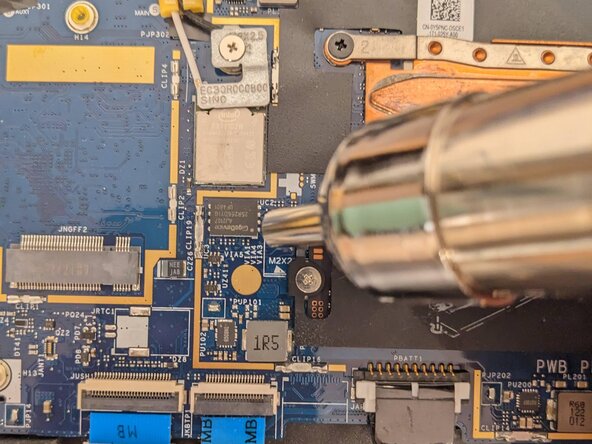
Locate the BIOS chip on the motherboard. In this case, it is a Gigadevice chip which you can see has 8 smalls pads on each side.
-
You cannot see it but there is a large square solder pad in the back, around 3x4mm that is also holding the chip in place.
-
Use your hot air soldering iron to get the chip to temperature (I used 375 degrees for a few seconds). Using tweezers, hold the chip as you heat it. Put a very light pressure pulling upward in order to detach it from the motherboard as soon as the solder is melted.
-
Be carefull not to hit anything out on the motherboard while doing the operation. It is very easy to burn or damage other small components on the board.
-
I suggest to reduce the air speed of your iron as well as to not blow off other components of the board in case they get their own solder to melting temperature. It will give you more time to perform the operation and make it less risky.
-
-
-
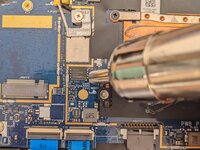
At that point, you should have the BIOS chip in your tweazers. It is time to set it on the programmer.
-
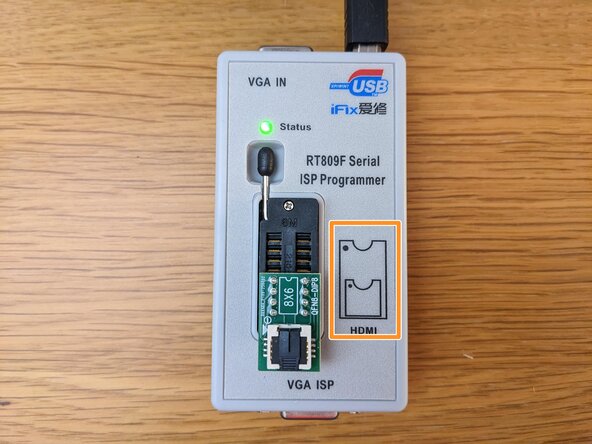
Prepare your RT809F Serial programmer. You should put the WSON8 adapter on the bottom of the slot as indicated by the drawing on the programmer.
-
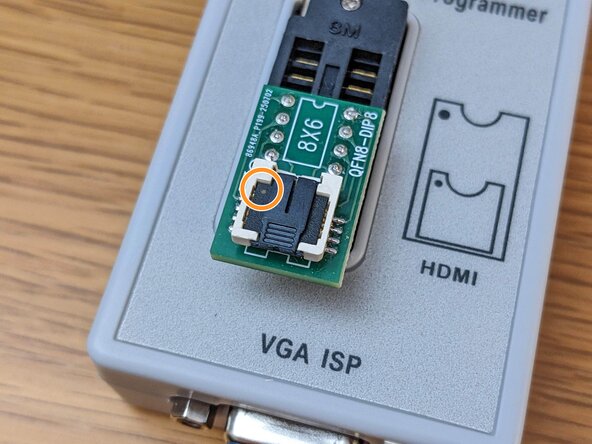
Use the small handle to secure the WSON8 adapter into the programmer.
-
Set the BIOS chip into the adapter.
-
Make sure to have the dot on the BIOS chip align with the top-left corner as it indicates the correct alignment for the pins. You have an arrow on the adapter telling you to do so.
-
Note: The adapter has a small piece of plastic at the top for holding the chip. You need to pull it out to open the adapter, set the BIOS chip in and secure it by pushing the plastic holder down and then pushing it back. The chips should be very secure and not move. Be careful as the tab is fragile.
-
-
-
Connect the programmer to a computer with the provided cable and turn on the RT809F programming software.
-
On the adapter, you should see a green light showing that the programmer is connected and ready for work.
-
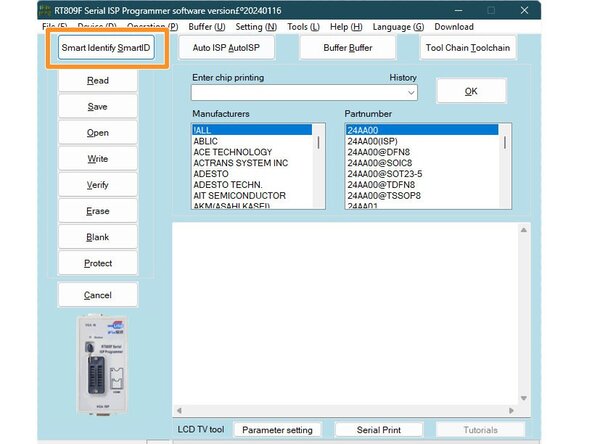
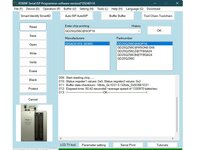
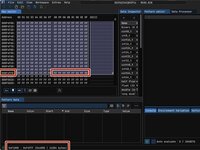
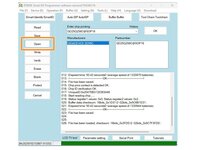
Hit the "Smart Identify SmartID" button on the top left to read the chip identity.
-
The program will read the chip and identify it as a 32MB chip.
-
Note: If you get an error reading the chip, it could be that it is not installed properly on the adapter. The programmer will tell you if one or more of the pins are not connected properly and identify them clearly (like "pin 1,3 and 5 do not respond to signal").
-
If that is the case, simply reseat the chip in the adapter until it can identify the chip without any issue
-
-
-
-
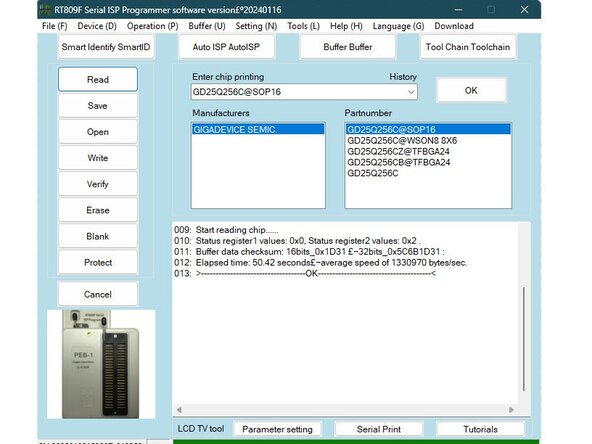
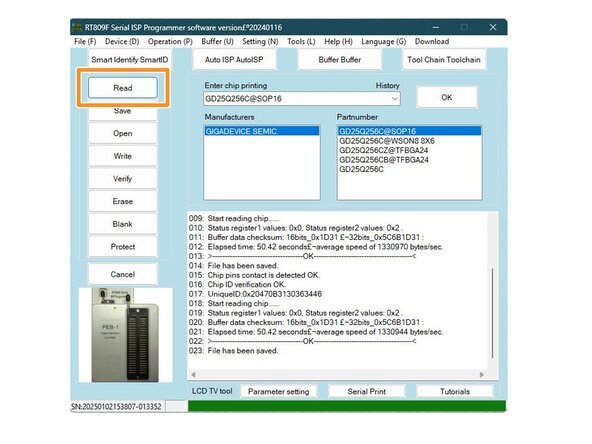
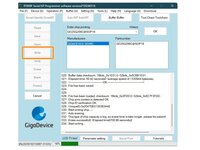
First things to be done is to read the full chip to make a backup of the current BIOS in case anything happens.
-
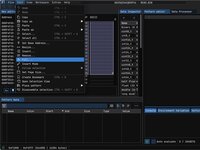
Hit the "Read" button on the left and let the programmer do its work.
-
After around 1 min, it will ask you where to save a binary file (.BIN) as well as a extra file (.BIN_StatusRegVal) that we will ignore here.
-
Just for safety, you can do a second read and change the name of the file to have a clean backup as we will modify only one of the .BIN file only.
-
-
-
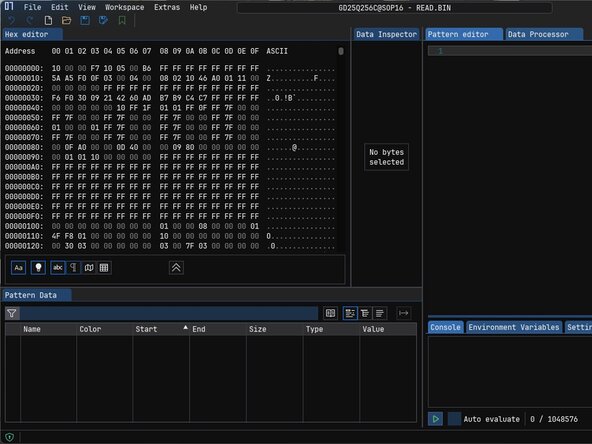
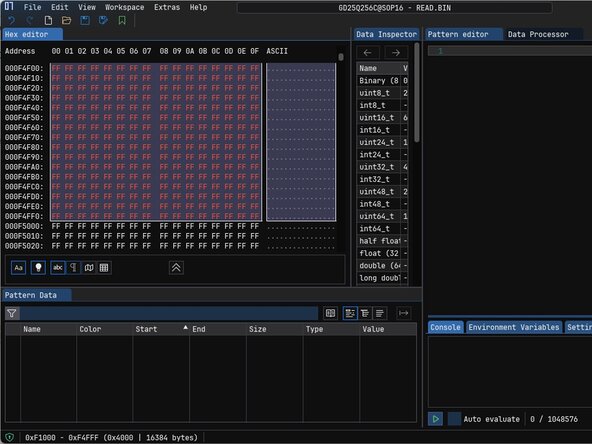
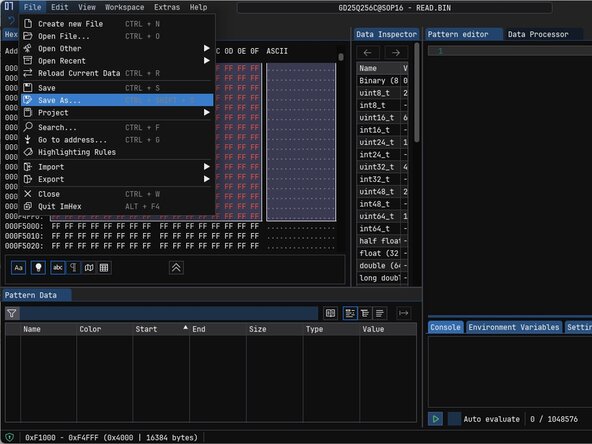
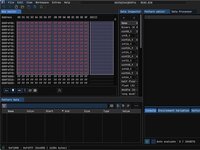
Start the ImHex editor (or your favorite hexadecimal editor) and open the first binary that we read from the chip at the previous step.
-
The file contains millions of lines, that is the entire programming of the BIOS. We will here modify only the EC (Embedded Controller) region and specifically the small part that contains the password.
-
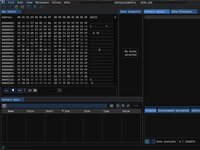
Jump directly to address "0x000F1000" using the jump function under the "file" menu. You should see the search pattern "010000" appearing on the second line like in the screenshot provided.
-
This mark the beginning of the EC region.
-
-
-
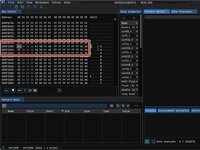
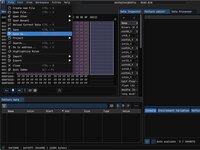
Select the next 16KB (16.384 bytes to be exact), from "0x000F1000" to "0x000F4FF0". It should be exactly 4000 lines in the program. Note: The very end of the space should finish with the values "FF E5 FF 55" which mark the end of the programmed space.
-
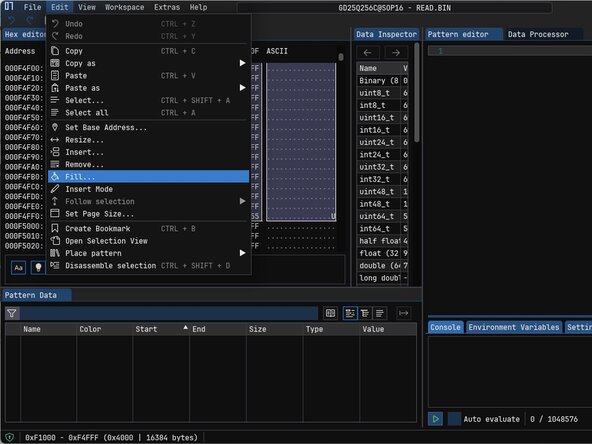
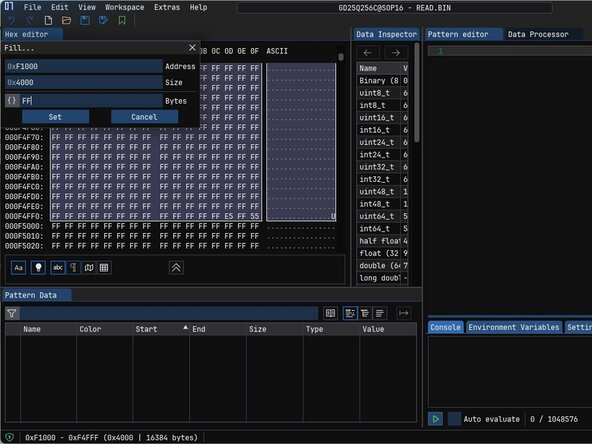
Fill in the entire space with "FF" values to effectively erase the memory space by selecting the "Fill" tool in the edit menu.
-
Enter the value FF and validate.
-
Note: If the BIOS is updated, it could be that the start of the EC region has moved but so far, it has never been the case. Use the two provided pattern to identify where the EC region starts and end to know where to fill.
-
-
-
As you validate the fill, the selection will turn into red confirming the change.
-
You can now save the file onto your machine as we have completed the modification of the BIOS.
-
Make sure to save it as "your-bios-chip-name-WRITE.bin" or similar to not confuse it with your backup READ file.
-
-
-
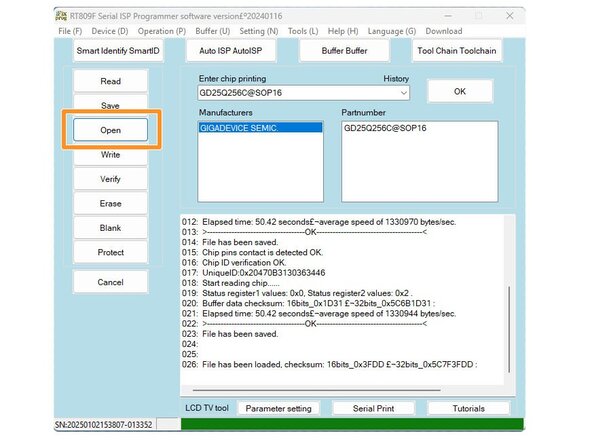
Back to the RT809F programmer software, click on the "Open" button and select your new "your-bios-chip-name-WRITE.bin" file that you just created.
-
The programmer will open the file and verify that everything is fine.
-
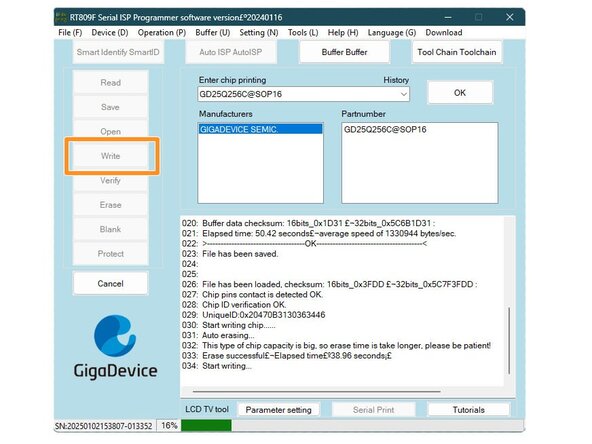
Hit the "Write" button and let the programmer write the chip for you. It will erase it first, then write your new BIOS and finally verify that everything is well. This step should take 2-3 mins.
-
If you are paranoid, you can do a last "Read" of your chip to make sure you wrote the right .BIN file before reassembly.
-
-
-
Remove the BIOS chip from the programmer carefully and prepare it for soldering.
-
Note: I found here that adding an ever so small amount of solder on the solder pad of the chip (and not on the motherboard) helps tremendously in making sure the chip will be resoldered correctly (as you cannot see how the back will stick).
-
If you have the tools to do so (a soldering iron), it will make the connections a lot stronger and prevent issues.
-
Using the reverse method as before, use your hot air iron to re-solder the chip in place. It should match perfectly the outline drawn on the motherboard.
-
-
-
Reconnect the battery you disconnected before by simply pressing it down into its slot. No need to reassemble the back yet as we need to check that the re-solder worked as expected.
-
Since you disconnected the battery, the BIOS boot will be much longer than normal (around 1-2 min) with the fan of the machine turning on at full speed. This is the BIOS performing a self-check to make sure everything is correct. This is the same procedure that occurs when the BIOS is updated via software.
-
The machine will reboot itself 2-3 times, each time the keyboard lighting up and down (and/or power button). If you did everything correctly, you will see the screen light up and the logo appear.
-
If the power led turns orange (for example if you press power and it turns orange only then), something is wrong. It is usually called the "orange LED of death". Try to re-solder the BIOS and pray that this was the issue. Otherwise, it might be something else entirely and extremely difficult to diagnose.
-
Note: You might get a black screen with a text telling you that the machine is in factory mode. If that is the case, you did right. Proceed to the BIOS to set up the machine.
-
-
-
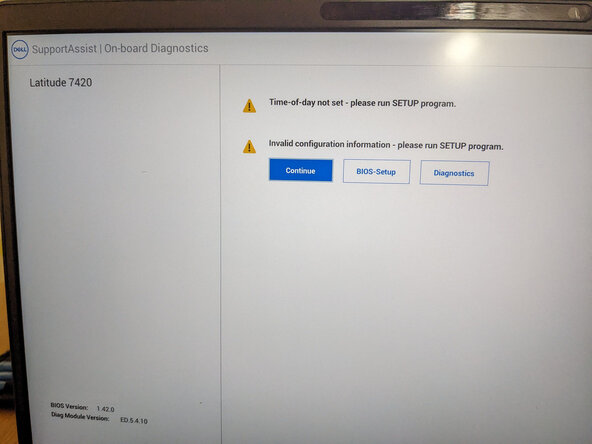
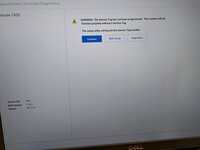
As we have erased the EC region on the chip, the BIOS does not know which machine it is and ask you to re-enter the service tag associated with the machine.
-
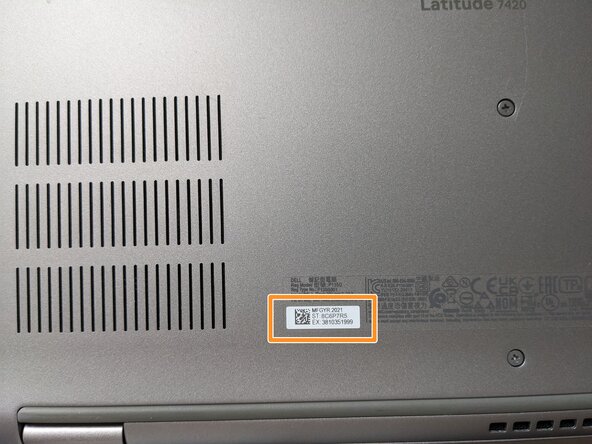
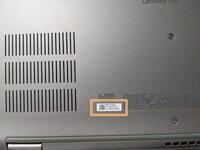
It will say: "The service tag has not been programmed. This system will not function properly without a service tag". If you do not have a massive sticker on the machine with the tag written on it, you can find it on the back of the machine, in the small white sticker set by led, next to the QR code.
-
The code is exactly 7 characters, located next to "ST:" (for Service Tag).
-
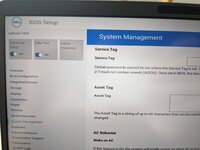
Enter the BIOS, and under the "System Management" tab, you will have a field now open to re-enter the service tag. Make sure it stays the same as the original.
-
Validate and exit to confirm your changes.
-
Re-enter to the BIOS by pressing "F2" during boot.
-
-
-
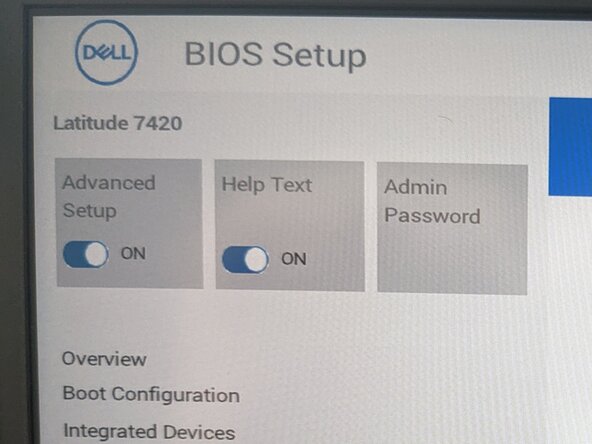
As you reboot into the BIOS, notice that the admin password is now gone.
-
You can now modify any setting in the BIOS, including setting a new admin password for the machine.
-
You can also, under "Integrated device", allow boot via USB and thus reinstall the machine!
-
Note: Make sure to update the BIOS to the latest version to benefit from the latest security updates. You should be able to do this directly from the operating system.
-
-
-
Turn off the machine one last time, and re-secure the back cover of the machine with the eight screws.
-
You have now completed the repair.
-


That is all for this guide. Thank you for reading and hope it helped!
crwdns2947412:02crwdne2947412:0
Hello, I have a dell Precision 5570 that has the admin password just like you showed. Does this work also on this laptop ? i can open the case and stuff just not sure where the BIOS chip is at ?
I cannot tell by experience since I haven't worked with a 5570 before. But the method in itself should work on most dell machines as one do not re-write bios from scratch very often. Manipulating the bios is the ultimate solution if there is simply no battery on the motherboard you can remove to reset the bios itself easily. If you can find a clean bios image for your specific machine, it could work. Unfortunately, there are too many unknown for me here so I am sorry my answer is but vague. Try contacting a local shop near you. They will most likely be able to help you there.
Menorine -