crwdns2933423:0crwdne2933423:0

Dell XPS 18 Touch Control Board Replacement

crwdns2942213:0crwdne2942213:0

  1. Dell XPS 18 Touch Control Board Replacement, Back Cover: crwdns2935265:01crwdnd2935265:01crwdnd2935265:01crwdne2935265:0
    • Turn the device on its screen.

    • Remove the ten 4mm screws using a T8 Torx screwdriver.

  2. Dell XPS 18 Touch Control Board Replacement: crwdns2935265:02crwdnd2935265:01crwdnd2935265:01crwdne2935265:0
    • Gently flip out support feet located near the bottom of device.

  3. Dell XPS 18 Touch Control Board Replacement: crwdns2935265:03crwdnd2935265:01crwdnd2935265:01crwdne2935265:0
    • Gently lift the back cover off the device. The back cover should come off easily.

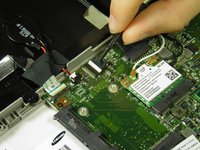
  4. Dell XPS 18 Touch Control Board Replacement, Internal Cover: crwdns2935265:04crwdnd2935265:01crwdnd2935265:01crwdne2935265:0
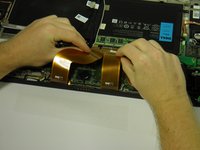
    • Use the opening tool's angled edge to lift the clasps securing the screen and motherboard cables.

  5. Dell XPS 18 Touch Control Board Replacement: crwdns2935265:05crwdnd2935265:01crwdnd2935265:02crwdne2935265:0 Dell XPS 18 Touch Control Board Replacement: crwdns2935265:05crwdnd2935265:02crwdnd2935265:02crwdne2935265:0
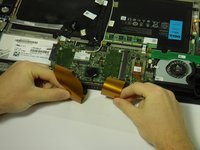
    • Disconnect the screen and copper colored motherboard cables and tuck them under the device to prevent future hassle.

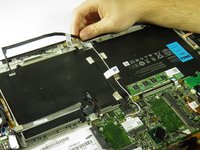
  6. Dell XPS 18 Touch Control Board Replacement: crwdns2935265:06crwdnd2935265:01crwdnd2935265:02crwdne2935265:0 Dell XPS 18 Touch Control Board Replacement: crwdns2935265:06crwdnd2935265:02crwdnd2935265:02crwdne2935265:0
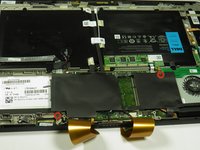
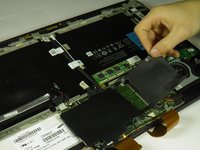
    • Remove the two black 3mm screws from the internal cover with a Phillips 00 screwdriver.

    • Remove the internal cover.

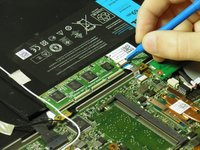
  7. Dell XPS 18 Touch Control Board Replacement, Touch Control Board: crwdns2935265:07crwdnd2935265:01crwdnd2935265:02crwdne2935265:0 Dell XPS 18 Touch Control Board Replacement, Touch Control Board: crwdns2935265:07crwdnd2935265:02crwdnd2935265:02crwdne2935265:0
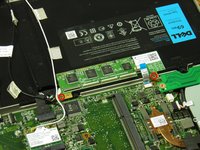
    • Disconnect the black camera cable and pull it back to prevent future hassle.

  8. Dell XPS 18 Touch Control Board Replacement: crwdns2935265:08crwdnd2935265:01crwdnd2935265:02crwdne2935265:0 Dell XPS 18 Touch Control Board Replacement: crwdns2935265:08crwdnd2935265:02crwdnd2935265:02crwdne2935265:0
    • Use the angled edge of the plastic opening tool to lift the clasp securing the touch control board cable.

    • Disconnect the silver and blue touch control board cable.

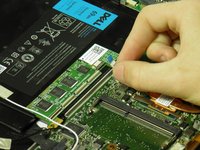
  9. Dell XPS 18 Touch Control Board Replacement: crwdns2935265:09crwdnd2935265:01crwdnd2935265:02crwdne2935265:0 Dell XPS 18 Touch Control Board Replacement: crwdns2935265:09crwdnd2935265:02crwdnd2935265:02crwdne2935265:0
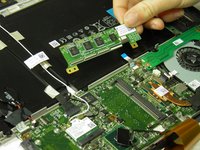
    • Remove the two silver 3mm screws holding the touch control board in place with a Phillips 00 screwdriver.

    • Remove the touch control board.

crwdns2915888:0crwdne2915888:0

To reassemble your device, follow these instructions in reverse order.

crwdns2935229:04crwdne2935229:0

Austin Weir

crwdns2935283:001/31/15crwdne2935283:0

1,287 crwdns2915208:0crwdne2915208:0

crwdns2935297:08crwdne2935297:0

crwdns2915084:0crwdne2915084:0

Cal Poly, Team 6-29, Amido Winter 2015 crwdns2935289:0Cal Poly, Team 6-29, Amido Winter 2015crwdne2935289:0

CPSU-AMIDO-W15S6G29

crwdns2931471:04crwdne2931471:0

crwdns2935297:016crwdne2935297:0

crwdns2944067:02crwdne2944067:0

Which of Torx screwdrivers is used in step 1? As I can see, it is T8, but right above the Introduction section it is stated it is Torx T9...

Евгений Громов - crwdns2934203:0crwdne2934203:0

crwdns2917038:0crwdne2917038:0

crwdns2936625:0crwdne2936625:0:

crwdns2936751:024crwdne2936751:0 1

crwdns2936753:07crwdne2936753:0 1

crwdns2936753:030crwdne2936753:0 15

crwdns2942667:0crwdne2942667:0 1,912