crwdns2933423:0crwdne2933423:0

Dell XPS 17 9710 SSD Replacement

crwdns2862587:0crwdne2862587:0
crwdns2862588:0crwdne2862588:0

crwdns2942213:0crwdne2942213:0

  1. Dell XPS 17 9710 SSD Replacement, Back Panel: crwdns2935265:01crwdnd2935265:01crwdnd2935265:02crwdne2935265:0 Dell XPS 17 9710 SSD Replacement, Back Panel: crwdns2935265:01crwdnd2935265:02crwdnd2935265:02crwdne2935265:0
    • Remove eight 5 mm screws from the back panel using a T5 Torx screwdriver.

    • Use the opening tool to loosen the panel on all sides and then lift it from the device.

  2. Dell XPS 17 9710 SSD Replacement, SSD: crwdns2935265:02crwdnd2935265:01crwdnd2935265:02crwdne2935265:0 Dell XPS 17 9710 SSD Replacement, SSD: crwdns2935265:02crwdnd2935265:02crwdnd2935265:02crwdne2935265:0
    • Remove two 3 mm screws (four total) from each of the copper plates using a JIS #1 screwdriver.

  3. Dell XPS 17 9710 SSD Replacement: crwdns2935265:03crwdnd2935265:01crwdnd2935265:02crwdne2935265:0 Dell XPS 17 9710 SSD Replacement: crwdns2935265:03crwdnd2935265:02crwdnd2935265:02crwdne2935265:0
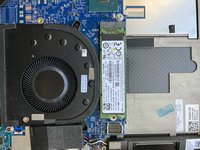
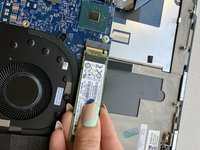
    • Unplug the SSD card underneath each plate.

    • There may be two slots for SSD cards, but only one card. You can install another card for storage customizability in the laptop.

crwdns2935217:0crwdne2935217:0

Abigail Matos

crwdns2935283:003/28/22crwdne2935283:0

308 crwdns2915208:0crwdne2915208:0

crwdns2935297:03crwdne2935297:0

crwdns2915084:0crwdne2915084:0

UMass Dartmouth, Team 1-2, Mellen Spring 2022 crwdns2935289:0UMass Dartmouth, Team 1-2, Mellen Spring 2022crwdne2935289:0

UMASSD-MELLEN-S22S1G2

crwdns2931471:03crwdne2931471:0

crwdns2935297:04crwdne2935297:0

crwdns2947412:00crwdne2947412:0

crwdns2917038:0crwdne2917038:0

crwdns2936625:0crwdne2936625:0:

crwdns2936751:024crwdne2936751:0 0

crwdns2936753:07crwdne2936753:0 0

crwdns2936753:030crwdne2936753:0 15

crwdns2942667:0crwdne2942667:0 1,872