crwdns2915892:0crwdne2915892:0
Follow this guide if you need to replace the heat sink of your Dell XPS 15 9570. You may need to complete this replacement if your computer is overheating or if you wish to apply more thermal paste.
Before starting this guide, power the laptop off and disconnect from the charger.
crwdns2942213:0crwdne2942213:0
-
-
Flip the device over so the base cover of the computer is facing upwards.
-
-
-
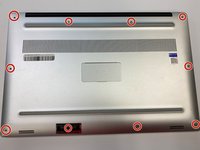
Using a Torx T5 screwdriver, remove the ten 3 mm screws on the back.
-
-
-
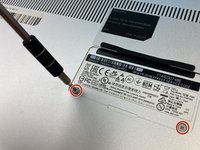
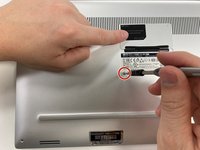
Flip open the system badge and with a Phillips #00 screwdriver, remove the two 8.5 mm screws.
-
-
-
-
Lift the back cover off of the device.
-
-
-
Using the Phillips #00 screwdriver, remove the four 4 mm screws holding the battery in place.
-
-
-
Use the iFixit opening tool to disconnect the battery connector from the motherboard.
-
-
-
With your hands, pick up and remove the battery from the system.
-
-
-
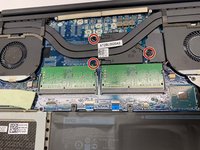
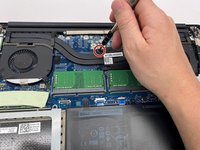
Use the Phillips #00 to remove the three (without graphics card) or four (with graphics card) 3 mm screws that connect the heat sink to the system board.
-
-
-
Lift the heat sink from the device. The thermal paste may have dried and make this handling more complicated, be careful.
-


To reassemble your device, follow these instructions in reverse order.

crwdns2935287:0crwdne2935287:0

University of Alabama, Team 2-4, Bedsole Fall 2021 crwdns2935289:0University of Alabama, Team 2-4, Bedsole Fall 2021crwdne2935289:0
UA-BEDSOLE-F21S2G4
crwdns2931471:03crwdne2931471:0
crwdns2935297:020crwdne2935297:0