crwdns2915892:0crwdne2915892:0
If your Dell XPS 15 9560 boots up with the BIOS menu, produces a beeping pattern upon failure to boot, or has been experiencing hardware and software malfunctioning with all other fixes ruled out, there may be an irreparable issue with the motherboard and it will need to be replaced.
The motherboard is the central hub of the laptop. It distributes power throughout the laptop and allows the laptop’s hardware components to communicate with the processor.
Damage to a laptop’s body or damage by liquids leaking into a laptop can lead to a damaged motherboard. A motherboard may also fail over time as it ages. This is the worst case scenario for many laptops as a damage motherboard means the entire computer is no longer operable.
Before beginning, backup all important files to an external hard drive or a USB. Additionally, make sure the laptop is off and the laptop is disconnected from any power source.
crwdns2942213:0crwdne2942213:0
-
-
Remove the ten 4.0 mm screws from the back panel of the laptop using a T5 Torx screwdriver.
-
-
-
Remove the two 5 mm screws underneath the XPS badge door using a Phillips screwdriver
-
-
-
Use a scribe to remove the bottom base cover from the backplate.
-
-
-
Using a T5 Torx screwdriver, remove the six 4.0 mm screws.
-
-
-
Use your fingernails to gently "walk" the battery connector directly out of its socket.
-
-
-
Using a Phillips #0 screwdriver, remove four 4.0 mm screws of the hard drive bracket.
-
Unplug the hard drive cable.
-
-
-
Remove the hard drive bracket. Then, unplug and remove the hard drive.
-
-
-
-
Using a Phillips #2 screwdriver, remove a single 3.0 mm screw from the SSD bracket.
-
-
-
Using the same Phillips #2 screwdriver, unscrew and remove one 2.0 mm wafer screw from the SSD bracket.
-
-
-
Pull out and separate the SSD bracket and SSD, replacing the old SSD with a new one.
-
-
-
Using the Phillips #2 screwdriver, remove the single 4.0 mm screw securing the wireless card base to the motherboard.
-
-
-
Disconnect the wireless card cables from the wireless card.
-
-
-
Slide the wireless card out of its slot.
-
-
-
Using a T5 Torx screwdriver, remove two 4.0 mm screws.
-
-
-
Using a T5 Torx screwdriver, remove two 4.0 mm screws.
-
Unplug the fan cable.
-
-
-
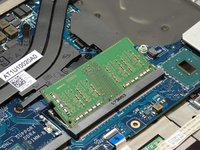
Pull the metal clips surrounding the RAM stick outward.
-
Remove the RAM stick from the device.
-
-
-
Using a screwdriver, unscrew one 5.0 mm Torx T5 bracket screw.
-
Remove the bracket and unplug and loosen the LCD cable.
-
-
-
Using a T5 Torx screwdriver, remove ten 4.0 mm screws securing the motherboard to the device.
-
-
-
From right to left, unplug the bottom motherboard cables, DC jack cable, speaker cable.
-


To reassemble your device, follow these instructions in reverse order.
To reassemble your device, follow these instructions in reverse order.
crwdns2935221:0crwdne2935221:0
crwdns2935227:0crwdne2935227:0

crwdns2915084:0crwdne2915084:0

Clemson, Team 4-5, Hunter Fall 2021 crwdns2935289:0Clemson, Team 4-5, Hunter Fall 2021crwdne2935289:0
CLEM-HUNTER-F21S4G5
crwdns2931471:04crwdne2931471:0
crwdns2935297:019crwdne2935297:0