crwdns2915892:0crwdne2915892:0
Failure of fans to turn on automatically can lead to devices overheating. This guide shows how to replace the two fans located within the Dell XPS 15 9510 laptop. Be sure to remove small parts carefully.
Before using this guide, make sure to review the Dell XPS 15 9510 troubleshooting page to review if it isn't a BIOS issue or anything else.
Your fans might also be dirty; you can use these steps to locate your fans before cleaning them using a DataVac. If that is the case, you won't need to replace your fans.
Make sure to power off your laptop completely and disconnect from any external power source before beginning the process.
crwdns2942213:0crwdne2942213:0
-
-
Remove eight 3 mm screws from the underside of the case using a T5 Torx screwdriver.
-
-
-
Wedge the case apart with a nylon spudger.
-
Slide spudger along each side of the laptop
-
-
-
Lift the back panel of the laptop off and set it aside.
-
-
-
-
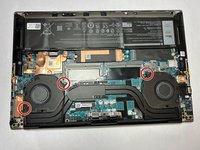
Remove two 4.3 mm screws from the left fan and one 4.3 mm screw from the right fan using a JIS #000 screwdriver.
-
-
crwdns2935267:0crwdne2935267:0Tweezers$4.99
-
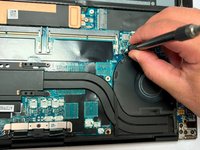
Gently unplug the motherboard fan connector using a pair of tweezers.
-
-
-
Unplug the motherboard connector on the other fan using a pair of tweezers.
-
-
-
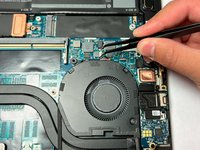
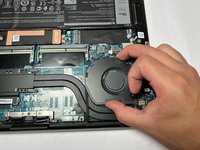
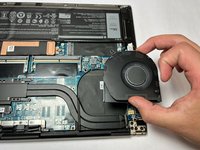
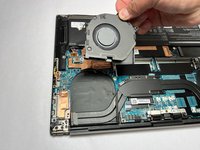
Gently slide and then lift the fans out of their positions.
-
-
-
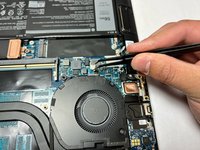
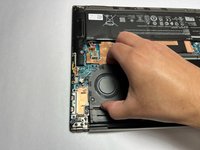
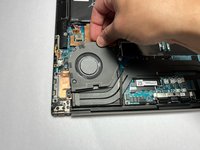
Repeat the previous step and remove the other fan.
-


To reassemble your device, follow these instructions in reverse order.
crwdns2935221:0crwdne2935221:0
crwdns2935229:03crwdne2935229:0

crwdns2935287:0crwdne2935287:0

IUPUI, Team 2-1, Harley Summer 2023 crwdns2935289:0IUPUI, Team 2-1, Harley Summer 2023crwdne2935289:0
IUPUI-HARLEY-SU23S2G1
crwdns2931471:04crwdne2931471:0
crwdns2935297:03crwdne2935297:0