crwdns2933423:0crwdne2933423:0

Dell XPS 14 L401X Hard Drive Replacement

crwdns2942213:0crwdne2942213:0

  1. Dell XPS 14 L401X Hard Drive Replacement, Battery: crwdns2935265:01crwdnd2935265:01crwdnd2935265:02crwdne2935265:0 Dell XPS 14 L401X Hard Drive Replacement, Battery: crwdns2935265:01crwdnd2935265:02crwdnd2935265:02crwdne2935265:0
    • Make sure that the laptop is shut off before attempting to remove any components from the device.

    • The laptop in this example did not have a battery equipped.

    • Locate the spring latch on the bottom of the device that will unlatch the battery.

    • Hold the spring latch in the open position and pull the battery out of its recess.

  2. Dell XPS 14 L401X Hard Drive Replacement, RAM: crwdns2935265:02crwdnd2935265:01crwdnd2935265:03crwdne2935265:0 Dell XPS 14 L401X Hard Drive Replacement, RAM: crwdns2935265:02crwdnd2935265:02crwdnd2935265:03crwdne2935265:0 Dell XPS 14 L401X Hard Drive Replacement, RAM: crwdns2935265:02crwdnd2935265:03crwdnd2935265:03crwdne2935265:0
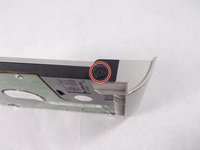
    • Use a JIS 1 screwdriver to loosen the (2) captive screws from the panel.

    • The captive screws will not come off of the panel.

    • Pull the panel upwards and towards the battery to remove.

    • Put the panel to the side, exposing the RAM.

  3. Dell XPS 14 L401X Hard Drive Replacement: crwdns2935265:03crwdnd2935265:01crwdnd2935265:02crwdne2935265:0 Dell XPS 14 L401X Hard Drive Replacement: crwdns2935265:03crwdnd2935265:02crwdnd2935265:02crwdne2935265:0
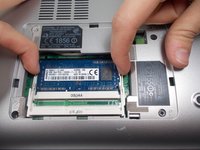
    • The RAM is held by two spring clips. Pull at the two spring clips and the RAM will move upwards.

    • Keep your fingers on the edge of the chip.

    • Only handle the RAM by the sides! Do not touch the circuits or the terminals to avoid contamination!

  4. Dell XPS 14 L401X Hard Drive Replacement, Hard Drive: crwdns2935265:04crwdnd2935265:01crwdnd2935265:02crwdne2935265:0 Dell XPS 14 L401X Hard Drive Replacement, Hard Drive: crwdns2935265:04crwdnd2935265:02crwdnd2935265:02crwdne2935265:0
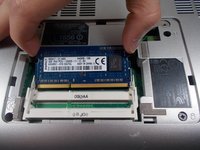
    • Use a JIS 1 screwdriver to remove (2) 2.5mm screws located on the right side of the RAM bay.

  5. Dell XPS 14 L401X Hard Drive Replacement: crwdns2935265:05crwdnd2935265:01crwdnd2935265:02crwdne2935265:0 Dell XPS 14 L401X Hard Drive Replacement: crwdns2935265:05crwdnd2935265:02crwdnd2935265:02crwdne2935265:0
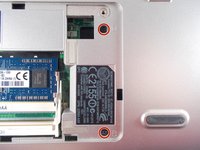
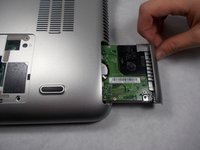
    • Push the hard drive to the right with a spudger to unseat it from its socket while pulling out the hard drive with your other hand.

  6. Dell XPS 14 L401X Hard Drive Replacement: crwdns2935265:06crwdnd2935265:01crwdnd2935265:03crwdne2935265:0 Dell XPS 14 L401X Hard Drive Replacement: crwdns2935265:06crwdnd2935265:02crwdnd2935265:03crwdne2935265:0 Dell XPS 14 L401X Hard Drive Replacement: crwdns2935265:06crwdnd2935265:03crwdnd2935265:03crwdne2935265:0
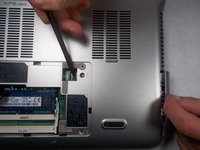
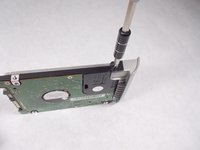
    • Use a JIS 1 screwdriver to remove (1) 2.5mm screw attaching the plastic cosmetic cover to the hard drive.

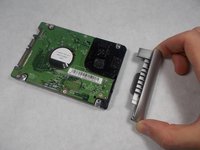
    • Detach the plastic cosmetic cover from the hard drive.

    • This cosmetic cover will be transferred to the new hard drive.

crwdns2915888:0crwdne2915888:0

To reassemble your device, follow these instructions in reverse order.

Nicole Johnson

crwdns2935283:010/19/17crwdne2935283:0

428 crwdns2915208:0crwdne2915208:0

crwdns2935297:04crwdne2935297:0

crwdns2915084:0crwdne2915084:0

UMass Dartmouth, Team S4-G3, Julie Fall 2017 crwdns2935289:0UMass Dartmouth, Team S4-G3, Julie Fall 2017crwdne2935289:0

UMASSD-JULIE-F17S4G3

crwdns2931471:03crwdne2931471:0

crwdns2935297:011crwdne2935297:0

crwdns2944067:00crwdne2944067:0

crwdns2917038:0crwdne2917038:0

crwdns2936625:0crwdne2936625:0:

crwdns2936751:024crwdne2936751:0 0

crwdns2936753:07crwdne2936753:0 0

crwdns2936753:030crwdne2936753:0 6

crwdns2942667:0crwdne2942667:0 1,290