crwdns2933423:0crwdne2933423:0

Dell XPS 13 9365 2-in-1 Display without Frame Replacement

crwdns2942213:0crwdne2942213:0

  1. Dell XPS 13 9365 2-in-1 Display without Frame Replacement, Display Assembly: crwdns2935265:01crwdnd2935265:01crwdnd2935265:01crwdne2935265:0
    • Use a Phillips #000 screwdriver to remove the screw (M1.6x2.5) that secures the wireless-card bracket to the motherboard.

  2. Dell XPS 13 9365 2-in-1 Display without Frame Replacement: crwdns2935265:02crwdnd2935265:01crwdnd2935265:01crwdne2935265:0
    • Lift the wireless-card bracket off the wireless card.

  3. Dell XPS 13 9365 2-in-1 Display without Frame Replacement: crwdns2935265:03crwdnd2935265:01crwdnd2935265:01crwdne2935265:0
    • Use a pair of nylon tipped tweezers to gently disconnect the antenna cables from the wireless card.

  4. Dell XPS 13 9365 2-in-1 Display without Frame Replacement: crwdns2935265:04crwdnd2935265:01crwdnd2935265:01crwdne2935265:0
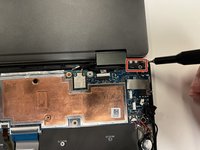
    • Peel off the tape that secures the display cable to the M.2 solid-state drive heatsink.

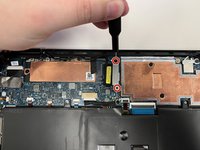
  5. Dell XPS 13 9365 2-in-1 Display without Frame Replacement: crwdns2935265:05crwdnd2935265:01crwdnd2935265:02crwdne2935265:0 Dell XPS 13 9365 2-in-1 Display without Frame Replacement: crwdns2935265:05crwdnd2935265:02crwdnd2935265:02crwdne2935265:0
    • Use a Phillips #000 screwdriver to remove the two screws (M1.6x2.5) that secure the display cable bracket to the motherboard.

    • Lift the display cable bracket off the display cable.

  6. Dell XPS 13 9365 2-in-1 Display without Frame Replacement: crwdns2935265:06crwdnd2935265:01crwdnd2935265:01crwdne2935265:0
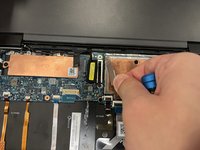
    • Use the pull tab to disconnect the display cable from the motherboard.

  7. Dell XPS 13 9365 2-in-1 Display without Frame Replacement: crwdns2935265:07crwdnd2935265:01crwdnd2935265:01crwdne2935265:0
    • Disconnect the touch-screen cable from the system board (labeled "TS").

  8. Dell XPS 13 9365 2-in-1 Display without Frame Replacement: crwdns2935265:08crwdnd2935265:01crwdnd2935265:01crwdne2935265:0
    • Disconnect the camera cable from the system board.

  9. Dell XPS 13 9365 2-in-1 Display without Frame Replacement: crwdns2935265:09crwdnd2935265:01crwdnd2935265:03crwdne2935265:0 Dell XPS 13 9365 2-in-1 Display without Frame Replacement: crwdns2935265:09crwdnd2935265:02crwdnd2935265:03crwdne2935265:0 Dell XPS 13 9365 2-in-1 Display without Frame Replacement: crwdns2935265:09crwdnd2935265:03crwdnd2935265:03crwdne2935265:0
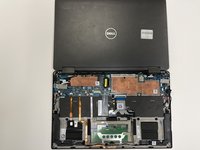
    • Open the palm-rest assembly fully and place the display assembly and palm-rest assembly face down.

    • Make sure that your surface is flat and free of objects when you lay the laptop face down.

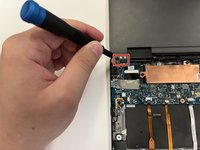
    • Use a Phillips #000 screwdriver to remove the six screws (M2.5x3.5) that secure the display hinges to the palm-rest assembly. There are three on each side.

  10. Dell XPS 13 9365 2-in-1 Display without Frame Replacement: crwdns2935265:010crwdnd2935265:01crwdnd2935265:01crwdne2935265:0
    • Lift the display assembly off the palm-rest assembly.

  11. Dell XPS 13 9365 2-in-1 Display without Frame Replacement, Start: crwdns2935265:011crwdnd2935265:01crwdnd2935265:01crwdne2935265:0
    • You Should have already removed your Display Following the XPS 9365 Guide

    • Quick tip for adjusting the hinges

  12. Dell XPS 13 9365 2-in-1 Display without Frame Replacement, Remove Front Cover: crwdns2935265:013crwdnd2935265:01crwdnd2935265:01crwdne2935265:0
    • Remove Camera Cover To Get to more screws. Take a spudger or guitar pick and lift it in between the hinge, after you get it started you can just slide your pick under the cover along the whole display. Be careful of the camera.

    • Don't Use a Knife, use what you have but be careful first picture is the better option.

  13. Dell XPS 13 9365 2-in-1 Display without Frame Replacement, Remove Screws: crwdns2935265:015crwdnd2935265:01crwdnd2935265:01crwdne2935265:0
    • Remove the 12 Screws. Put them in a safe Place.

    • Look For black Plastic Strips, This will allow you to remove the adhesive the easy way, so be gentile. Slowly pull on them until most of the adhesive is removed. Similar to apple Battery Tabs

  14. Dell XPS 13 9365 2-in-1 Display without Frame Replacement, Adhesive Removal: crwdns2935265:017crwdnd2935265:01crwdnd2935265:01crwdne2935265:0
    • The tab might be under the swivel bracket, so you might need to remove it first.

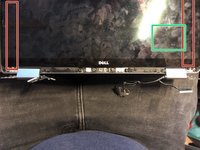
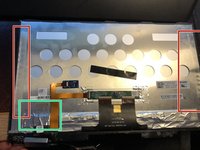
  15. Dell XPS 13 9365 2-in-1 Display without Frame Replacement, The Tabs Broke!!!!: crwdns2935265:018crwdnd2935265:01crwdnd2935265:02crwdne2935265:0 Dell XPS 13 9365 2-in-1 Display without Frame Replacement, The Tabs Broke!!!!: crwdns2935265:018crwdnd2935265:02crwdnd2935265:02crwdne2935265:0
    • The red indicates where the adhesive is located. Heat the back cover with a heat gun and start lifting the adhesive. Add heat as you go. Use your Spuger and work your way from the bottom up, try and stay in the red area. In green there is a critical connector, so be careful.

  16. Dell XPS 13 9365 2-in-1 Display without Frame Replacement, Screen Re-Use?: crwdns2935265:019crwdnd2935265:01crwdnd2935265:01crwdne2935265:0
    • If you intend to reuse your screen, do not try and pry the display from the top, there are inserts that lock the display to the top of the chaise. You will break the screen if you try and fores these inserts out. You have to remove all the adhesive first from the bottom and you can just pull the display out.

  17. Dell XPS 13 9365 2-in-1 Display without Frame Replacement, Display Cable: crwdns2935265:020crwdnd2935265:01crwdnd2935265:01crwdne2935265:0
    • Now that you have the display out, you can remove the Display cable Assembly to use with the next display.

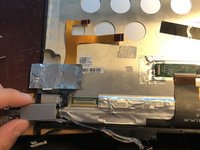
  18. Dell XPS 13 9365 2-in-1 Display without Frame Replacement, Display Connector: crwdns2935265:021crwdnd2935265:01crwdnd2935265:03crwdne2935265:0 Dell XPS 13 9365 2-in-1 Display without Frame Replacement, Display Connector: crwdns2935265:021crwdnd2935265:02crwdnd2935265:03crwdne2935265:0 Dell XPS 13 9365 2-in-1 Display without Frame Replacement, Display Connector: crwdns2935265:021crwdnd2935265:03crwdnd2935265:03crwdne2935265:0
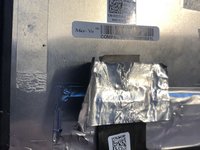
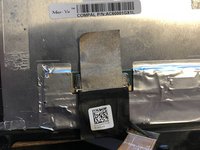
    • Remove the foil cover to the display connector.

    • The display connector must first be unlocked and then pulled out, the bottom.

  19. Dell XPS 13 9365 2-in-1 Display without Frame Replacement, More Cable Removal: crwdns2935265:023crwdnd2935265:01crwdnd2935265:01crwdne2935265:0
    • Remove the Gold cable. Caution it is glued to the display, use a pick to carefully remove it. Apply heat if needed.

  20. Dell XPS 13 9365 2-in-1 Display without Frame Replacement, Flex-Cable: crwdns2935265:024crwdnd2935265:01crwdnd2935265:01crwdne2935265:0
    • Remove Flexcable

    • Remove the Chips, you might need them for your next Screen. Depending on the seller.

  21. Dell XPS 13 9365 2-in-1 Display without Frame Replacement, The Guts: crwdns2935265:026crwdnd2935265:01crwdnd2935265:01crwdne2935265:0
    • In Green is your camera and Antenna, you don't need to remove this if you are just switching displays.

    • You can now put in your new display and connect everything back up and glue the new display to the case.

crwdns2915888:0crwdne2915888:0

To reassemble your device, follow these instructions in reverse order.

Nicolas Remy Thouin

crwdns2935283:005/29/20crwdne2935283:0

253 crwdns2915208:0crwdne2915208:0

crwdns2935295:0crwdne2935295:0

crwdns2944067:00crwdne2944067:0

crwdns2917038:0crwdne2917038:0

crwdns2936625:0crwdne2936625:0:

crwdns2936751:024crwdne2936751:0 0

crwdns2936753:07crwdne2936753:0 3

crwdns2936753:030crwdne2936753:0 14

crwdns2942667:0crwdne2942667:0 373