crwdns2933423:0crwdne2933423:0

Dell Vostro 3550 Keyboard Replacement

crwdns2942213:0crwdne2942213:0

  1. Dell Vostro 3550 Keyboard Replacement, Unlocking the Battery: crwdns2935265:01crwdnd2935265:01crwdnd2935265:01crwdne2935265:0
    • Slide the release latches to unlock the battery.

  2. Dell Vostro 3550 Keyboard Replacement, Sliding the Battery: crwdns2935265:02crwdnd2935265:01crwdnd2935265:01crwdne2935265:0
    • Slide the battery and remove it from the computer.

  3. Dell Vostro 3550 Keyboard Replacement, Keyboard: crwdns2935265:03crwdnd2935265:01crwdnd2935265:03crwdne2935265:0 Dell Vostro 3550 Keyboard Replacement, Keyboard: crwdns2935265:03crwdnd2935265:02crwdnd2935265:03crwdne2935265:0 Dell Vostro 3550 Keyboard Replacement, Keyboard: crwdns2935265:03crwdnd2935265:03crwdnd2935265:03crwdne2935265:0
    • Turn the laptop right side up. Open the display to reveal the keyboard.

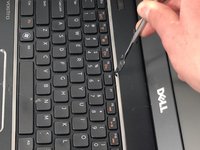
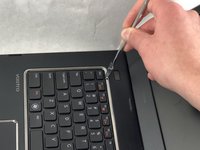
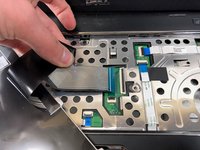
    • Use the metal spudger to pry the keyboard upward from the base. Make sure to pop each of the three clips keeping the keyboard in place.

  4. Dell Vostro 3550 Keyboard Replacement: crwdns2935265:04crwdnd2935265:01crwdnd2935265:03crwdne2935265:0 Dell Vostro 3550 Keyboard Replacement: crwdns2935265:04crwdnd2935265:02crwdnd2935265:03crwdne2935265:0 Dell Vostro 3550 Keyboard Replacement: crwdns2935265:04crwdnd2935265:03crwdnd2935265:03crwdne2935265:0
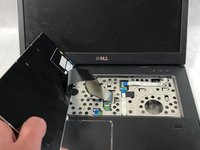
    • Carefully lift the keyboard upward to reveal the keyboard ribbon cable.

  5. Dell Vostro 3550 Keyboard Replacement: crwdns2935265:05crwdnd2935265:01crwdnd2935265:02crwdne2935265:0 Dell Vostro 3550 Keyboard Replacement: crwdns2935265:05crwdnd2935265:02crwdnd2935265:02crwdne2935265:0
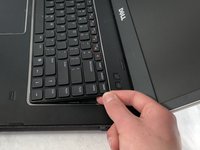
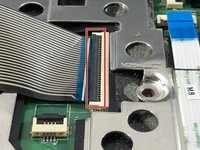
    • Lift the black tab on the keyboard cable connector upwards to release the cable.

  6. Dell Vostro 3550 Keyboard Replacement: crwdns2935265:06crwdnd2935265:01crwdnd2935265:03crwdne2935265:0 Dell Vostro 3550 Keyboard Replacement: crwdns2935265:06crwdnd2935265:02crwdnd2935265:03crwdne2935265:0 Dell Vostro 3550 Keyboard Replacement: crwdns2935265:06crwdnd2935265:03crwdnd2935265:03crwdne2935265:0
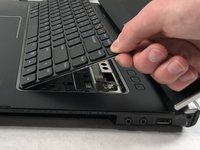
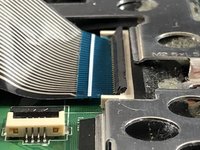
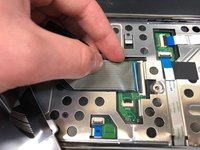
    • Pull the ribbon cable away from the connector.

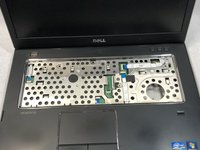
    • Remove the keyboard.

crwdns2915888:0crwdne2915888:0

To reassemble your device, follow these instructions in reverse order.

crwdns2935229:03crwdne2935229:0

Sean Stonehouse

crwdns2935283:003/22/19crwdne2935283:0

291 crwdns2915208:0crwdne2915208:0

crwdns2935295:0crwdne2935295:0

crwdns2915084:0crwdne2915084:0

UMass Dartmouth, Team S8-G6, Bailey Spring 2019 crwdns2935289:0UMass Dartmouth, Team S8-G6, Bailey Spring 2019crwdne2935289:0

UMASSD-BAILEY-S19S8G6

crwdns2931471:03crwdne2931471:0

crwdns2935297:07crwdne2935297:0

crwdns2944067:00crwdne2944067:0

crwdns2917038:0crwdne2917038:0

crwdns2936625:0crwdne2936625:0:

crwdns2936751:024crwdne2936751:0 1

crwdns2936753:07crwdne2936753:0 5

crwdns2936753:030crwdne2936753:0 12

crwdns2942667:0crwdne2942667:0 1,280