crwdns2933423:0crwdne2933423:0

Dell Venue 8 7840 Power and Volume Button Replacement

crwdns2942213:0crwdne2942213:0

  1. Dell Venue 8 7840 Power and Volume Button Replacement, Screen: crwdns2935265:01crwdnd2935265:01crwdnd2935265:01crwdne2935265:0
    • Make sure your device is turned off. Leaving it turned on may cause an electric shock.

    • Face the device with the screen towards you.

  2. Dell Venue 8 7840 Power and Volume Button Replacement: crwdns2935265:02crwdnd2935265:01crwdnd2935265:01crwdne2935265:0
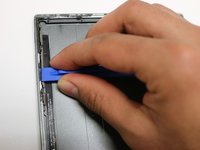
    • With a plastic opening tool, pry open the bottom left corner of the screen.

    • The screen is tightly attached to the tablet, so you may have to use a metal spudger to pry it open if the plastic spudger does not do the task.

  3. Dell Venue 8 7840 Power and Volume Button Replacement: crwdns2935265:03crwdnd2935265:01crwdnd2935265:01crwdne2935265:0
    • Next, pry open the top left corner of the screen.

  4. Dell Venue 8 7840 Power and Volume Button Replacement: crwdns2935265:04crwdnd2935265:01crwdnd2935265:01crwdne2935265:0
    • Then, pry open the top right corner of the screen.

  5. Dell Venue 8 7840 Power and Volume Button Replacement: crwdns2935265:05crwdnd2935265:01crwdnd2935265:01crwdne2935265:0
    • Lastly, pry open the bottom right corner of the screen.

  6. Dell Venue 8 7840 Power and Volume Button Replacement: crwdns2935265:06crwdnd2935265:01crwdnd2935265:01crwdne2935265:0
    • Once you have pried open all the corners of the tablet, carefully open the screen from the right side of the tablet.

    • Do not try and open the screen from the left side of the tablet, because the screen is attached on the left side of the tablet; doing this can damage the tablet.

  7. Dell Venue 8 7840 Power and Volume Button Replacement: crwdns2935265:07crwdnd2935265:01crwdnd2935265:01crwdne2935265:0
    • Once the tablet is opened, locate the connector.

  8. Dell Venue 8 7840 Power and Volume Button Replacement: crwdns2935265:08crwdnd2935265:01crwdnd2935265:01crwdne2935265:0
    • Disconnect the connector from the tablet.

  9. Dell Venue 8 7840 Power and Volume Button Replacement, Battery: crwdns2935265:09crwdnd2935265:01crwdnd2935265:01crwdne2935265:0
    • Unscrew the eight 7 mm Philips #1 screws.

    • After the screws are unscrewed, you can take off the silver cover.

  10. Dell Venue 8 7840 Power and Volume Button Replacement: crwdns2935265:010crwdnd2935265:01crwdnd2935265:01crwdne2935265:0
    • Using tweezers, disconnect the battery from the tablet.

    • After disconnecting the battery, you can remove the battery from the tablet.

  11. Dell Venue 8 7840 Power and Volume Button Replacement, Power and Volume Button: crwdns2935265:011crwdnd2935265:01crwdnd2935265:02crwdne2935265:0 Dell Venue 8 7840 Power and Volume Button Replacement, Power and Volume Button: crwdns2935265:011crwdnd2935265:02crwdnd2935265:02crwdne2935265:0
    • Using a plastic opening tool, pry open the left side of the tablet.

    • Locate the power and volume buttons.

  12. Dell Venue 8 7840 Power and Volume Button Replacement: crwdns2935265:012crwdnd2935265:01crwdnd2935265:01crwdne2935265:0
    • Using a plastic opening tool, push out the volume button from the left side of the tablet.

  13. Dell Venue 8 7840 Power and Volume Button Replacement: crwdns2935265:013crwdnd2935265:01crwdnd2935265:01crwdne2935265:0
    • Make sure that you hold the left side of the tablet open with a plastic opening tool so that you will be able to take out the volume button.

    • With tweezers, pull out the volume button.

  14. Dell Venue 8 7840 Power and Volume Button Replacement: crwdns2935265:014crwdnd2935265:01crwdnd2935265:01crwdne2935265:0
    • With a plastic opening tool, push out the power button from the left side of the tablet.

  15. Dell Venue 8 7840 Power and Volume Button Replacement: crwdns2935265:015crwdnd2935265:01crwdnd2935265:01crwdne2935265:0
    • Just like the volume button, you want to make sure that you hold the left side of the tablet open with a plastic opening tool so that you will be able to take out the power button.

    • With tweezers, pull out the power button.

crwdns2915888:0crwdne2915888:0

To reassemble your device, follow these instructions in reverse order.

Donnelle January

crwdns2935283:009/12/16crwdne2935283:0

429 crwdns2915208:0crwdne2915208:0

crwdns2935297:03crwdne2935297:0

crwdns2915084:0crwdne2915084:0

USF Tampa, Team 6-5, Remmell Fall 2016 crwdns2935289:0USF Tampa, Team 6-5, Remmell Fall 2016crwdne2935289:0

USFT-REMMELL-F16S6G5

crwdns2931471:03crwdne2931471:0

crwdns2935297:06crwdne2935297:0

crwdns2944067:00crwdne2944067:0

crwdns2917038:0crwdne2917038:0

crwdns2936625:0crwdne2936625:0:

crwdns2936751:024crwdne2936751:0 0

crwdns2936753:07crwdne2936753:0 1

crwdns2936753:030crwdne2936753:0 2

crwdns2942667:0crwdne2942667:0 740