crwdns2915892:0crwdne2915892:0
In this tutorial we will discuss how to remove and re-install memory into a Dell Optiplex 745 Ultra Small Form Factor. The Dell Optiplex 745 Ultra Small Form Factor encases two DIMM memory slots that can both house a 2GB memory module, allowing a total maximum of 4GB of memory in this machine.
crwdns2942213:0crwdne2942213:0
-
-
Make sure to shut down the computer! Go to the start menu and click shutdown from the power options first
-
Ensure all cables, speakers and other devices are unplugged and turned off before opening the computer case.
-
-
-
Lay the computer on its side; you will see a blue knob.
-
Turn said knob 90 degrees counter clockwise.
-
-
-
-
While the knob is still turned, slide the panel case forward about 1/2 inch, and then lift the panel off the computer.
-
-
-
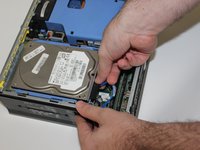
Find the power and data cables connected to the hard drive, press down on the metal tab and carefully remove them.
-
-
-
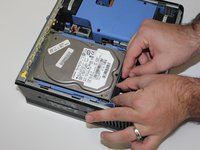
Locate the blue tabs shown on the left and right of the hard disk drive
-
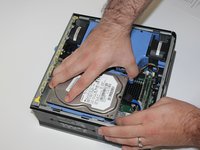
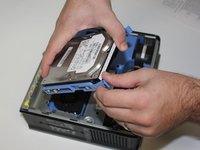
Squeeze both tabs and slide the hard disk drive towards you, then lift the drive out of the cage.
-
-
-
Press down on the two white tabs on either side of the memory module; the RAM will pop out.
-


To reassemble your device, follow these instructions in reverse order.
crwdns2935221:0crwdne2935221:0
crwdns2935227:0crwdne2935227:0
crwdns2935103:0crwdne2935103:0
crwdns2935287:0crwdne2935287:0

Pasco Hernando, Team 1-1, Prince Fall 2014 crwdns2935289:0Pasco Hernando, Team 1-1, Prince Fall 2014crwdne2935289:0
PHSC-PRINCE-F14S1G1
crwdns2931471:011crwdne2931471:0
crwdns2935297:014crwdne2935297:0