crwdns2933423:0crwdne2933423:0

Dell OptiPlex GX260 CPU Replacement

crwdns2942213:0crwdne2942213:0

  1. Dell OptiPlex GX260 CPU Replacement, Case: crwdns2935265:01crwdnd2935265:01crwdnd2935265:02crwdne2935265:0 Dell OptiPlex GX260 CPU Replacement, Case: crwdns2935265:01crwdnd2935265:02crwdnd2935265:02crwdne2935265:0
    • Lay the Dell Optiplex GX260 down on a clean flat surface with the rear towards you.

    • Push the oval shaped buttons located on the top and bottom of the PC simultaneously and lift the case straight up.

    • Note: Some force may be required to push in the oval buttons open the PC case.

  2. Dell OptiPlex GX260 CPU Replacement, CPU: crwdns2935265:02crwdnd2935265:01crwdnd2935265:03crwdne2935265:0 Dell OptiPlex GX260 CPU Replacement, CPU: crwdns2935265:02crwdnd2935265:02crwdnd2935265:03crwdne2935265:0 Dell OptiPlex GX260 CPU Replacement, CPU: crwdns2935265:02crwdnd2935265:03crwdnd2935265:03crwdne2935265:0
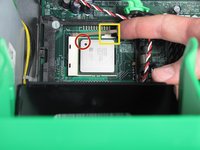
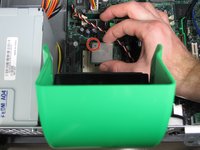
    • Flip the green fan cover up towards you to reveal the CPU heatsink.

    • Lift the heat sink release lever

    • Remove the heat sink from the CPU and lift it out.

    • The heat sink may be adhered to the CPU by the the thermal pad or compound. If so gently twist the heat sink counter clockwise slightly and then pull the heat sink up and to the right.

    • Ensure you clean the heat sink and CPU thoroughly and apply fresh thermal compound before you reinstall the heat sink. Refer to this handy iFixit Technique if you need further information.

  3. Dell OptiPlex GX260 CPU Replacement: crwdns2935265:03crwdnd2935265:01crwdnd2935265:02crwdne2935265:0 Dell OptiPlex GX260 CPU Replacement: crwdns2935265:03crwdnd2935265:02crwdnd2935265:02crwdne2935265:0
    • Carefully release the ZIF socket - push the lever backwards to release it from the hold down tab and lift it up and to the left until it stops (roughly 90 degrees).

    • Gently lift the CPU straight up and out of the socket. There should be no resistance.

    • The CPU will only fit into the ZIF socket in one orientation so take care when reinserting it. make sure that pin A1 is located correctly

    • Take care not to bend the pins on the CPU

crwdns2915888:0crwdne2915888:0

To reassemble your device, follow these instructions in reverse order.

crwdns2935229:06crwdne2935229:0

Kevin Schapansky

crwdns2935283:010/05/10crwdne2935283:0

1,457 crwdns2915208:0crwdne2915208:0

crwdns2935297:09crwdne2935297:0

crwdns2915084:0crwdne2915084:0

Cal Poly, Team 4-48, Amido Fall 2010 crwdns2935289:0Cal Poly, Team 4-48, Amido Fall 2010crwdne2935289:0

CPSU-AMIDO-F10S4G48

crwdns2931471:04crwdne2931471:0

crwdns2935297:027crwdne2935297:0

crwdns2944067:00crwdne2944067:0

crwdns2917038:0crwdne2917038:0

crwdns2936625:0crwdne2936625:0:

crwdns2936751:024crwdne2936751:0 0

crwdns2936753:07crwdne2936753:0 7

crwdns2936753:030crwdne2936753:0 25

crwdns2942667:0crwdne2942667:0 10,105