crwdns2933423:0crwdne2933423:0

Dell Latitude E4200 RAM Replacement

crwdns2942213:0crwdne2942213:0

  1. Dell Latitude E4200 RAM Replacement, Back Panel: crwdns2935265:01crwdnd2935265:01crwdnd2935265:01crwdne2935265:0
    • Use PH0 screwdriver to unscrew the 4.49x7.88 mm screw in the middle of the back panel.

  2. Dell Latitude E4200 RAM Replacement: crwdns2935265:02crwdnd2935265:01crwdnd2935265:03crwdne2935265:0 Dell Latitude E4200 RAM Replacement: crwdns2935265:02crwdnd2935265:02crwdnd2935265:03crwdne2935265:0 Dell Latitude E4200 RAM Replacement: crwdns2935265:02crwdnd2935265:03crwdnd2935265:03crwdne2935265:0
    • Place thumbs flat on the front side of the back panel (the side to open the laptop).

    • Push panel upwards sliding it out of the locked position.

    • Lift panel out of socket.

  3. Dell Latitude E4200 RAM Replacement: crwdns2935265:03crwdnd2935265:01crwdnd2935265:01crwdne2935265:0
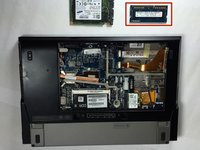
    • Remove panel and screw from the device. This opens up the main board of the device.

  4. Dell Latitude E4200 RAM Replacement, Remove the back panel: crwdns2935265:04crwdnd2935265:01crwdnd2935265:01crwdne2935265:0
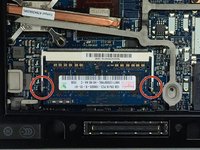
    • Once you removed the back panel, the RAM will easily be located.

    • Be sure to remove the battery first

  5. Dell Latitude E4200 RAM Replacement, Take out the RAM: crwdns2935265:05crwdnd2935265:01crwdnd2935265:02crwdne2935265:0 Dell Latitude E4200 RAM Replacement, Take out the RAM: crwdns2935265:05crwdnd2935265:02crwdnd2935265:02crwdne2935265:0
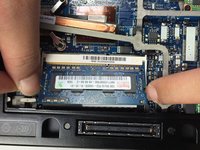
    • Place your thumbs on each side of the RAM tabs.

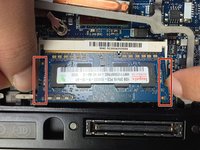
    • Gently push outward on the tabs to release the RAM. This will allow you to remove the RAM completely from your device.

    • The RAM should "bump up" after you push away the tabs.

  6. Dell Latitude E4200 RAM Replacement: crwdns2935265:06crwdnd2935265:01crwdnd2935265:03crwdne2935265:0 Dell Latitude E4200 RAM Replacement: crwdns2935265:06crwdnd2935265:02crwdnd2935265:03crwdne2935265:0 Dell Latitude E4200 RAM Replacement: crwdns2935265:06crwdnd2935265:03crwdnd2935265:03crwdne2935265:0
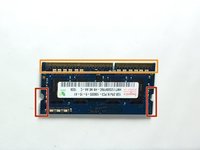
    • Gently grab each side of the RAM and remove it from the device.

    • Please do not touch connection side of the RAM (shown in orange) with fingers. It might causes possible corrosion to the connection.

crwdns2915888:0crwdne2915888:0

To reassemble your device, follow these instructions in reverse order.

crwdns2935229:02crwdne2935229:0

Chao Wei

crwdns2935283:003/22/15crwdne2935283:0

146 crwdns2915208:0crwdne2915208:0

crwdns2935295:0crwdne2935295:0

crwdns2915084:0crwdne2915084:0

Baylor, Team 5-6, Williams Spring 2015 crwdns2935289:0Baylor, Team 5-6, Williams Spring 2015crwdne2935289:0

BU-WILLIAMS-S15S5G6

crwdns2931471:04crwdne2931471:0

crwdns2935297:06crwdne2935297:0

crwdns2947412:00crwdne2947412:0

crwdns2917038:0crwdne2917038:0

crwdns2936625:0crwdne2936625:0:

crwdns2936751:024crwdne2936751:0 1

crwdns2936753:07crwdne2936753:0 3

crwdns2936753:030crwdne2936753:0 14

crwdns2942667:0crwdne2942667:0 2,792