crwdns2915892:0crwdne2915892:0
Guide to separating the display from the body of the laptop.
crwdns2942213:0crwdne2942213:0
-
-
Open the laptop cover all of the way.
-
-
-
Locate the notch under the cover at the top of the keyboard
-
Using the spudger as a lever, lift the plastic covering
-
Carefully remove the rest of the covering from right to left
-
-
-
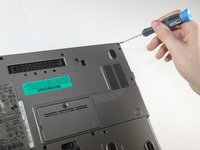
Unscrew the top portion of the keyboard using a #00 screwdriver
-
-
-
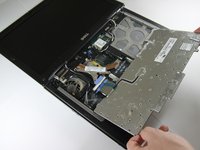
Hold keyboard from the top and gently pull towards the LCD screen to remove the keyboard from the case
-
-
-
Once keyboard is out of the case, lay it face-down on the track pad
-
-
-
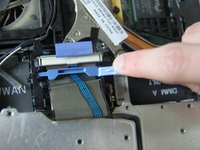
Using a small spudger, pull back on the black bar to release the blue lever
-
-
-
-
Pull up on the metal bar connected to the socket to detach the ribbon cable
-
-
-
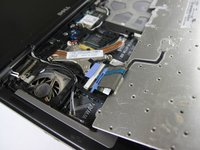
Detach cables that connect the display to the body of the laptop
-
-
-
Disconnect the black cable attached to the motherboard
-
-
-
Close the laptop lid
-
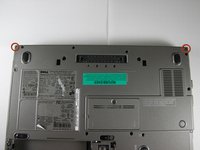
Turn the laptop over onto its backside
-
Unscrew the two screws shown in the picture using a #00 screwdriver
-
-
-
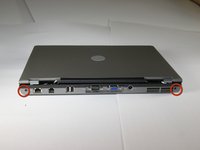
Face the laptop's back ports towards you
-
Unscrew the two screws labeled in the picture using a #00 screwdriver
-
-
-
Turn the laptop over again so it's right-side up
-
Open the display, and pull the display up and out of the laptop's body
-
-
-
Remove the circular rubber pads as outlined in the picture using a spudger
-
-
-
Unscrew the screws that were under the rubber circles using the #00 screwdriver
-
-
-
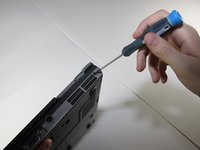
Carefully use a spudger to work around the edge of the screen to lift off the plastic cover
-
-
-
Remove the screws outlined in the picture
-
-
-
Carefully lift the LCD screen out of its casing
-


To reassemble your device, follow these instructions in reverse order.
To reassemble your device, follow these instructions in reverse order.
crwdns2935221:0crwdne2935221:0
crwdns2935229:019crwdne2935229:0
crwdns2915084:0crwdne2915084:0

Cal Poly, Team 24-35, Regan Spring 2010 crwdns2935289:0Cal Poly, Team 24-35, Regan Spring 2010crwdne2935289:0
CPSU-REGAN-S10S24G35
crwdns2931471:04crwdne2931471:0
crwdns2935297:04crwdne2935297:0
crwdns2947410:01crwdne2947410:0
Check out this replacement screen at a great price on bcdelectrostore.com