crwdns2915892:0crwdne2915892:0
This manual provides the steps to replacing the Latitude 9410 2-in-1 base cover. It includes a list of necessary tools, safety precautions, and detailed instructions with visual references (if available).
Before starting, please review the entire manual to familiarize yourself with the steps and precautions. The replacement of the base cover is necessary to address potential damage, wear, or malfunction, ensuring proper function and longevity of your device. It is crucial to perform this repair carefully to avoid further damage to internal components.
Special requirements for this procedure include handling sensitive internal components with care and ensuring you are working in a static-free environment to prevent damage to the electronics. Additionally, be aware of the potential risk of sharp edges on the cover or screws, which may cause injury if not handled properly.
If you feel unsure about any aspect of the replacement, consider seeking professional assistance for a correct and safe repair.
crwdns2942213:0crwdne2942213:0
-
-
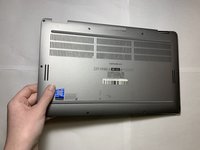
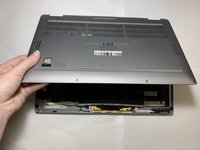
Place the laptop upside down on a flat surface.
-
-
-
-
Use a Phillips #00 screwdriver to loosen the ten captive screws.
-


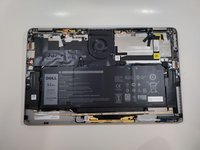
To reassemble your device, follow these instructions in reverse order.
To reassemble your device, follow these instructions in reverse order.
crwdns2915084:0crwdne2915084:0

Western Carolina University, Team 1-2, Virtue Spring 2022 crwdns2935289:0Western Carolina University, Team 1-2, Virtue Spring 2022crwdne2935289:0
WCU-VIRTUE-S22S1G2
crwdns2931471:04crwdne2931471:0
crwdns2935297:011crwdne2935297:0