crwdns2915892:0crwdne2915892:0
If the keys of your keyboard are unresponsive or damaged, replacing the individual keys or the entire keyboard might be necessary.
This guide will lead you through replacing the keyboard of a Dell Latitude 7420.
Before starting, please ensure the device is turned off and disconnected from any adaptors or charging cables.
Likewise, use an anti-static band or mat when opening computers or handling components.
crwdns2942213:0crwdne2942213:0
-
-
Remove the eight, 7 mm screws from the back case using a Phillips #0 screwdriver.
-
Use an opening pick or opening tool and work your way around the periphery of the base cover to separate it from the chassis.
-
-
-
Using the Phillips #1 screwdriver, remove the five 5 mm screws securing the battery to the motherboard.
-
-
-
Use a spudger to pry up each side of the battery connector. Then, lift the connector straight up from its socket.
-
-
-
Unplug the speaker cable by pulling it down, then carefully unthread the cable from the battery
-
-
-
Gently remove the battery from its housing.
-
-
-
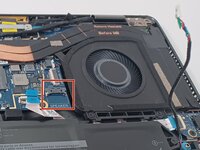
Use a Phillips #00 screwdriver to remove the two 2.0 mm screws holding down the SSD cover.
-
Remove the SSD cover.
-
-
-
-
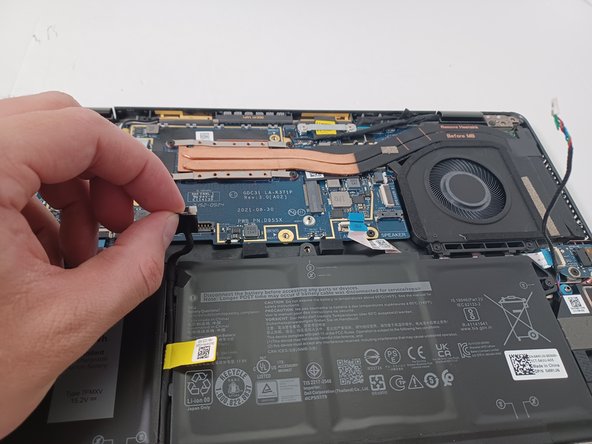
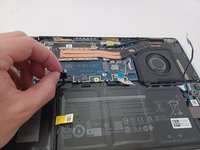
Pull the SSD card by its left edge to slide it out of the socket.
-
-
crwdns2935267:0crwdne2935267:0Dust Blower$4.99
-
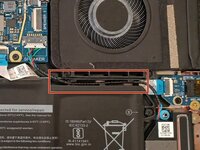
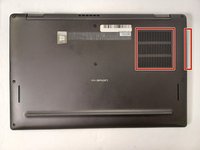
Use a cloth and dust blower to clean the vents.
-
-
-
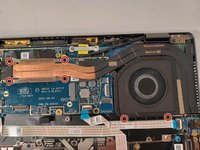
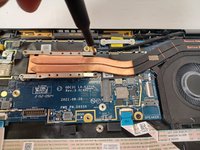
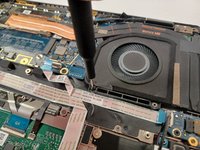
Use a Phillips #00 screwdriver to remove the six 2.5 mm screws securing the fan assembly.
-
-
-
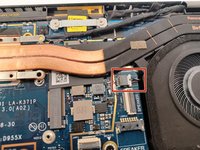
Use the pointed tip of a spudger to carefully push on each side of the connector and remove it from the socket.
-
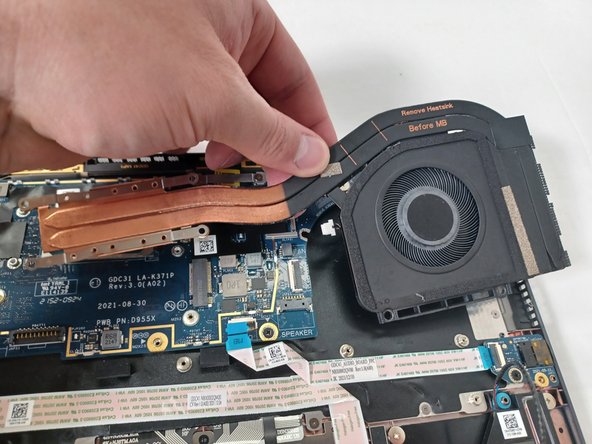
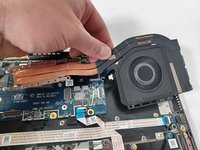
Remove the fan assembly.
-
-
-
Use a Phillips #00 screwdriver to remove the single 2.5 mm screw from the audio board.
-
Use a spudger or your fingernail to flip the black cover open.
-
Slide the ribbon cable out from the ZIF connector.
-
Remove the audio board.
-
-
-
Use a Phillips #00 screwdriver to remove the screws securing the motherboard to the device.
-
-
crwdns2935267:0crwdne2935267:0Tweezers$4.99
-
Remove the connectors to the system board.
-
Place the tip of your opening tool under the edge of the connector, and pry the connector straight up from its socket.
-
Use the tip of a spudger or your fingernail to flip up the small locking flaps from these ZIF connectors. Then, you can safely pull the cables out.
-
Slide a thin, ESD-safe pry tool or tweezers under the wire until it's snug against the connector, and pry straight up from the board to disconnect these coaxial cables.
-
To remove the blue connector, pull the cable away from the connector in the same direction that the individual wires are running.
-
Lift the final connector up from the socket.
-
-
-
Use a Phillips #00 screwdriver to remove two 4.0 mm screws from the I/O board.
-
Remove the I/O board from the device.
-
-
-
Use a Phillips #00 screwdriver to remove the twenty 1.7 mm screws securing the keyboard.
-
-
-
Use the tip of a spudger or your fingernail to flip up the small locking flap on the remaining cables. Then, you can safely pull them out.
-
Pull the keyboard out from the chassis.
-


To reassemble your device, follow these instructions in reverse order.
To reassemble your device, follow these instructions in reverse order.
crwdns2935221:0crwdne2935221:0
crwdns2935227:0crwdne2935227:0
crwdns2915084:0crwdne2915084:0

Gateway, Team 1-2, Pee Spring 2023 crwdns2935289:0Gateway, Team 1-2, Pee Spring 2023crwdne2935289:0
GCC-PEE-S23S1G2
crwdns2931471:04crwdne2931471:0
crwdns2935297:010crwdne2935297:0