crwdns2942213:0crwdne2942213:0
-
-
Shut down the computer and turn it upside down.
-
-
-
Slide both of the battery release latches on the bottom of the device in towards the center of the computer.
-
-
-
Slide and lift the battery up and out from the device.
-
-
-
Open the computer and push the screen back as far as possible.
-
-
-
Slide a plastic opening tool into the slots on the top of the keyboard.
-
-
-
Pry the keyboard away from the device using the plastic opening tool.
-
-
-
-
Lift and slide the keyboard towards the screen to remove the tabs on the keyboard from the slots on the palmrest.
-
-
-
Flip the keyboard over and place it on the front of the device making sure not to pull out the keyboard cable.
-
-
-
Lift up the connector latch and remove the keyboard cable. The keyboard is now free from the device.
-
-
-
Turn the computer over and remove the six screws that secure the palmrest assembly
-
-
-
Turn the computer over and open the display as far as possible and remove the four 5 mm Phillips # 0 screw holding the palmrest in place.
-
-
-
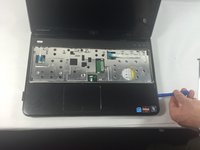
Disconnect the power button board cable, touch pad cable and the hot key board cable from the connectors.
-
-
-
Use a plastic opening tool to carefully pry out the palmrest assembly and lift it off the computer base.
-
-
-
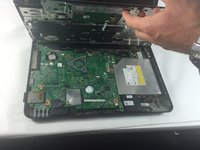
Turn the device over and then remove the two 5 mm Phillips #0 screws that keeps the display assembly to the base and then flip the device.
-
-
-
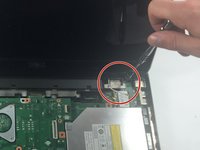
Disconnect the display antenna cable from the Mini Card.
-
-
-
Disconnect the LCD display cable and touch screen cable.
-
-
-
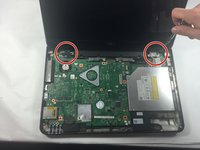
There are two 5 mm Phillips # 0 screws on each hinge.
-
Unscrew the four 5 mm Phillips # 0 screws holding the hinge that keeps the monitor in place.
-
-
-
Lift the display off the computer base.
-


To reassemble your device, follow these instructions in reverse order.
To reassemble your device, follow these instructions in reverse order.
crwdns2915084:0crwdne2915084:0

UMass Dartmouth, Team 4-3, Catania Fall 2016 crwdns2935289:0UMass Dartmouth, Team 4-3, Catania Fall 2016crwdne2935289:0
UMASSD-CATANIA-F16S4G3
crwdns2931471:03crwdne2931471:0
crwdns2935297:08crwdne2935297:0