crwdns2915892:0crwdne2915892:0
Please read the troubleshooting section before using this repair guide to take apart your computer. Many problems can be resolved without taking the computer apart.
It is important to remove the battery before following these instructions. It will ensure no electrical discharge to occur. If you are unsure at all about how to remove the battery please refer to the battery repair guide for this item.
crwdns2942213:0crwdne2942213:0
-
-
Turn it upside down and locate the battery release switch.
-
-
-
While holding the switch in the open position, lift out the battery.
-
-
-
-
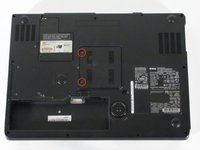
Turn the computer over, screen closed, so that the underside is showing
-
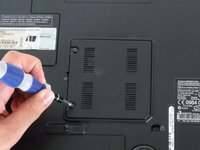
Locate the two screws as shown and remove them.
-
Use a small phillips head screwdriver
-
-
-
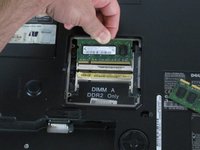
Remove plastic cover carefully
-
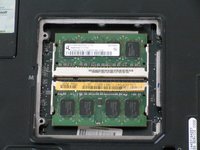
There will be two RAM sticks as shown
-
Using your fingers, pull the sides apart that are holding the RAM in place. This will release the RAM.
-
-
-
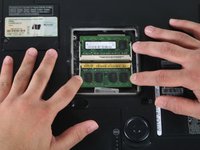
Carefully remove old/damaged RAM sticks and replace with new ones.
-


To reassemble your device, follow these instructions in reverse order.
To reassemble your device, follow these instructions in reverse order.
crwdns2935221:0crwdne2935221:0
crwdns2935229:05crwdne2935229:0
crwdns2915084:0crwdne2915084:0

Cal Poly, Team 22-5, Maness Fall 2010 crwdns2935289:0Cal Poly, Team 22-5, Maness Fall 2010crwdne2935289:0
CPSU-MANESS-F10S22G5
crwdns2931471:04crwdne2931471:0
crwdns2935297:011crwdne2935297:0
crwdns2947410:01crwdne2947410:0
If upgrading RAM, a black DOS based screen will show stating "the amount of RAM in system has changed", wait 1minute and the computer will beep and prompt for F1 (boot normally) or F2 (run system setup utility). Pressing F2 and waiting some time will allow the computer to reconfigure and then boot into Windows normally.