crwdns2933423:0crwdne2933423:0

Dell Inspiron E1705 Motherboard Replacement

crwdns2942213:0crwdne2942213:0

  1. Dell Inspiron E1705 Motherboard Replacement, Battery: crwdns2935265:01crwdnd2935265:01crwdnd2935265:01crwdne2935265:0
    • Make sure that the computer is turned off and is disconnected from external power source.

    • Turn it upside down and locate the battery release switch.

  2. Dell Inspiron E1705 Motherboard Replacement: crwdns2935265:02crwdnd2935265:01crwdnd2935265:02crwdne2935265:0 Dell Inspiron E1705 Motherboard Replacement: crwdns2935265:02crwdnd2935265:02crwdnd2935265:02crwdne2935265:0
    • While holding the switch in the open position, lift out the battery.

    • If you plan to work on any internal laptop components, press and hold the power button for 5 seconds. This will dissipate any residual charge on the motherboard to prevent electrical shock when you begin to handle it.

  3. Dell Inspiron E1705 Motherboard Replacement, Hard Drive: crwdns2935265:03crwdnd2935265:01crwdnd2935265:02crwdne2935265:0 Dell Inspiron E1705 Motherboard Replacement, Hard Drive: crwdns2935265:03crwdnd2935265:02crwdnd2935265:02crwdne2935265:0
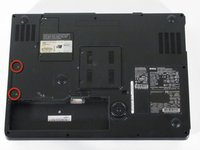
    • Remove the two Phillips #1 screws on the left side of the computer, just above the battery compartment.

    • These screws hold the hard drive tray into the hard drive compartment.

  4. Dell Inspiron E1705 Motherboard Replacement: crwdns2935265:04crwdnd2935265:01crwdnd2935265:01crwdne2935265:0
    • Slide the hard drive tray out of the hard drive compartment.

  5. Dell Inspiron E1705 Motherboard Replacement, Optical Drive: crwdns2935265:05crwdnd2935265:01crwdnd2935265:01crwdne2935265:0
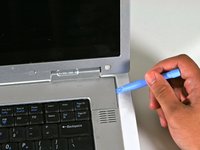
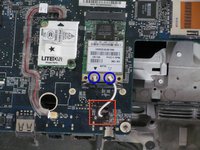
    • Locate and remove the screw shown

    • It is labeled with a lock symbol

  6. Dell Inspiron E1705 Motherboard Replacement: crwdns2935265:06crwdnd2935265:01crwdnd2935265:02crwdne2935265:0 Dell Inspiron E1705 Motherboard Replacement: crwdns2935265:06crwdnd2935265:02crwdnd2935265:02crwdne2935265:0
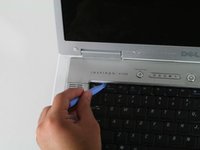
    • Use the screwdriver to gently push the optical drive out

  7. Dell Inspiron E1705 Motherboard Replacement, Lower Case: crwdns2935265:07crwdnd2935265:01crwdnd2935265:01crwdne2935265:0
    • Remove the 12 Phillips #1 screws from the edges of the lower case.

    • You may also need to remove the central screw next to the lock icon.

  8. Dell Inspiron E1705 Motherboard Replacement: crwdns2935265:08crwdnd2935265:01crwdnd2935265:03crwdne2935265:0 Dell Inspiron E1705 Motherboard Replacement: crwdns2935265:08crwdnd2935265:02crwdnd2935265:03crwdne2935265:0 Dell Inspiron E1705 Motherboard Replacement: crwdns2935265:08crwdnd2935265:03crwdnd2935265:03crwdne2935265:0
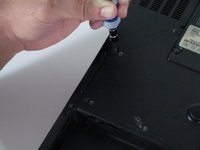
    • Turn the computer back over and tilt the screen open.

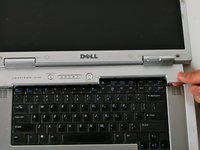
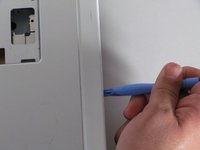
    • Use the plastic opening tool to carefully pry the panel out as shown in the pictures

    • Remove the plastic panel carefully.

  9. Dell Inspiron E1705 Motherboard Replacement: crwdns2935265:09crwdnd2935265:01crwdnd2935265:03crwdne2935265:0 Dell Inspiron E1705 Motherboard Replacement: crwdns2935265:09crwdnd2935265:02crwdnd2935265:03crwdne2935265:0 Dell Inspiron E1705 Motherboard Replacement: crwdns2935265:09crwdnd2935265:03crwdnd2935265:03crwdne2935265:0
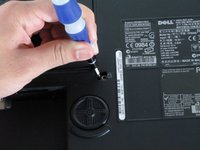
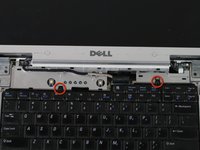
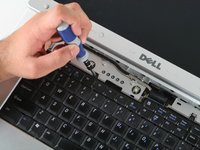
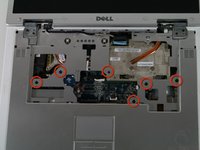
    • Use the small Phillips head screwdriver to remove the screws circled in red.

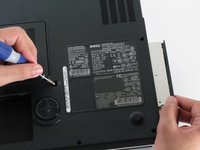
    • Gently lift the keyboard up and rest it just below the screen as shown in the picture.

    • The keyboard will still be connected to the motherboard.

  10. Dell Inspiron E1705 Motherboard Replacement: crwdns2935265:010crwdnd2935265:01crwdnd2935265:02crwdne2935265:0 Dell Inspiron E1705 Motherboard Replacement: crwdns2935265:010crwdnd2935265:02crwdnd2935265:02crwdne2935265:0
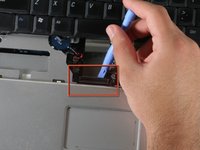
    • Before removing the keyboard completely, use the plastic opening tool to gently lift the clamp connecting the keyboard to the motherboard.

    • Once the keyboard has been disconnected, remove the keyboard completely.

  11. Dell Inspiron E1705 Motherboard Replacement: crwdns2935265:011crwdnd2935265:01crwdnd2935265:03crwdne2935265:0 Dell Inspiron E1705 Motherboard Replacement: crwdns2935265:011crwdnd2935265:02crwdnd2935265:03crwdne2935265:0 Dell Inspiron E1705 Motherboard Replacement: crwdns2935265:011crwdnd2935265:03crwdnd2935265:03crwdne2935265:0
    • Using a Phillips head screwdriver, remove the screws shown in the image. They all have the letter "P" next to them.

    • Carefully unplug the connections shown.

    • Don't forget the display cable. It is slightly to the right of the Dell logo at the top.

    • Also, the wireless cables on the right side may prevent moving the upper case out of the way.

    • Once the screws have been removed and the connections unplugged, use the plastic opening tool to gently separate the panel from the lower case.

  12. Dell Inspiron E1705 Motherboard Replacement: crwdns2935265:012crwdnd2935265:01crwdnd2935265:01crwdne2935265:0
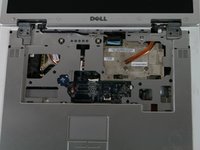
    • Remove the plastic case by gently bending back towards the screen. You can bend the screen all the way back if that helps.

    • For the motherboard the optical drive will be removed already. However for the lower case it is not necessary that it be taken out.

    • If you are having trouble removing the upper plastic case (and LCD) from the lower case, there may still be a wire connected to the Wi-Fi adapter. Turn the laptop over, open the Wi-Fi module access panel and remove the + and - leads for the Wi-Fi antenna.

  13. Dell Inspiron E1705 Motherboard Replacement, Heat Sink: crwdns2935265:013crwdnd2935265:01crwdnd2935265:01crwdne2935265:0
    • Unscrew the 4 screws shown in the picture.

    • Screws will not come out all the way.

  14. Dell Inspiron E1705 Motherboard Replacement: crwdns2935265:014crwdnd2935265:01crwdnd2935265:02crwdne2935265:0 Dell Inspiron E1705 Motherboard Replacement: crwdns2935265:014crwdnd2935265:02crwdnd2935265:02crwdne2935265:0
    • Remove the heat sync gently

  15. Dell Inspiron E1705 Motherboard Replacement: crwdns2935265:015crwdnd2935265:01crwdnd2935265:03crwdne2935265:0 Dell Inspiron E1705 Motherboard Replacement: crwdns2935265:015crwdnd2935265:02crwdnd2935265:03crwdne2935265:0 Dell Inspiron E1705 Motherboard Replacement: crwdns2935265:015crwdnd2935265:03crwdnd2935265:03crwdne2935265:0
    • The right heat sync is connected to the videocard. To remove the heat sync requires also removing the videocard.

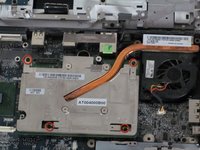
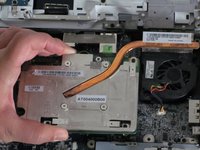
    • Remove the 4 screws indicated in the first picture

    • Screws will not totally come out.

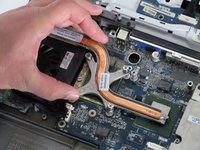
    • Gently lift up the videocard and heat sync from the motherboard.

  16. Dell Inspiron E1705 Motherboard Replacement, Motherboard: crwdns2935265:016crwdnd2935265:01crwdnd2935265:03crwdne2935265:0 Dell Inspiron E1705 Motherboard Replacement, Motherboard: crwdns2935265:016crwdnd2935265:02crwdnd2935265:03crwdne2935265:0 Dell Inspiron E1705 Motherboard Replacement, Motherboard: crwdns2935265:016crwdnd2935265:03crwdnd2935265:03crwdne2935265:0
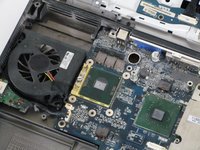
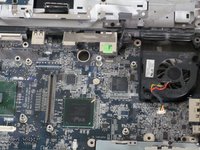
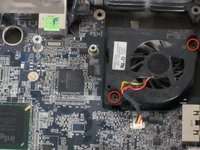
    • Remove both fans from the computer. This will make it easier to remove the motherboard.

    • Remove the screws in the photos to remove the fans.

  17. Dell Inspiron E1705 Motherboard Replacement: crwdns2935265:017crwdnd2935265:01crwdnd2935265:01crwdne2935265:0
    • Unplug the shown leads by gently pulling them up.

    • Remove the shown screws from the motherboard

  18. Dell Inspiron E1705 Motherboard Replacement: crwdns2935265:018crwdnd2935265:01crwdnd2935265:03crwdne2935265:0 Dell Inspiron E1705 Motherboard Replacement: crwdns2935265:018crwdnd2935265:02crwdnd2935265:03crwdne2935265:0 Dell Inspiron E1705 Motherboard Replacement: crwdns2935265:018crwdnd2935265:03crwdnd2935265:03crwdne2935265:0
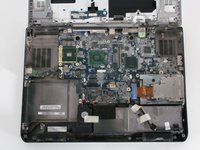
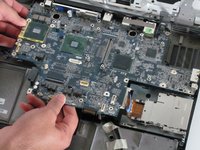
    • Gently remove the motherboard from the laptop by simultaneously lifting and pulling away from the sides.

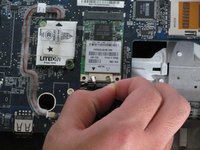
    • Once the motherboard is free, flip it over, towards the screen of the laptop and gently remove the black and white wire from the wireless card.

    • Once the wires are disconnected, pull them through the hole and completely remove the motherboard from the computer.

  19. Dell Inspiron E1705 Motherboard Replacement: crwdns2935265:019crwdnd2935265:01crwdnd2935265:01crwdne2935265:0
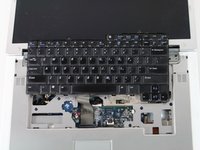
    • Your computer should look like the computer in the photo without the motherboard.

crwdns2915888:0crwdne2915888:0

To reassemble your device, follow these instructions in reverse order.

crwdns2935229:05crwdne2935229:0

Malik Shahbal

crwdns2935283:010/05/10crwdne2935283:0

471 crwdns2915208:0crwdne2915208:0

crwdns2935297:05crwdne2935297:0

crwdns2915084:0crwdne2915084:0

Cal Poly, Team 22-5, Maness Fall 2010 crwdns2935289:0Cal Poly, Team 22-5, Maness Fall 2010crwdne2935289:0

CPSU-MANESS-F10S22G5

crwdns2931471:04crwdne2931471:0

crwdns2935297:011crwdne2935297:0

crwdns2947412:00crwdne2947412:0

crwdns2917038:0crwdne2917038:0

crwdns2936625:0crwdne2936625:0:

crwdns2936751:024crwdne2936751:0 0

crwdns2936753:07crwdne2936753:0 5

crwdns2936753:030crwdne2936753:0 11

crwdns2942667:0crwdne2942667:0 17,464