crwdns2915892:0crwdne2915892:0
The Hard Drive is one of the main components of any computer. Replacing it isn't extremely difficult, but important nonetheless. In this guide, we'll walk you through replacing the hard drive in the Dell Inspiron Duo, step by step, making it easy for anyone to accomplish.
crwdns2942213:0crwdne2942213:0
-
-
Flip your device over so the bottom panel is facing up.
-
To remove the old battery from the laptop, first unscrew the eight screws (size M2.5x8) from the bottom with a Phillips #0 screwdriver, this will allow the removal of the keyboard and front panel.
-
-
-
Flip the device over again and open the laptop so that you have access to the keyboard. There are hooks on the bottom of the keyboard, but gently pulling the keyboard towards the monitor will allow it to pull out easily. Be sure to unclamp the ribbon cable. Remove the three screws under the keyboard.
-
Remove the three plastic Keyboard and trackpad connectors (these are labeled with a blue circle on the second photograph).
-
-
-
-
Next, remove the top cover from the device using the plastic opening tools. It snaps in on the sides, so don't worry if you hear it unsnapping; it's not breaking.
-
-
-
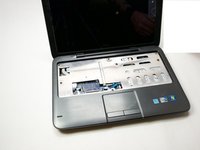
With the laptop open, locate the hard drive. It will be on the left side of the laptop, the side with the power button.
-
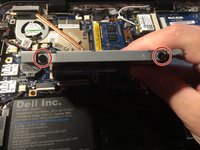
Remove the two screws on the left side of the hard drive enclosure.
-
-
-
With the screws removed, the hard drive will slide from the left to right, disconnecting it from the hard drive port.
-
Lift the hard drive and hard drive enclosure out out of laptop.
-
-
-
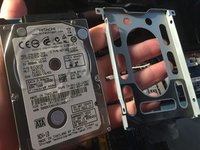
With the hard drive and the metal case that encloses the hard drive removed from the laptop, you will see two screws on either side of the metal case. Remove these screws and lift the hard drive out of the metal casing.
-
Set the hard drive to the side and slide a new hard drive to the metal casing, ensuring that the white label is on top.
-


To reassemble your device, follow these instructions in reverse order.
To reassemble your device, follow these instructions in reverse order.
crwdns2935221:0crwdne2935221:0
crwdns2935229:07crwdne2935229:0
crwdns2915084:0crwdne2915084:0

UW Tacoma, Team 1-1, Liner SU 2015 crwdns2935289:0UW Tacoma, Team 1-1, Liner SU 2015crwdne2935289:0
UWT-LINER-SU15S1G1
crwdns2931471:03crwdne2931471:0
crwdns2935297:06crwdne2935297:0
crwdns2947412:02crwdne2947412:0
This guide leaves out some critical information:
In step 1 there are two additional screws under the removable panel at the bottom of the picture.
In step 2 it should be noted that the keyboard and trackpad connectors have tiny clamps that should be dealt with carefully. If lost your Duo will no longer function unless you can somehow find replacements.
In step 3 there are four additional screws not mentioned that must be removed before the top panel can be removed. I nearly damaged my Duo irreparably by first unsnapping the sides with a flat spudger and then attempting to lift the panel off. Once the four unmentioned screws are removed the panel comes off easily.
Following this guide to the letter will result in either confusion or damage to your Duo.
Many thanks for the instructions. Very help together with comments from Aaron. Also YouTube video on disassembling the Duo. As Aaron said be careful with the three small connectors. I broke the black plastic on one of them. The trick is to lift the white plastic catch and cable then comes out.