crwdns2933423:0crwdne2933423:0

Dell Inspiron B130 Hard Drive Replacement

crwdns2942213:0crwdne2942213:0

  1. Dell Inspiron B130 Hard Drive Replacement, Battery: crwdns2935265:01crwdnd2935265:01crwdnd2935265:03crwdne2935265:0 Dell Inspiron B130 Hard Drive Replacement, Battery: crwdns2935265:01crwdnd2935265:02crwdnd2935265:03crwdne2935265:0 Dell Inspiron B130 Hard Drive Replacement, Battery: crwdns2935265:01crwdnd2935265:03crwdnd2935265:03crwdne2935265:0
    • First, make sure your computer is turned off.

    • Remove the battery by flipping the two switches under the battery and pulling it out

  2. Dell Inspiron B130 Hard Drive Replacement: crwdns2935265:02crwdnd2935265:01crwdnd2935265:03crwdne2935265:0 Dell Inspiron B130 Hard Drive Replacement: crwdns2935265:02crwdnd2935265:02crwdnd2935265:03crwdne2935265:0 Dell Inspiron B130 Hard Drive Replacement: crwdns2935265:02crwdnd2935265:03crwdnd2935265:03crwdne2935265:0
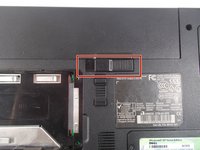
    • Push the tab from the battery, downwards to unlock the battery.

    • The tab should be in the position next to the unlocked indicator.

  3. Dell Inspiron B130 Hard Drive Replacement: crwdns2935265:03crwdnd2935265:01crwdnd2935265:03crwdne2935265:0 Dell Inspiron B130 Hard Drive Replacement: crwdns2935265:03crwdnd2935265:02crwdnd2935265:03crwdne2935265:0 Dell Inspiron B130 Hard Drive Replacement: crwdns2935265:03crwdnd2935265:03crwdnd2935265:03crwdne2935265:0
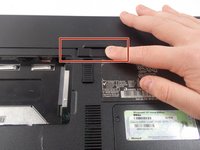
    • Now, push the other tab (the one right under the battery) from right to left.

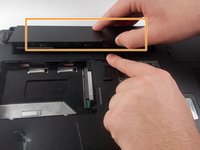
    • Now the battery will be loose; lift the battery up and out of the computer.

  4. Dell Inspiron B130 Hard Drive Replacement, Hard Drive: crwdns2935265:04crwdnd2935265:01crwdnd2935265:03crwdne2935265:0 Dell Inspiron B130 Hard Drive Replacement, Hard Drive: crwdns2935265:04crwdnd2935265:02crwdnd2935265:03crwdne2935265:0 Dell Inspiron B130 Hard Drive Replacement, Hard Drive: crwdns2935265:04crwdnd2935265:03crwdnd2935265:03crwdne2935265:0
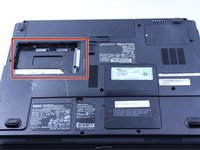
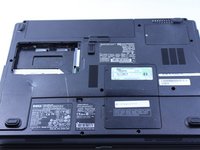
    • This particular computer is missing its hard drive.

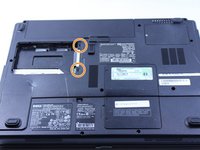
    • Remove the two screws.

    • Remove the plastic cover by lifting from the groove as indicated.

    • Remove the hard drive from the computer by lifting up and out.

crwdns2915888:0crwdne2915888:0

To reassemble your device, follow these instructions in reverse order.

Patrick McNeil

crwdns2935283:010/19/16crwdne2935283:0

937 crwdns2915208:0crwdne2915208:0

crwdns2935297:08crwdne2935297:0

crwdns2915084:0crwdne2915084:0

UMass Dartmouth, Team 1-8, Catania Fall 2016 crwdns2935289:0UMass Dartmouth, Team 1-8, Catania Fall 2016crwdne2935289:0

UMASSD-CATANIA-F16S1G8

crwdns2931471:03crwdne2931471:0

crwdns2935297:09crwdne2935297:0

crwdns2944067:00crwdne2944067:0

crwdns2917038:0crwdne2917038:0

crwdns2936625:0crwdne2936625:0:

crwdns2936751:024crwdne2936751:0 0

crwdns2936753:07crwdne2936753:0 0

crwdns2936753:030crwdne2936753:0 6

crwdns2942667:0crwdne2942667:0 622