crwdns2915892:0crwdne2915892:0
This guide will walk you through removing and replacing your Dell Inspiron 17R-N7110 hard drive. You will be handling and working with delicate electronic components, so be sure to wear the anti-static wrist strap for this replacement.
crwdns2942213:0crwdne2942213:0
-
crwdns2935267:0crwdne2935267:0Anti-Static Wrist Strap$7.95
-
Place the laptop on a flat surface with the Dell logo upside down.
-
Flip the laptop over. The battery will be in the top center.
-
-
-
Slide both the left lock and right lock, towards the center of the battery.
-
Push upwards on the grip on the bottom of the battery to remove it.
-
-
-
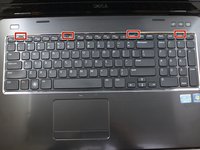
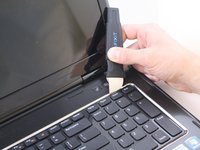
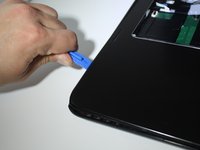
Flip over and open your device. Gently wedge the metal Jimmy into the rightmost hole at a 45-degree angle. Make sure that the Jimmy is between the silver metal portion of the keyboard and the silver plastic edge around the keyboard.
-
Tilt the metal jimmy away from you to pry up the edge of the keyboard.
-
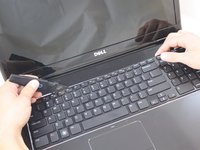
Repeat the previous actions on each of the other three holes to release the keyboard.
-
-
-
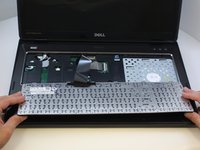
Gently flip the keyboard over and lay it on the touchpad area.
Only the frame of the keyboard came off, keys remained there
-
-
-
-
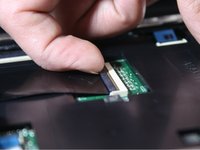
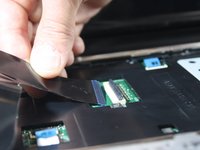
Flip up the black flap where the keyboard cable connects to the motherboard
-
Gently pull the cable away from the slot to release the keyboard.
-
Remove the keyboard from the device.
-
-
-
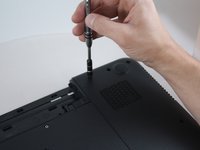
Flip the laptop over so it is bottom-up.
-
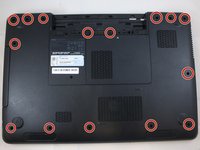
Use a Phillips #0 screwdriver to unscrew the fifteen 5mm screws pictured.
the CDROM drive also needs to be removed as it is hiding two screws
-
-
-
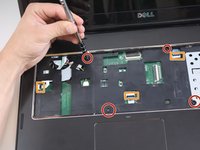
Flip the laptop over.
-
Use a Phillips #0 screwdriver to unscrew the four 5mm screws from the palmrest.
-
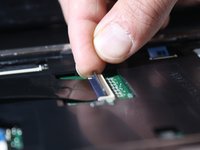
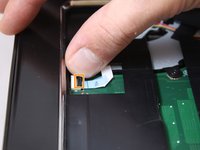
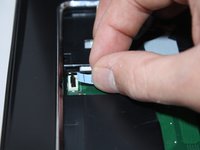
Flip up the black flaps over the three cables pictured and gently pull them out.
-
-
-
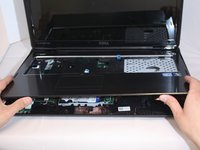
Use a plastic opening tool to pry up the edges of the palmrest cover.
-
Pull off the palmrest cover. You will hear some popping sounds.
If the keyboard shroud does not pry up from the right side you need to remove the disk drive by sliding it to the right. Once you remove the drive turn the laptop over and you will see two M2x2.5 screws, remove them and you will be able to lift the keyboard shroud up.
My palmrest cover did not disengage on the right side at this step. I used a paperclip to manually eject the optical drive tray, and then used a plastic pry tool to disconnect the plastic optical drive bezel. Once this was done, I closed the optical drive tray and was able to access the two M2x2.5 screws holding it in place.
Following the instructions the palm rest would not easily come off. Turns out there are two screws underneath in the battery compartment the hold the palm rest in under the screen. Flip the laptop before prying the edge clips out. Also, once you have created a gap along the edge its easier to slip a credit card in and just push along the edge all around the palm rest. All the “hooks” will release easily.
-
-
-
Optical drive MUST be removed beforehand: remove the screw on bottom of laptop on the small panels that has the service tag number. Then use a paperclip to eject the drive and pull it out. This reveals the two small silver screws that attach the top cover. Remove those screws prior to prying off the cover.
-
-
-
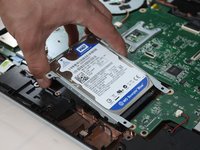
Use a Phillips #0 screwdriver to unscrew the two 5mm screws holding the hard drive.
-
Slowly lift up on the left side of the hard drive and pull to the left.
-


To reassemble your device, follow these instructions in reverse order.
To reassemble your device, follow these instructions in reverse order.
crwdns2935221:0crwdne2935221:0
crwdns2935229:017crwdne2935229:0
crwdns2915084:0crwdne2915084:0

Eastern Washington University, Team S1-G4, Carnegie Spring 2018 crwdns2935289:0Eastern Washington University, Team S1-G4, Carnegie Spring 2018crwdne2935289:0
EWU-CARNEGIE-S18S1G4
crwdns2931471:04crwdne2931471:0
crwdns2935297:07crwdne2935297:0
crwdns2947412:05crwdne2947412:0
Good guide, but missing a step. In the one I disassembled, the optical drive needed to be removed (it just slides out), and two screws that were holding in the keyboard needed to be removed before the keyboard would come out.
Yes that step is ESSENTIAL. Had I known that, I’d have saved 15 minutes as I tried to remove the top cover without destroying my client’s laptop. Really unfortunate to not have that step included NOW, it really can’t be isolated in the comments.
frank -
Agree with iGuys, need to remove optical drive and two screws, they are smaller than others.
Same for my laptop. Two silver screws need to be removed after removing the optical drive. Great instructions otherwise.
Where do you all get your drives? And what's the highest it can go?